Unity SDK Quick Start Guide
Learn about the Unity SDK Quick Start Guide – Quickly integrate and set up the Unity SDK in your project.
Overview
This section demonstrates how to install the CleverTap SDK, track your first user event, and check this information within the CleverTap dashboard in less than ten minutes. CleverTap provides a Unity SDK that enables app developers to track, segment, and engage users.
Install
You can now install the CleverTap Unity SDK using the .unitypackage Unity package or as a local package through Unity Package Manager (UPM).
This installation involves the following major steps:
- Import the CleverTap Unity Package
Select one of the following options based on your preferred installation method:- Import the CleverTap Unity Package This method includes the full SDK structure and supports most Unity LTS versions.
- Import the CleverTap Unity Package as a Local Dependency
- Set Up the Unity SDK to initialize CleverTap in your Unity project and configure mandatory project settings.
- Configure Platform-Specific Settings.
Complete the required platform integrations: - Learn how to implement Unity callbacks to handle key events such as push notifications and profile updates.
- Verify Your Integration
Ensure the setup is complete by tracking:
Import the CleverTap Unity Package
- Download the latest version of the CleverTap Unity SDK from the CleverTap Unity GitHub repository.
- Import the
.unitypackageinto your Unity project. In the Unity Editor, Go to Assets > Import Package > Custom Package.
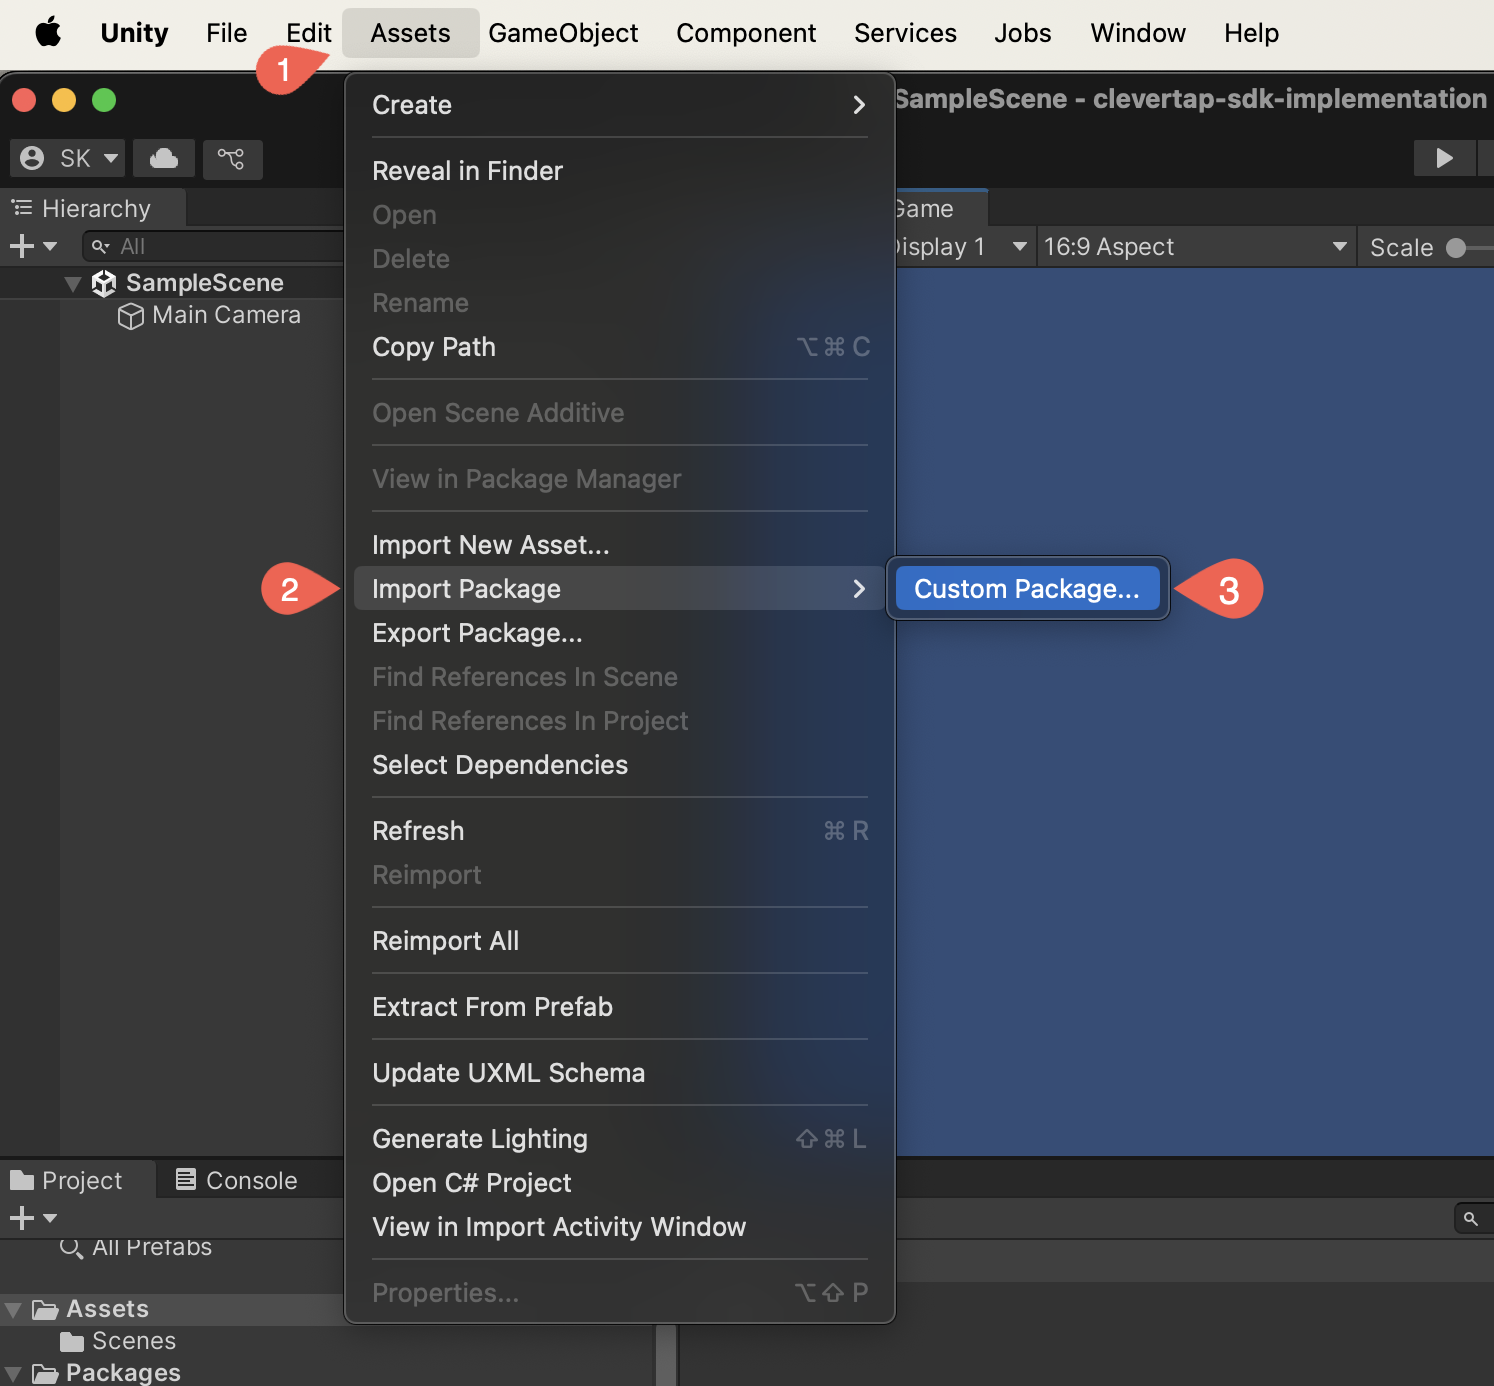
Import Unity Package
- Add the PlayServiceResolver and the ExternalDependencyManager folders. These folders will install the EDM4U plugin, which automatically adds all the Android and iOS dependencies when building your project.
- Ensure that the scripts inside the
Editorfolder are added. TheAndroidPostImportscript sets upclevertap-android-wrapperlibrary for Android.IOSPostBuildProcessorandAndroidProjectPostProcessorscripts help iOS and Android setup.
Import the CleverTap Unity Package as a Local Dependency
Clone the latest release version of CleverTap Unity SDK. The SDK can be imported as a local package through the Unity Package Manager.
Set Up the Unity SDK
CleverTap API can be accessed anywhere in your project by simply calling the static CleverTap class. No need to create GameObject with the CleverTapUnity name or attach any script. The new architecture handles the following:
You can access the CleverTap API anywhere in your project using the static CleverTap class. No need to manually create a GameObject named CleverTapUnity or attach any scripts. The updated SDK architecture automatically handles the following:
- Instantiation of platform-specific binding (iOS, Android, Native)
- Creating the required
GameObject - Script attachment.
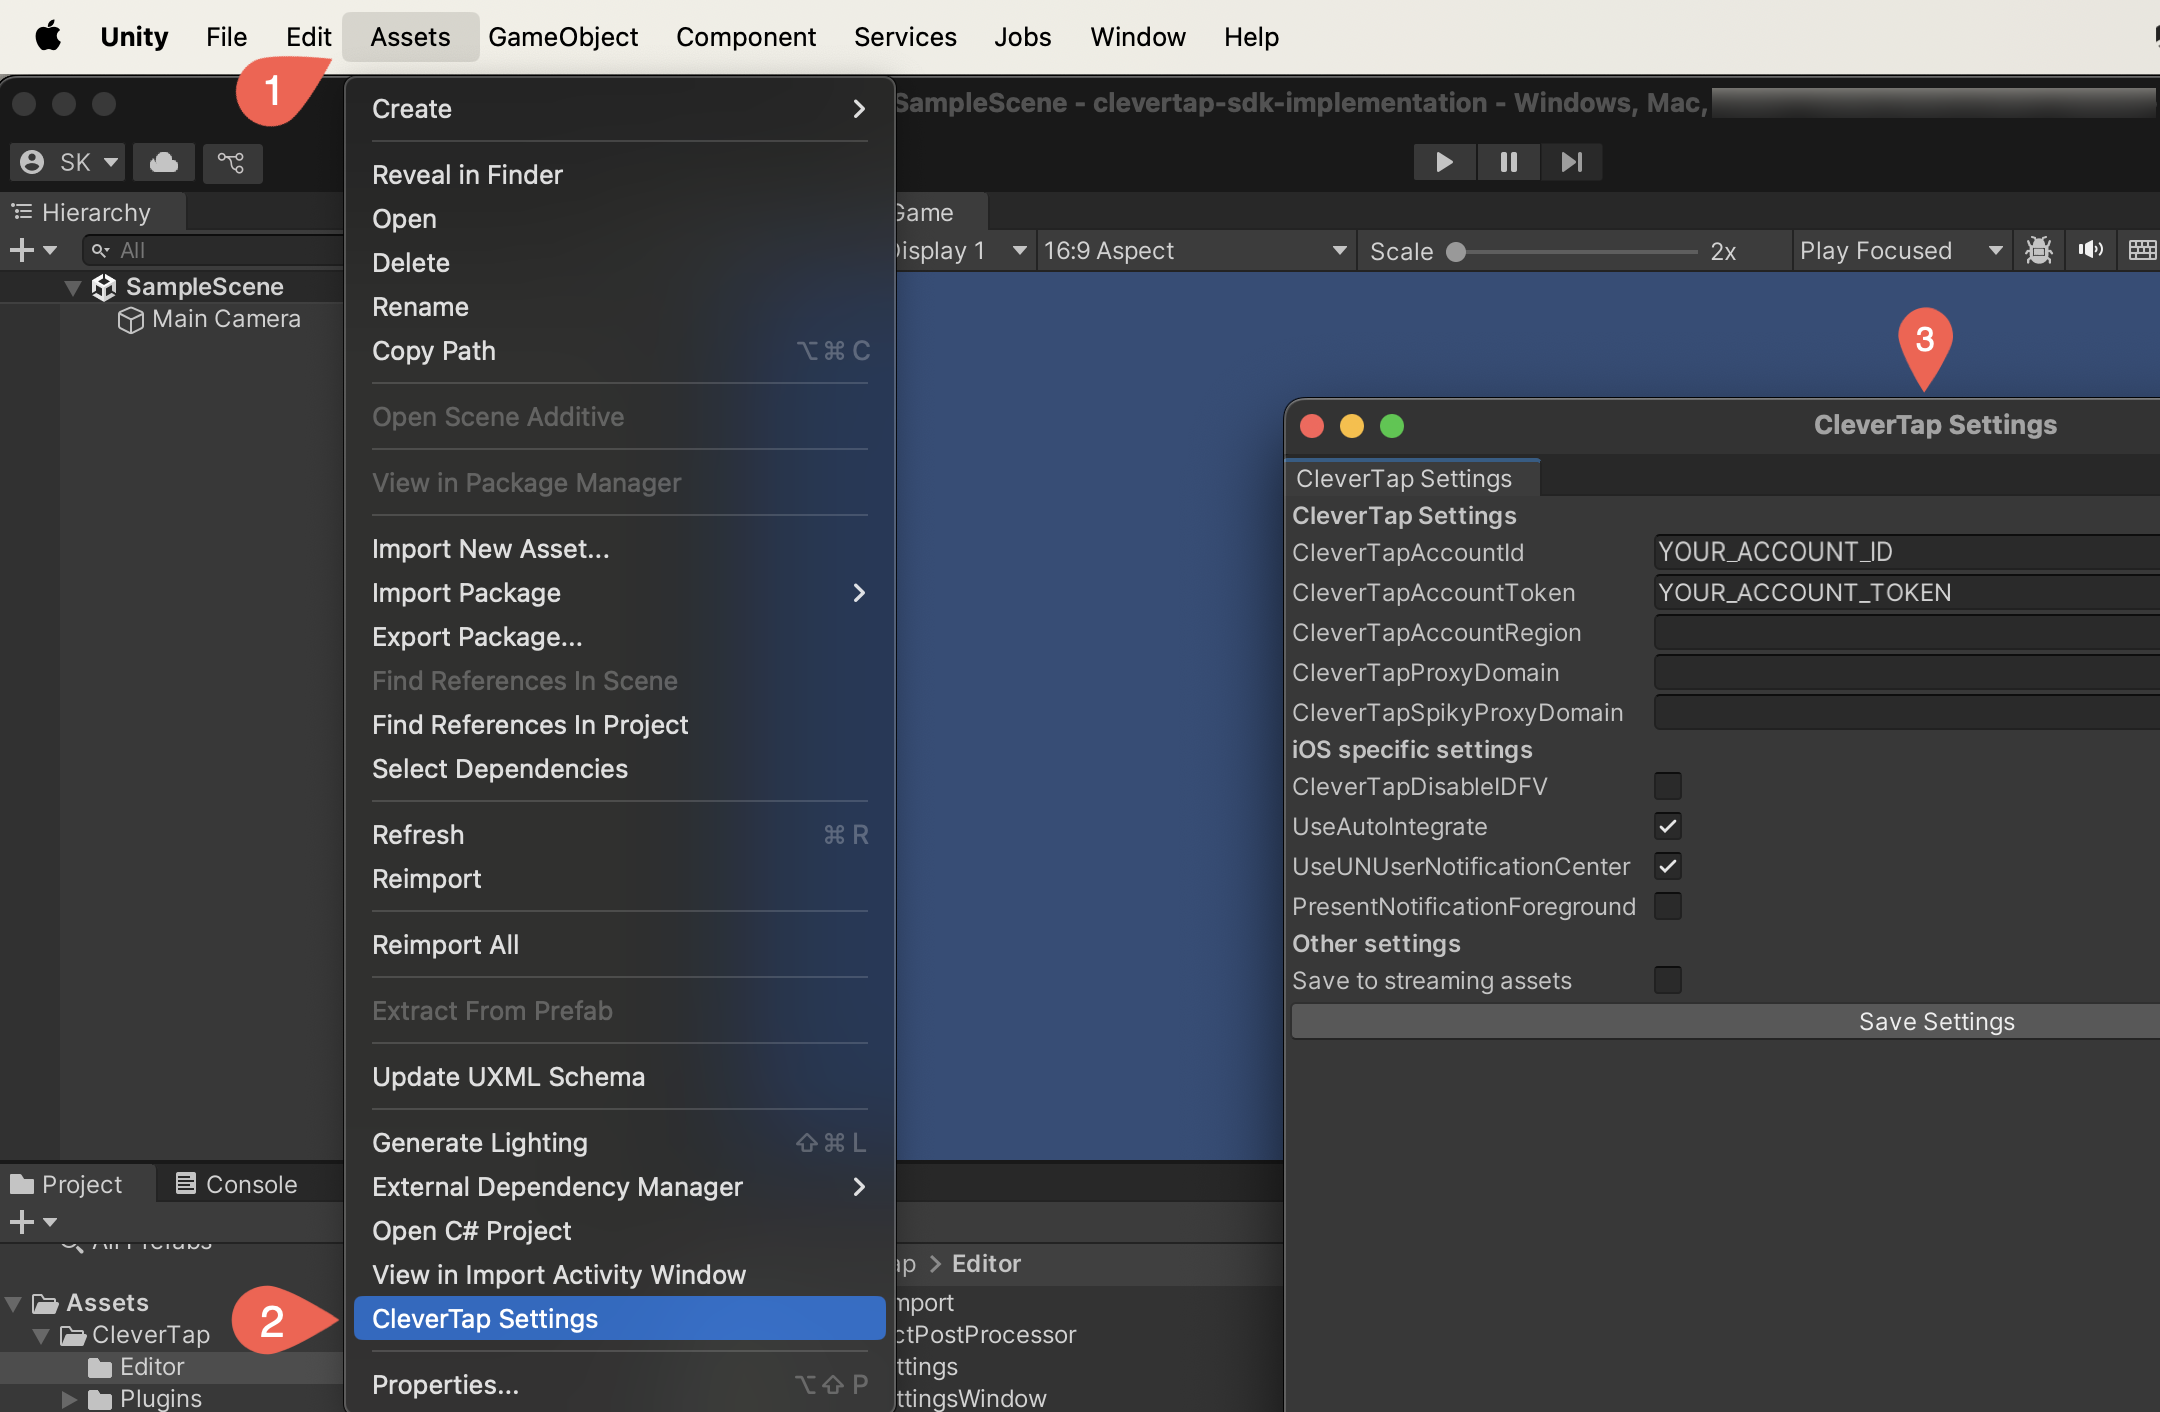
Use the Unity Editor CleverTap Settings dialog (Assets > CleverTap Settings) to configure your account for iOS and Android builds automatically.
Enter your CleverTap Account ID, CleverTap Account token, Region, and personalization settings in the CleverTap Settings Assets > CleverTap Settings.
Set Up the Unity SDK
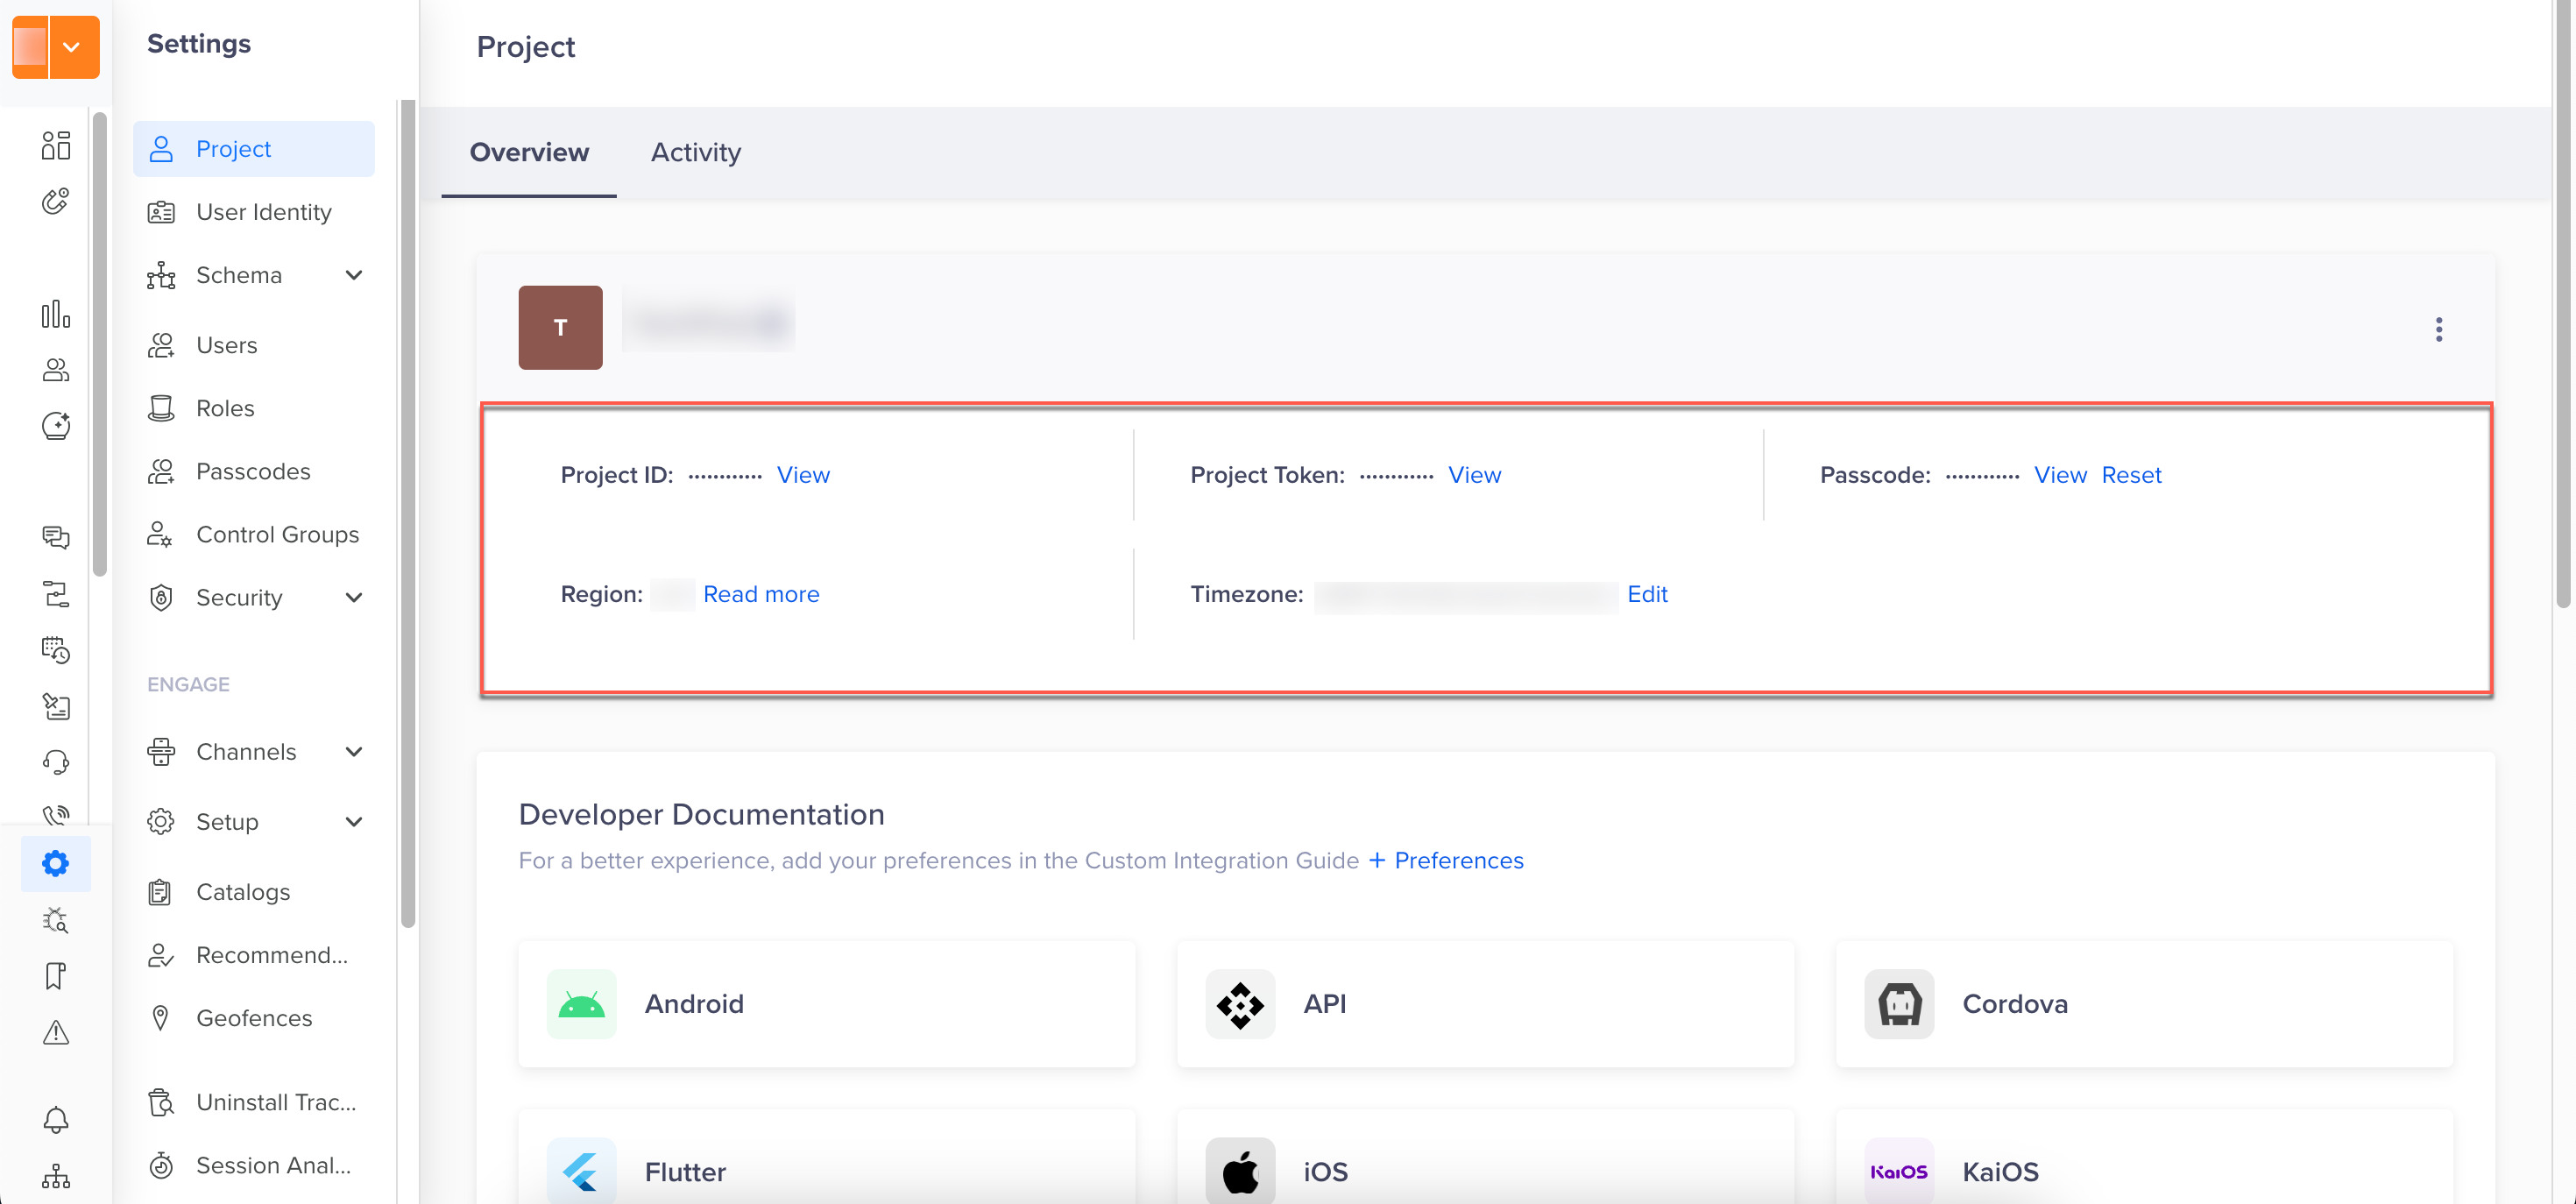
You can find the CleverTap Account ID, CleverTap Account token, and CleverTap Region on the Settings page of the CleverTap dashboard.
Credentials and AccessThe CleverTap Account ID and CleverTap Token are available as Project ID and Project Token respectively on the CleverTap dashboard. Member and Creator roles in the project do not have access to view the Passcode and Project Token of the account on the dashboard.
CleverTap Account Details
This ensures that the CleverTap Post Processor scripts automatically add these settings to the Info.plist and AndroidManifest.xml files.
Multi-Environment Credential Support
From CleverTap Unity SDK 5.5.0 and above, you can manage multiple environments such as TEST, DEV, STAGE, PROD, and custom environments within a single Unity project.
For setup steps, runtime switching, and migration details, refer to CleverTap Unity SDK – Multi-Environment Credential Support.
iOS Specific Instructions
To integrate the required dependencies and configurations for your iOS project. Use a CocoaPods Podfile to manage iOS dependencies. After exporting the project to XCode, run pod install to install them. The EDM4U plugin can automate this process for each export. Alternatively, manually install pods by running pod install in the exported XCode project. Ensure to start .xcworkspace to build the game with dependencies.
SDK Initialization
On iOS, the SDK initialization is done using [CleverTap autoIntegrate] in the application:didFinishLaunchingWithOptions: method, with CleverTapUnityAppController overriding the default UnityAppController.
If you override UnityAppController, inherit from CleverTapUnityAppController or call the required CleverTap methods.
Follow these steps in Unity Editor:
- Set your Account ID (Project ID), Account token (Project Token), and iOS Specific settings in the CleverTap Settings Assets > CleverTap Settings.
Configure the CleverTap Unity SDK with the required iOS settings:iOS Specific Settings
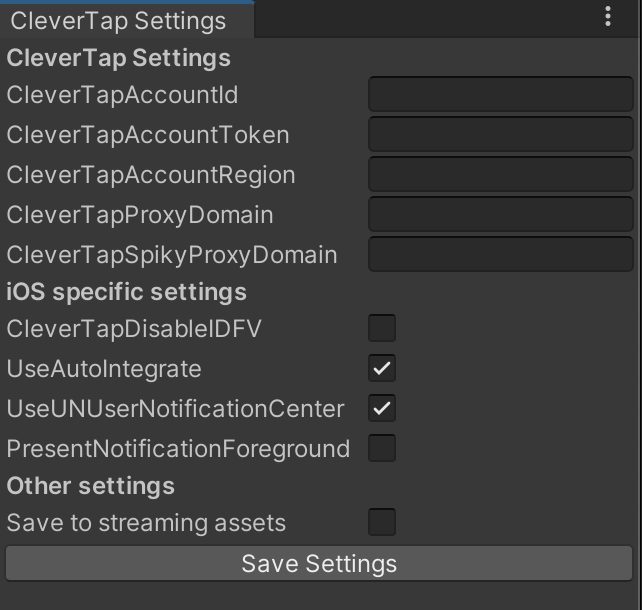
iOS Specific Settings
- Disable IDFV – Set
CleverTapDisableIDFVtotrueto disable IDFV (Identifier for Vendor) usage for CleverTap ID.
IDFV Usage for CleverTap IDStarting from CleverTap Unity SDK 2.1.2, you can optionally disable the usage of IDFV for CleverTap ID by selecting CLEVERTAP_DISABLE_IDFV. We recommend this for apps that send data from different iOS apps to a common CleverTap account. By default, the CLEVERTAP_DISABLE_IDFV checkbox is not selected.
- Use AutoIntegrate – Initializes the iOS SDK with
[CleverTap autoIntegrate], automatically swizzling the application and push notification methods. To disable swizzling, setCleverTapIOSUseAutoIntegratetofalse. - Use UNUserNotificationCenter – Ensures that notifications are handled correctly, and it is required whether you use autoIntegrate or not. If you implement the delegate in your own class, disable the
UNUserNotificationCenterDelegatefrom being set toCleverTapUnityAppControllerby unchecking theCleverTapIOSUseUNUserNotificationCentersetting. In this case, you must implement theUNUserNotificationCenterDelegatemethods yourself and call the CleverTap methods. - Present Notifications Foreground – Set this option to
trueto display remote notifications even when the app is in the foreground. By default, it is set tofalse, andUNNotificationPresentationOptionNoneis used, meaning the notification is received silently. However, if the notification contains a deep link, the app will still open it in the background.
When set totrue, the notification is displayed using one or more of the following iOS presentation options:UNNotificationPresentationOptionBannerorUNNotificationPresentationOptionAlert(for visual display)UNNotificationPresentationOptionBadge(to update the app icon badge)UNNotificationPresentationOptionSound(to play a notification sound)
- Set up EDM4U plugin to install CocoaPods automatically. Go to Assets > External Dependency Manager > iOS Resolver > Settings. You can also install CocoaPods manually using
pod install.
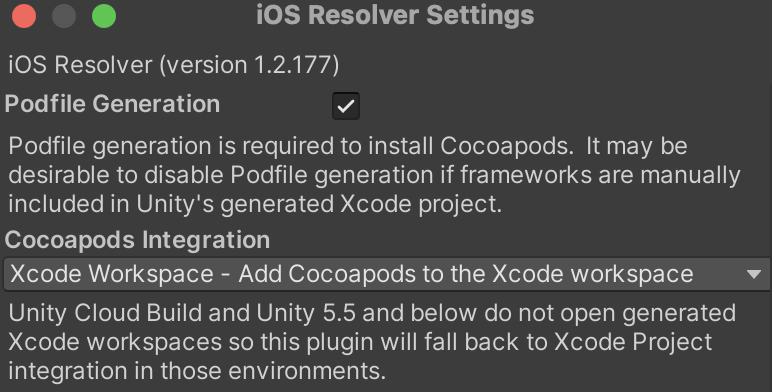
Set up EDM4U plugin
- Open the
.xcworkspaceproject. - Add the Push Notifications capability to your Xcode project to enable Push Notifications.
- Build and run your iOS project.
Add Region Code
To know how to add a region code for iOS in Unity SDK, refer to Region Codes.
Android Specific Instructions
To integrate the required dependencies and configurations for your Android project, follow these steps in Unity Editor:
- Go to File > Build Settings > Android > Player Settings > Publishing Settings > Build.
- Enable .gradle templates and custom AndroidManifest.
- EDM4U populates the Custom Main Gradle Template and Gradle Properties Template with the required Android dependencies.
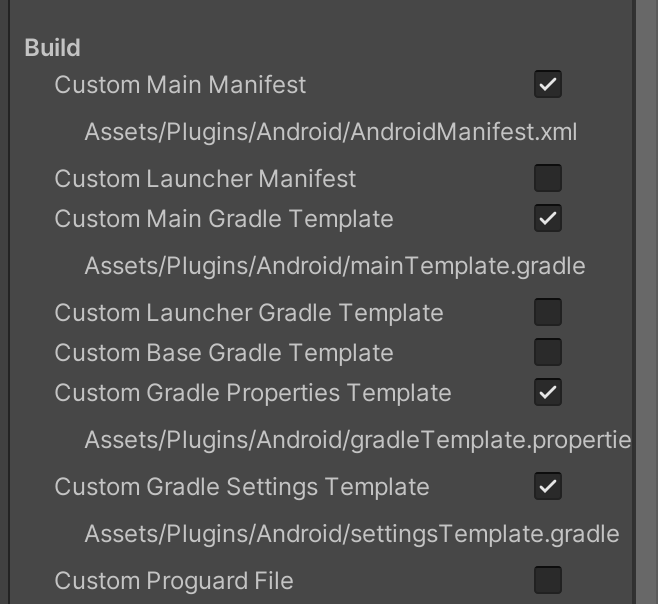
Build Settings
Unity 6 UsersIf you are using Unity 6, you must configure the Android Application Entry Point to ensure CleverTap initializes correctly.
See Unity 6 Android Application Entry Point Configuration before continuing with the Android setup.
-
Make the following changes to your Android application project, if applicable:
-
If you have implemented a custom
android.app.Applicationclass, add the following code:@Override public void onCreate() { ActivityLifecycleCallback.register(this); super.onCreate(); CleverTapUnityAPI.initialize(this); }class MyApp : Application() { override fun onCreate() { super.onCreate() ActivityLifecycleCallback.register(this) CleverTapUnityAPI.initialize(this) } }Otherwise, use
com.clevertap.unity.CleverTapUnityApplicationas the application class in yourAndroidManifest.xmlshown in the Sample Manifest below. -
If you have implemented a custom Launcher Activity, add the following code:
@Override
protected void onCreate(Bundle savedInstanceState) {
    super.onCreate(savedInstanceState);
    CleverTapUnityAPI.onLauncherActivityCreate(this);
}

@Override
public void onNewIntent(Intent intent) {
    super.onNewIntent(intent);
    CleverTapUnityAPI.onLauncherActivityNewIntent(this, intent);
}
class MainActivity : Activity() { override fun onCreate(savedInstanceState: Bundle?) { super.onCreate(savedInstanceState) CleverTapUnityAPI.onLauncherActivityCreate(this) } override fun onNewIntent(intent: Intent?) { super.onNewIntent(intent) CleverTapUnityAPI.onLauncherActivityNewIntent(this, intent) } }Otherwise, use
com.clevertap.unity.CleverTapOverrideActivityas shown in the Sample Manifest below.
-
-
To enable Push Notifications, add the Firebase Unity SDK to your app. For more information, refer to Firebase Unity Setup Docs.
- Download and import the
FirebaseMessaging.unitypackageinto your Unity project. Refer to Firebase Unity SDK repository.
- Download and import the
NoteThe Firebase Unity SDK auto-generates required entries in
AndroidManifest.xmlusing yourgoogle-services.json.
If you override this file, merge your custom configuration instead of reverting changes.
This ensures CleverTap and Firebase settings coexist correctly.
-
Edit the
AndroidManifest.xmlinAssets/Plugins/Androidto add the following configurations:- Your app’s Bundle Identifier
- FCM Sender ID
- Deep Link URL Scheme (if applicable)
- CleverTap Credentials (if not added via the CleverTap Settings dialog)
Sample Manifest structure:<?xml version="1.0" encoding="utf-8"?> <manifest package="YOUR_BUNDLE_IDENTIFIER" xmlns:android="http://schemas.android.com/apk/res/android" android:installLocation="preferExternal" android:versionCode="1" android:versionName="1.0"> <supports-screens android:anyDensity="true" android:largeScreens="true" android:normalScreens="true" android:smallScreens="true" android:xlargeScreens="true" /> <uses-permission android:name="android.permission.INTERNET" /> <uses-permission android:name="android.permission.ACCESS_NETWORK_STATE" /> <uses-permission android:name="com.google.android.c2dm.permission.RECEIVE" /> <uses-permission android:name="android.permission.WAKE_LOCK" /> <uses-feature android:glEsVersion="0x00020000" /> <uses-feature android:name="android.hardware.touchscreen" android:required="false" /> <uses-feature android:name="android.hardware.touchscreen.multitouch" android:required="false" /> <uses-feature android:name="android.hardware.touchscreen.multitouch.distinct" android:required="false" /> <application android:debuggable="true" android:icon="@drawable/app_icon" android:isGame="true" android:name="com.clevertap.unity.CleverTapUnityApplication" android:label="@string/app_name" android:theme="@style/UnityThemeSelector"> <activity android:name="com.clevertap.unity.CleverTapOverrideActivity" android:configChanges="mcc|mnc|locale|touchscreen|keyboard|keyboardHidden|navigation|orientation|screenLayout|uiMode|screenSize|smallestScreenSize|fontScale" android:label="@string/app_name" android:launchMode="singleTask" android:screenOrientation="fullSensor"> <intent-filter> <action android:name="android.intent.action.MAIN" /> <category android:name="android.intent.category.LAUNCHER" /> <category android:name="android.intent.category.LEANBACK_LAUNCHER" /> </intent-filter> <!-- Deep Links uncomment and replace YOUR_URL_SCHEME, if applicable, or remove if not supporting deep links--> <!-- <intent-filter android:label="@string/app_name"> <action android:name="android.intent.action.VIEW" /> <category android:name="android.intent.category.DEFAULT" /> <category android:name="android.intent.category.BROWSABLE" /> <data android:scheme="YOUR_URL_SCHEME" /> </intent-filter> --> <meta-data android:name="unityplayer.UnityActivity" android:value="true" /> </activity> <service android:name="com.clevertap.android.sdk.pushnotification.fcm.FcmMessageListenerService" android:exported="true"> <intent-filter> <action android:name="com.google.firebase.MESSAGING_EVENT" /> </intent-filter> </service> <service android:name="com.clevertap.android.sdk.pushnotification.CTNotificationIntentService" android:exported="false"> <intent-filter> <action android:name="com.clevertap.PUSH_EVENT" /> </intent-filter> </service> <!-- Uncomment these lines to manually add your account configuration. <meta-data android:name="CLEVERTAP_ACCOUNT_ID" android:value="Your CleverTap Account ID" /> <meta-data android:name="CLEVERTAP_TOKEN" android:value="Your CleverTap Account Token" /> <meta-data android:name="CLEVERTAP_REGION" android:value="Your CleverTap Account Region" /> <meta-data android:name="CLEVERTAP_PROXY_DOMAIN" android:value="Your CleverTap Account Proxy Domain" /> <meta-data android:name="CLEVERTAP_SPIKY_PROXY_DOMAIN" android:value="Your CleverTap Account Spiky Proxy Domain" /> --> </application> </manifest> -
Add your
google-services.jsonfile to the Assets folder at the root of your Unity project. This file is essential for FCM configuration and must be present during build. -
Build your app or Android project as usual.
Add Region Code
To know how to add region code for Android in Unity SDK, refer to Region Codes.
Unity 6 Android Application Entry Point Configuration
Unity 6 provides two Android application entry point options:
- Activity
- GameActivity
For CleverTap Android integration, you must select Activity.
Configure the entry point
- In the Unity Editor, go to Project Settings > Player > Android > Other Settings
- Set Application Entry Point to Activity.
NoteCleverTap depends on standard Android
ApplicationandActivitylifecycle callbacks.
Using GameActivity can prevent CleverTap from initializing correctly.
After completing this step, continue with the Android setup in this guide. For required Android components, refer to Sample Manifest structure.
Callbacks
A new mechanism to handle callbacks is introduced. You can now add an event listener for a callback directly through the CleverTap static events. No need to set all callbacks in the CleverTapUnity.cs anymore.
CleverTap.OnCleverTapDeepLinkCallback += YOUR_CALLBACK_METHOD;
CleverTap.OnCleverTapProfileInitializedCallback += YOUR_CALLBACK_METHOD;
CleverTap.OnCleverTapProfileUpdatesCallback += YOUR_CALLBACK_METHOD;
This introduces breaking changes in the CleverTapUnity.cs, rendering all existing callback methods obsolete, and these methods will not be called anymore. If you still want to use the callbacks through the CleverTapUnity.cs methods, each method must subscribe to a new event listener found at CleverTap.On{CleveTapUnity_Callback_MethodName}.
The following is a sample code on how to subscribe to new event listeners with existing methods in CleverTapUnity.cs:
CleverTap.OnCleverTapDeepLinkCallback += CleverTapDeepLinkCallback;
CleverTap.OnCleverTapProfileInitializedCallback += CleverTapProfileInitializedCallback;
CleverTap.OnCleverTapProfileUpdatesCallback += CleverTapProfileUpdatesCallback;
CleverTap.OnCleverTapPushOpenedCallback += CleverTapPushOpenedCallback;
CleverTap.OnCleverTapInitCleverTapIdCallback += CleverTapInitCleverTapIdCallback;
CleverTap.OnCleverTapInAppNotificationDismissedCallback += CleverTapInAppNotificationDismissedCallback;
CleverTap.OnCleverTapInAppNotificationShowCallback += CleverTapInAppNotificationShowCallback;
CleverTap.OnCleverTapOnPushPermissionResponseCallback += CleverTapOnPushPermissionResponseCallback;
CleverTap.OnCleverTapInAppNotificationButtonTapped += CleverTapInAppNotificationButtonTapped;
CleverTap.OnCleverTapInboxDidInitializeCallback += CleverTapInboxDidInitializeCallback;
CleverTap.OnCleverTapInboxMessagesDidUpdateCallback += CleverTapInboxMessagesDidUpdateCallback;
CleverTap.OnCleverTapInboxCustomExtrasButtonSelect += CleverTapInboxCustomExtrasButtonSelect;
CleverTap.OnCleverTapInboxItemClicked += CleverTapInboxItemClicked;
CleverTap.OnCleverTapNativeDisplayUnitsUpdated += CleverTapNativeDisplayUnitsUpdated;
CleverTap.OnCleverTapProductConfigFetched += CleverTapProductConfigFetched;
CleverTap.OnCleverTapProductConfigActivated += CleverTapProductConfigActivated;
CleverTap.OnCleverTapProductConfigInitialized += CleverTapProductConfigInitialized;
CleverTap.OnCleverTapFeatureFlagsUpdated += CleverTapFeatureFlagsUpdated;
Track User Profiles
Create a User profile when the user logs in (On User Login):
Dictionary<string, string> newProps = new Dictionary<string, string>();

newProps.Add("Name", "Jack Montana");      // Name as a String
newProps.Add("Identity", "61026032");       // Unique Identity String
newProps.Add("Email", "[email protected]");    // Email address of the user
newProps.Add("Phone", "+14155551234");      // Phone number with country code (+)
newProps.Add("Gender", "M");                // Gender: "M" or "F"

CleverTap.OnUserLogin(newProps);
Navigate to the CleverTap Dashboard and check if the events and user profiles update as expected.
CleverTap Dashboard
Track User Events
Record an event without event data:
// record basic event with no properties
CleverTap.RecordEvent("testEvent");
Record an event with event data:
// record event with properties
Dictionary<string, object> Props = new Dictionary<string, object>();
Props.Add("testKey", "testValue");
CleverTap.RecordEvent("testEventWithProps", Props);
Error Handling and Troubleshooting
If you encounter issues during integration, such as missing callbacks, user data not syncing, or build errors, refer to the following:
-
Unity Troubleshooting and FAQs
Covers common issues, platform-specific caveats, and debugging tips. -
Check that all required steps are completed correctly for both Android and iOS platforms.
If you still face issues, contact the CleverTap Support team via the Support tab in your CleverTap dashboard.
Updated 5 months ago