CleverTap Baidu Push Integration
Learn how to integrate and send push notifications from Baidu.
Overview
China has the world’s largest number of smartphone users. However, Android users in China can only receive push notifications powered by Baidu Cloud Push. Baidu has an Android app marketplace with over 195M daily users and is the largest source of app downloads for Android in China. In the rest of the world, Google’s Firebase Cloud Messaging (FCM) is used to send push notifications to Android smartphones. For global businesses with apps that want to target users in China, it is critical for them to enable the Baidu push.
Follow to steps to enable push notifications for Baidu:
Register as a Baidu Developer
The first step to accessing the Baidu cloud push is to register as a developer.
Enter console and create an application
Log in to the Baidu account that has been registered as a developer on the homepage, and then click Get Started or My Console in the upper right corner to enter the push console.
Entering the push console will open the application list page. The application list page shows all the applications that you have created in the Baidu Developer Center. If you have configured applications in the old management console, the new management console can be used directly. For newly created or never-configured applications, you must perform an application configuration before you can send messages and other operations.
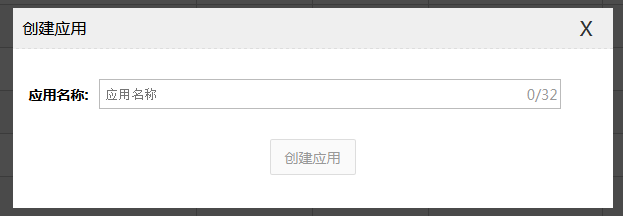
To create a new application, click the Create Application button on the application list page and then name your app.

Create Application Button
The application name can be a combination of Chinese, numbers, or English letters, with a maximum of 32 characters. Check that the application name complies with the relevant laws and regulations and complies with the cloud push developer service agreement.
After successful creation, you can configure the application immediately, or you can enter it later through the link in the application list.

Configure the Application
Application configuration - Android
If you are configuring an application for the first time, select the application platform (Android).
Application PlatformThe application platform cannot be changed after saving the configuration. Proceed with caution.
Android applications require the package name of the application. The package name requirements are as follows
- Can only contain uppercase letters (A to Z), lowercase letters (a to z), numbers and underscores, Chinese, and can be separated by periods.
- Each logo must start with a letter, underscore, or Chinese.
- Contains at least two identifiers or at least one period.
- Cannot contain Java reserved words.
- There can be only one period between two identifiers.
Get the app's ApiKey / SecretKey
ApiKey is the application identifier. During the SDK invocation process, an application is uniquely identified. SecretKey is the Token when calling the API. It is used to verify the validity of the request. Always keep it confidential. ApiKey / SecretKey can be found on the application details page after the application is created.
Integrate Baidu Push SDK
Download the latest Android SDK archive and unpack, increase Baidu cloud push functionality in an existing or new project.
Import cloud push jar package and .SO file
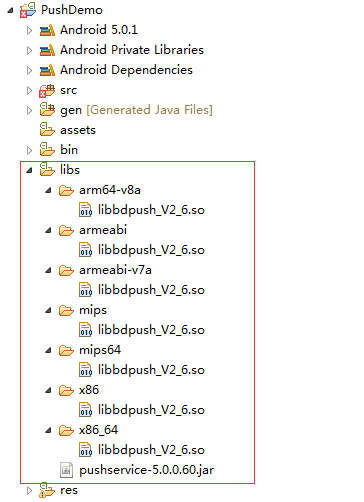
Copy all files in the unzipped libs folder to the libs folder of your project. If there are no other .so files in your project, it is recommended to copy only the armeabi folder. If other .so files are used in your project, only copy the .so files in the corresponding directory. If your Android development environment is Android Studio, create a new directory named jniLibs in the src / main_directory of the project, and copy the files in the libs folder to the _jniLibs directory. As shown in the following image:

Import Push Jar Package
Configure the AndroidManifest file
Add permissions and declaration information in the AndroidManifest.xml file of the current project.
<!-- Push service 运行需要的权限 -->
<uses-permission android:name="android.permission.INTERNET" />
<uses-permission android:name="android.permission.ACCESS_NETWORK_STATE" />
<uses-permission android:name="android.permission.RECEIVE_BOOT_COMPLETED" />
<uses-permission android:name="android.permission.VIBRATE" />
<uses-permission android:name="android.permission.ACCESS_WIFI_STATE" />
<uses-permission android:name="android.permission.WAKE_LOCK" />
<uses-permission android:name="android.permission.FOREGROUND_SERVICE" />

<!-- 适配Android N系统必需的ContentProvider写权限声明 -->
<uses-permission android:name="baidu.push.permission.WRITE_PUSHINFOPROVIDER.YourPackageName" />

<permission
    android:name="baidu.push.permission.WRITE_PUSHINFOPROVIDER.YourPackageName"
    android:protectionLevel="signature" />

<!-- push service start -->
<!-- 用于接收系统消息以保证PushService正常运行 -->
<receiver android:name="com.baidu.android.pushservice.PushServiceReceiver"
    android:exported="false"
    android:process=":bdservice_v1" >
    <intent-filter>
        <action android:name="android.intent.action.BOOT_COMPLETED" />
        <action android:name="android.net.conn.CONNECTIVITY_CHANGE" />
        <action android:name="com.baidu.android.pushservice.action.notification.SHOW" />
        <action android:name="android.intent.action.USER_PRESENT" />
        <action android:name="android.intent.action.ACTION_POWER_CONNECTED" />
        <action android:name="android.intent.action.ACTION_POWER_DISCONNECTED" />
    </intent-filter>
</receiver>

<!-- Push服务接收客户端发送的各种请求 -->
<receiver android:name="com.baidu.android.pushservice.RegistrationReceiver"
    android:exported="false"
    android:process=":bdservice_v1" >
    <intent-filter>
        <action android:name="com.baidu.android.pushservice.action.METHOD" />
        <action android:name="com.baidu.android.pushservice.action.BIND_SYNC" />
    </intent-filter>
    <intent-filter>
        <action android:name="android.intent.action.PACKAGE_REMOVED" />
        <data android:scheme="package" />
    </intent-filter>
</receiver>

<!-- Baidu Push Service -->
<service android:name="com.baidu.android.pushservice.PushService"
    android:exported="false"
    android:process=":bdservice_v1">
    <intent-filter>
        <action android:name="com.baidu.android.pushservice.action.PUSH_SERVICE" />
    </intent-filter>
</service>

<!-- 提升小米和魅族手机上的推送到达率 -->
<service android:name="com.baidu.android.pushservice.CommandService"
    android:exported="false" />

<!-- 适配Android N系统的ContentProvider -->
<provider
    android:name="com.baidu.android.pushservice.PushInfoProvider"
    android:authorities="YourPackageName.bdpush"
    android:writePermission="baidu.push.permission.WRITE_PUSHINFOPROVIDER.YourPackageName"
    android:protectionLevel="signature"
    android:exported="false" />

<!-- 在百度开发者中心查询应用的API Key -->
<meta-data android:name="api_key" android:value="YOUR_API_KEY" />

<!-- 🔹 CleverTap Push Notification Receiver -->
<receiver
    android:name="com.clevertap.android.sdk.pushnotification.CTPushNotificationReceiver"
    android:exported="false">
    <intent-filter>
        <action android:name="com.clevertap.PUSH_EVENT" />
    </intent-filter>
</receiver>

<!-- 🔹 CleverTap Notification Channel Metadata (Optional) -->
<meta-data
    android:name="com.clevertap.notification_channel"
    android:value="YourChannelId" />

<!-- push结束 -->
After configuring the Manifest file, replace YourPackageName your own package name and YOUR_API_KEY with your API key.
Launch cloud push
In the onCreate function of the main activity of the current project, add the following code:
PushManager.startWork(getApplicationContext(), PushConstants.LOGIN_TYPE_API_KEY,
                Utils.getMetaValue(YourMainActivity.this, "api_key"));
PushManager.startWork(getApplicationContext(), PushConstants.LOGIN_TYPE_API_KEY,
Utils.getMetaValue(this@YourMainActivity, "api_key"))Custom callback class
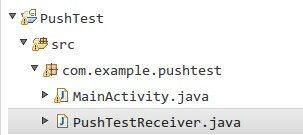
Create a new class in the current project, right-click and select new > Class. Fill in the class name of the class that receives cloud push callback information and push notification arrival information, and click Finish to create the class file (in this example, PushTestReceiver is used).

Custom Call Back Class
Open the newly created class and inherit PushMessageReceiver. The class name becomes red. Move to the class name, click _Add unimplemented _methods, reload all callback functions, and print the corresponding information, as shown in the image:

Inherit PushMessageReceiver Class
In the AndroidManifest.xml file of the current project, add custom receiver information as follows:
<!-- 此处Receiver名字修改为当前包名路径 -->
<receiver android:name="YourPackageName.PushTestReceiver">
    <intent-filter>
        <!-- 接收push消息 -->
        <action android:name="com.baidu.android.pushservice.action.MESSAGE" />
        <!-- 接收bind、setTags等method的返回结果 -->
        <action android:name="com.baidu.android.pushservice.action.RECEIVE" />
        <!-- 接收通知点击事件,和通知自定义内容 -->
        <action android:name="com.baidu.android.pushservice.action.notification.CLICK" />
    </intent-filter>
</receiver>

<!-- Recommended: Add CleverTap's Push Notification Receiver -->
<receiver
    android:name="com.clevertap.android.sdk.pushnotification.CTPushNotificationReceiver"
    android:exported="false">
    <intent-filter>
        <action android:name="com.clevertap.PUSH_EVENT" />
    </intent-filter>
</receiver>
Baidu Setup and send Channel ID to CleverTap
Baidu Push requires an App ID and Secret Key to generate a Channel ID for each device. This unique Channel ID identifier allows CleverTap to send push notifications to Baidu devices.
To ensure successful push delivery, you must:
- Enable Baidu Push Type in AndroidManifest.xml
- Pass the generated Baidu Channel ID to CleverTap using
pushRegistrationToken().
Enable Baidu Push Type in AndroidManifest.xml
Add the following meta-data entry inside the <application> tag:
<meta-data
    android:name="CLEVERTAP_PROVIDER_2"
    android:value="bps,bps_token,com.clevertap.android.bps.BaiduPushProvider,com.baidu.android.pushservice.PushMessageReceiver" />
Pass Token to CleverTap
In the onBind method add the method to pass the token/Channel ID to CleverTap.
public class BaiduPushReceiver extends PushMessageReceiver {

    private static final PushType BAIDU_PUSH_TYPE = new PushType(
        "bps",
        "bps_token",
        "com.clevertap.android.bps.BaiduPushProvider",
        "com.baidu.android.pushservice.PushMessageReceiver"
    );

    /**
     * 调用PushManager.startWork后,sdk将对push
     * server发起绑定请求,这个过程是异步的。绑定请求的结果通过onBind返回。 如果您需要用单播推送,需要把这里获取的channel
     * id和user id上传到应用server中,再调用server接口用channel id和user id给单个手机或者用户推送。
     *
     * @param context   BroadcastReceiver的执行Context
     * @param errorCode 绑定接口返回值,0 - 成功
     * @param appid     应用id。errorCode非0时为null
     * @param userId    应用user id。errorCode非0时为null
     * @param channelId 应用channel id。errorCode非0时为null
     * @param requestId 向服务端发起的请求id。在追查问题时有用;
     * @return none
     */

    @Override
    public void onBind(Context context, int errorCode, String appid,
                       String userId, String channelId, String requestId) {
        CleverTapAPI cleverTapAPI = CleverTapAPI.getDefaultInstance(context);
        if (cleverTapAPI != null && channelId != null) {
            cleverTapAPI.pushRegistrationToken(channelId, BAIDU_PUSH_TYPE, true);
        }
    }
}
class BaiduPushReceiver : PushMessageReceiver() {
companion object {
private val BAIDU_PUSH_TYPE = PushType(
"bps",
"bps_token",
"com.clevertap.android.bps.BaiduPushProvider",
"com.baidu.android.pushservice.PushMessageReceiver"
)
}
/**
* 调用PushManager.startWork后,sdk将对push
* server发起绑定请求,这个过程是异步的。绑定请求的结果通过onBind返回。
* 如果您需要用单播推送,需要把这里获取的channel id和user id上传到应用server中,
* 再调用server接口用channel id和user id给单个手机或者用户推送。
*
* @param context BroadcastReceiver的执行Context
* @param errorCode 绑定接口返回值,0 - 成功
* @param appid 应用id。errorCode非0时为null
* @param userId 应用user id。errorCode非0时为null
* @param channelId 应用channel id。errorCode非0时为null
* @param requestId 向服务端发起的请求id。在追查问题时有用;
*/
override fun onBind(
context: Context,
errorCode: Int,
appid: String,
userId: String,
channelId: String,
requestId: String
) {
val cleverTapAPI = CleverTapAPI.getDefaultInstance(context)
if (cleverTapAPI != null && channelId != null) {
cleverTapAPI.pushRegistrationToken(channelId, BAIDU_PUSH_TYPE, true)
}
}
}Receive Push Notifications from CleverTap
In the onMessageReceived method, write the following code for CleverTap to render Push Notification and raise Notification Viewed event.
/**
 * 接收透传消息的函数。
 *
 * @param context             上下文
 * @param message             推送的消息
 * @param customContentString 自定义内容, 为空或者JSON字符串
 */
@Override
public void onMessage(Context context, String message, String customContentString) {
    if (message == null || message.isEmpty()) {
        return; // 防止空消息崩溃
    }

    try {
        Bundle extras = com.clevertap.android.sdk.Utils.stringToBundle(message);
        if (extras != null) {
            CleverTapAPI cleverTapAPI = CleverTapAPI.getDefaultInstance(context);
            if (cleverTapAPI != null) {
                cleverTapAPI.getPushNotificationHandler().onMessageReceived(context, extras);
            }
        }
    } catch (JSONException e) {
        e.printStackTrace();
    }
}
/**
 * 接收透传消息的函数。
 *
 * @param context 上下文
 * @param message 推送的消息
 * @param customContentString 自定义内容, 为空或者JSON字符串
 */
override fun onMessage(context: Context, message: String?, customContentString: String?) {
    if (message.isNullOrEmpty()) return // 防止空消息崩溃

    try {
        val extras = com.clevertap.android.sdk.Utils.stringToBundle(message)
        extras?.let {
            CleverTapAPI.getDefaultInstance(context)?.pushNotificationHandler?.onMessageReceived(context, it)
        }
    } catch (e: JSONException) {
        e.printStackTrace()
    }
}
Ensure ProGuard Rules for Baidu SDK
If you are using ProGuard, R8, or a similar tool, add these rules to prevent code obfuscation issues:
-dontwarn com.baidu.**
-keep class com.baidu.** { *; }
-keepattributes *Annotation*
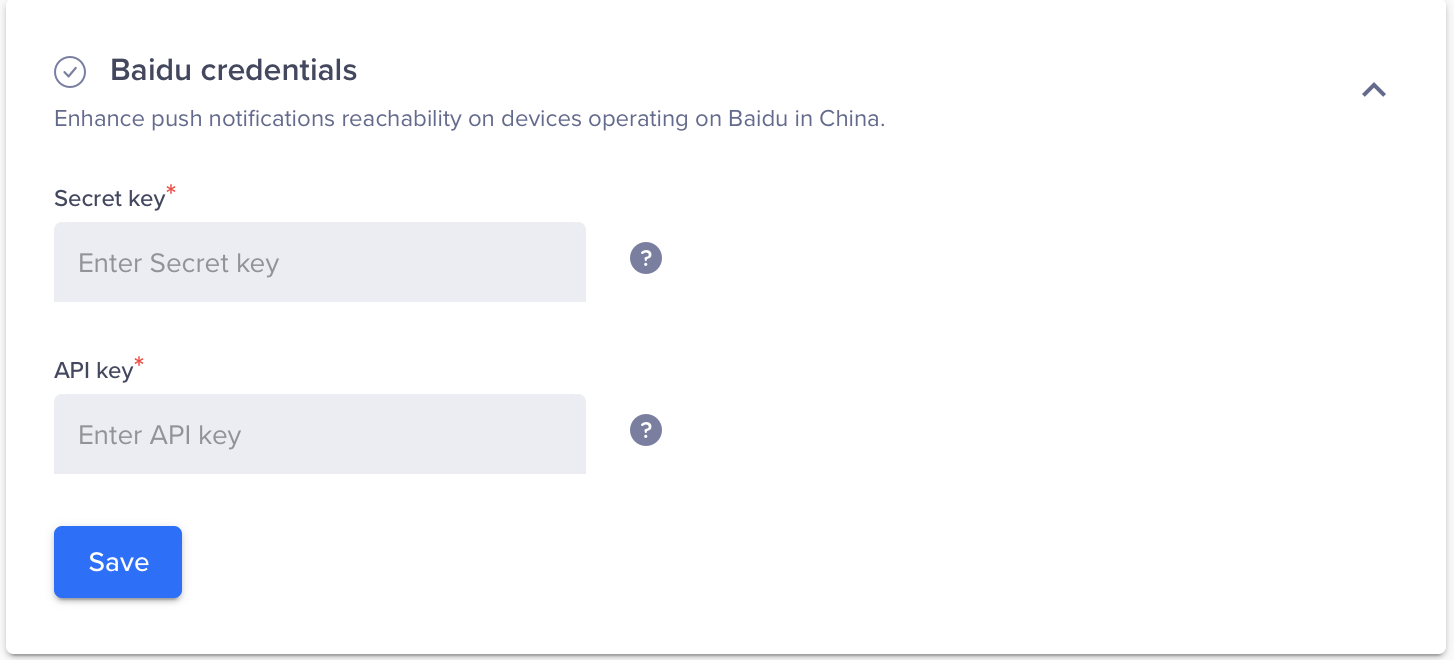
Update API Key / Secret Key in Settings Dashboard

Update API Key / Secret Key in Settings Dashboard
Updated 2 months ago
