Appsflyer
Attribution Platforms
Overview
Appsflyer is a mobile marketing analytics and attribution platform that powers predictable app growth and delivers an exceptional mobile experience. This document provides information about integrating Appsflyer and CleverTap. This integration helps track the following information from Appsflyer:
- Install events: These events can be organic install events and inorganic install events.
- Custom events: These events can include any events (other than install events) that are provided by the attribution partner and tracked in the app. The in-app events are tracked for Appsflyer.
To learn more about these events and their default attribution settings in CleverTap dashboard, refer to Types of Data.
Integrate Appsflyer
To enable Appsflyer integration with the CleverTap dashboard, proceed as follows:
- Add CleverTap Credentials to Appsflyer Dashboard.
- Integrate Appsflyer.
- Setup for Organic Install and Custom Events.
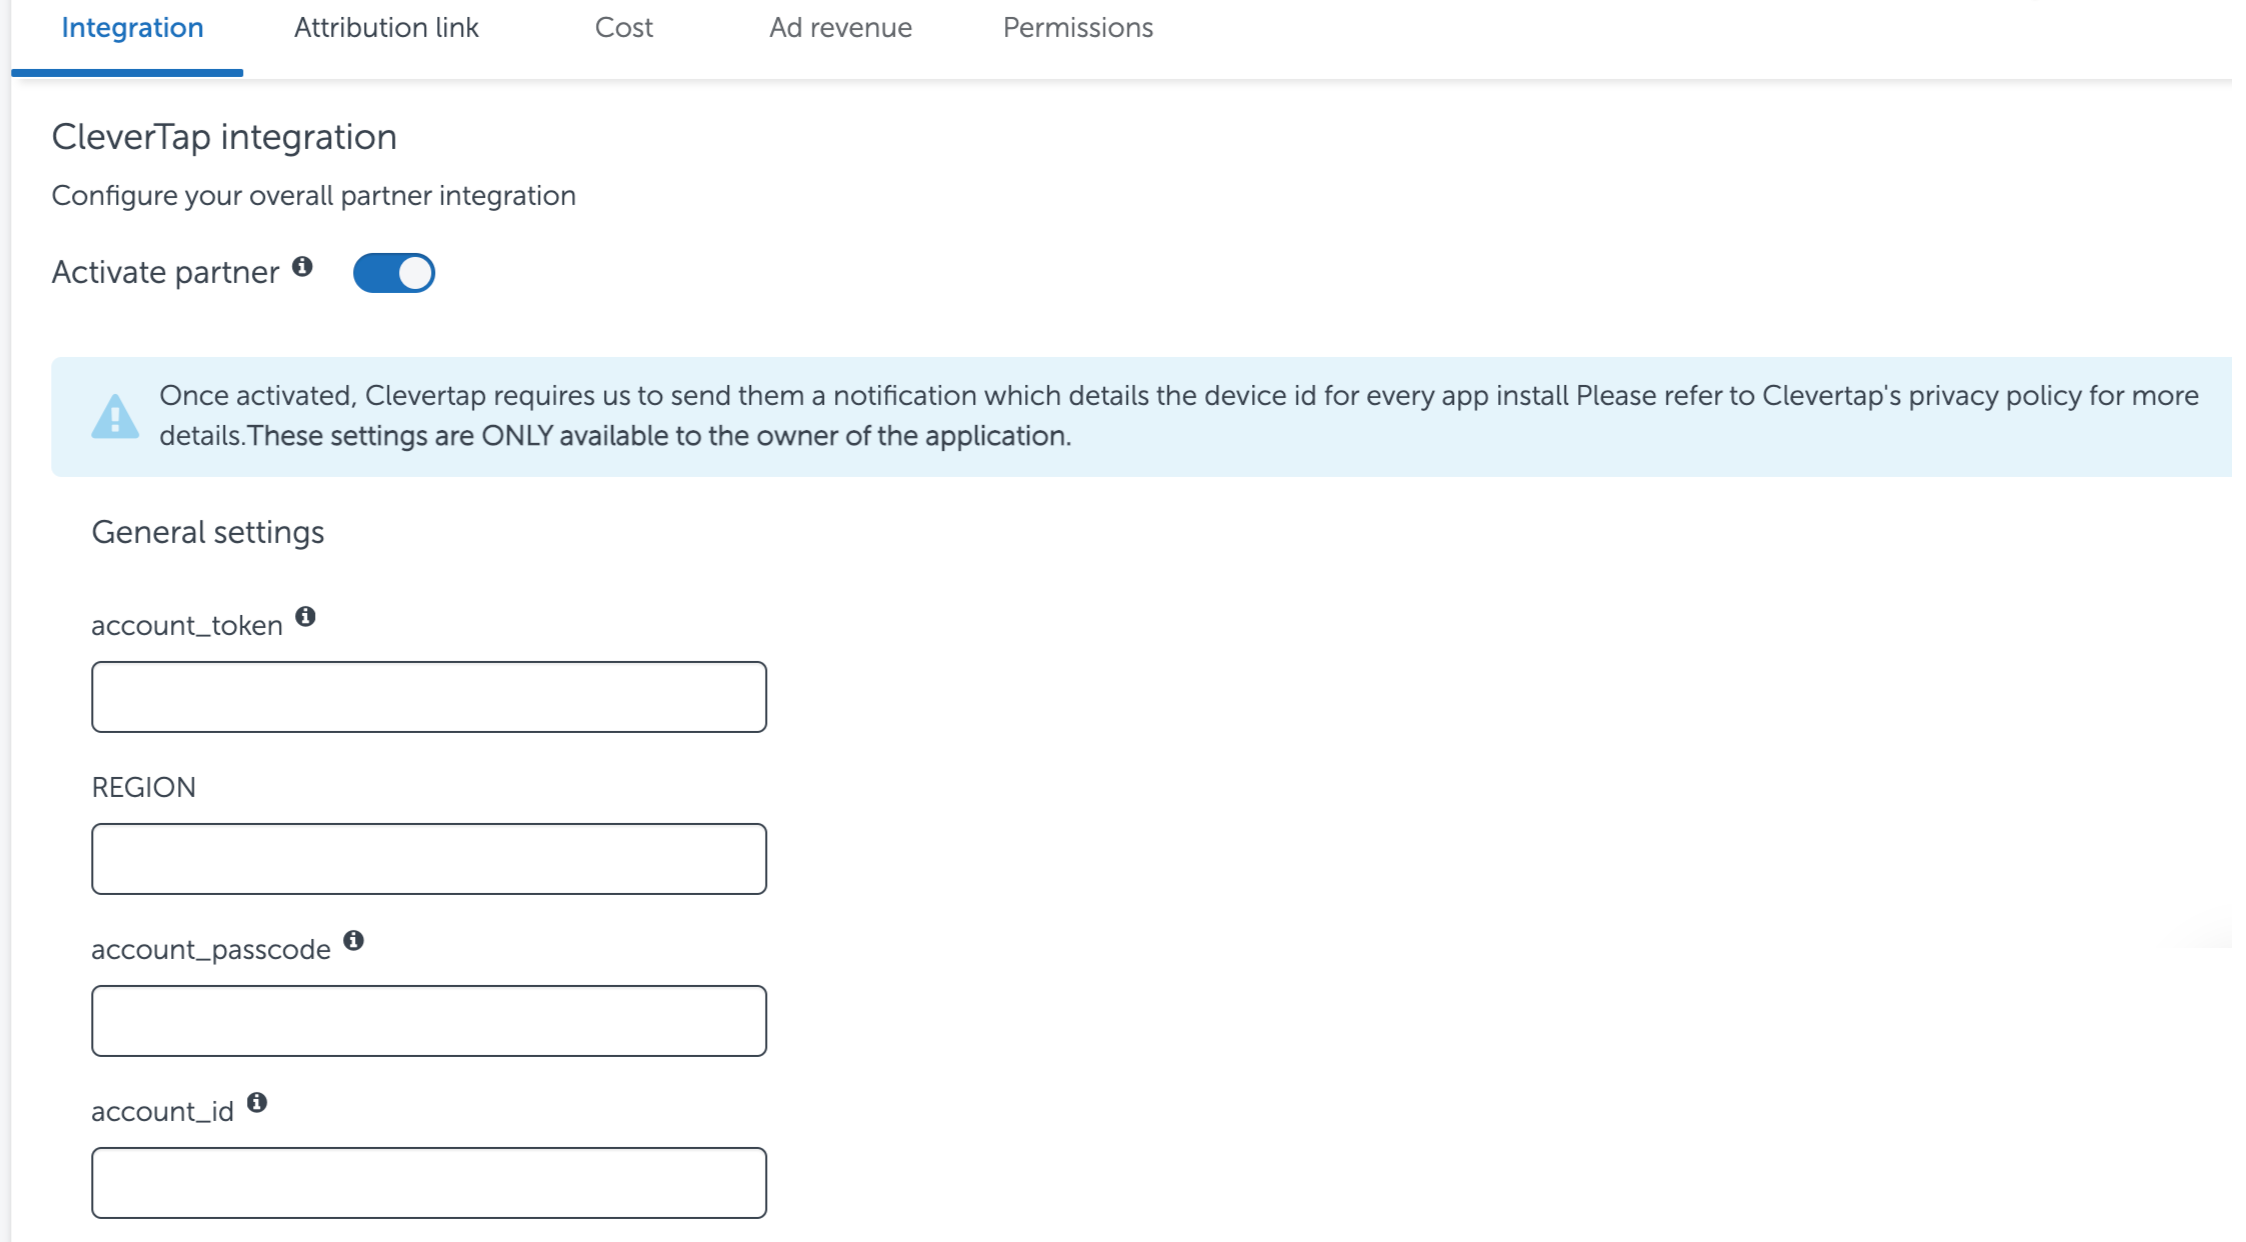
Add CleverTap Credentials to Appsflyer Dashboard
To activate integration with CleverTap from the Appsflyer dashboard, follow the steps listed under CleverTap integration with Appsflyer in Appsflyer documentation.

Add CleverTap Credentials to Appsflyer Dashboard
RegionIn the above figure, enter the region of your CleverTap account. The following table helps identify the region of your account:
Integrate AppsFlyer
The integration steps vary for every app. The steps for every app are listed in the sections to follow:
For Android App
- To track attribution and events data in your Android app, perform the steps listed in Appsflyer Android SDK Integration Guide.
- In your Android app code, add the following code.
For SDK version 4.2.0 and Above
Set the Customer ID
The getCleverTapAttributionIdentifier method is deprecated for CleverTap Android SDKs version 4.2.0 and above. Use the new getCleverTapID method to get the CleverTap ID on the OnInitCleverTapIDListener to set CustomerUserId method of AppsFlyer.
cleverTapInstance.getCleverTapID(new OnInitCleverTapIDListener() {
   @Override
   public void onInitCleverTapID(final String cleverTapID) {
       // Callback on main thread
       appsFlyerLib.setCustomerUserId(cleverTapID);
   }
});
cleverTapInstance?.getCleverTapID {
// Callback on main thread
appsFlyerLib.setCustomerUserId(it)
}Set Additional User Data
Let's say the customer is already using setCustomerUserId to send the identity of the user to AppsFlyer. So now, if you want to send the CleverTap ID, you can use the setAdditionaldata method instead of the setCustomerUserId.
NoteThe
setAdditionaldatamethod always takes priority oversetCustomerUserId.
cleverTapInstance.getCleverTapID(new OnInitCleverTapIDListener() {
   @Override
   public void onInitCleverTapID(final String CTID) {
       // Callback on main thread
       Map<String, Object> customData = new HashMap<>();
       customData.put("CleverTapID", CTID); // Add the CleverTap ID with the key

       AppsFlyerLib.getInstance().setAdditionalData(customData); // Pass the map to AppsFlyer
   }
});
cleverTapInstance.getCleverTapID { CTID ->
// Callback on main thread
val customData = mutableMapOf("CleverTapID" to CTID) // Create the map with the CleverTap ID
AppsFlyerLib.getInstance().setAdditionalData(customData) // Pass the map to AppsFlyer
}For SDK Version 4.1.1 and Below
String attributionID = cleverTapInstance.getCleverTapAttributionIdentifier();
appsFlyerLib.setCustomerUserId(attributionID);appsFlyerLib.setCustomerUserId(cleverTapInstance?.cleverTapAttributionIdentifier)For iOS App
To integrate Appsflyer with CleverTap for an iOS app, add the following code to your iOS app code:
[CleverTap autoIntegrate];
[[AppsFlyerTracker sharedTracker] setCustomerUserID:[[CleverTap sharedInstance] profileGetCleverTapAttributionIdentifier]];
For React-Native
To integrate Appsflyer with CleverTap for the react native app, add the following code to your React-Native app code:
CleverTap.profileGetCleverTapAttributionIdentifier((err, res) => {

const userId = res;

appsFlyer.setCustomerUserId(userId, (response) => {

//.. });

});
For Unity
To integrate Appsflyer with CleverTap for the unity app, add the following code to your Unity app code:
string CleverTapID = CleverTapBinding.ProfileGetCleverTapID();
AppsFlyer.setCustomerUserId(CleverTapID);
For Cordova
Add the following code to your Cordova app code:
CleverTap.getCleverTapID(function(clevertapId) {
    window.plugins.appsFlyer.setAppUserId(clevertapId);
});
For Flutter
To integrate Appsflyer with CleverTap for the Flutter app, add the following code to your Flutter app code:
Set the Customer ID
The getCleverTapAttributionIdentifier method is deprecated for CleverTap Android SDKs version 4.2.0 and above. Use the new getCleverTapID method to get the CleverTap ID on the OnInitCleverTapIDListener to set CustomerUserId method of AppsFlyer.
CleverTapPlugin.getCleverTapID().then((clevertapId) {
  appsFlyerSdk.setCustomerUserId(clevertapId);
});
Set Additional User Data
Let's say the customer is already using setCustomerUserId to send the identity of the user to AppsFlyer. So now, if you want to send the CleverTap ID, you can use the setAdditionaldata method instead of the setCustomerUserId.
NoteThe
setAdditionaldatamethod always takes priority oversetCustomerUserId.
CleverTapPlugin.getCleverTapID().then((clevertapId) {
    final customData = {'CleverTapID': clevertapId}; // Create a map with the CleverTap ID
    appsFlyerSdk.setAdditionalData(customData); // Pass the map to setAdditionalData
});
Delay SDK Initialization for customerUserID
To set up delay SDK initialization for customerUserID in Android and iOS apps, we strongly recommend setting the customer user ID early in the app's flow. For more information about the setup, refer to Delay SDK initialization until CUID is set section.
Setup for Organic Install and Custom Events
After successful integration, Appsflyer starts pushing inorganic install events data to CleverTap. To receive in-app events (custom events) in CleverTap from Appsflyer, proceed as follows:
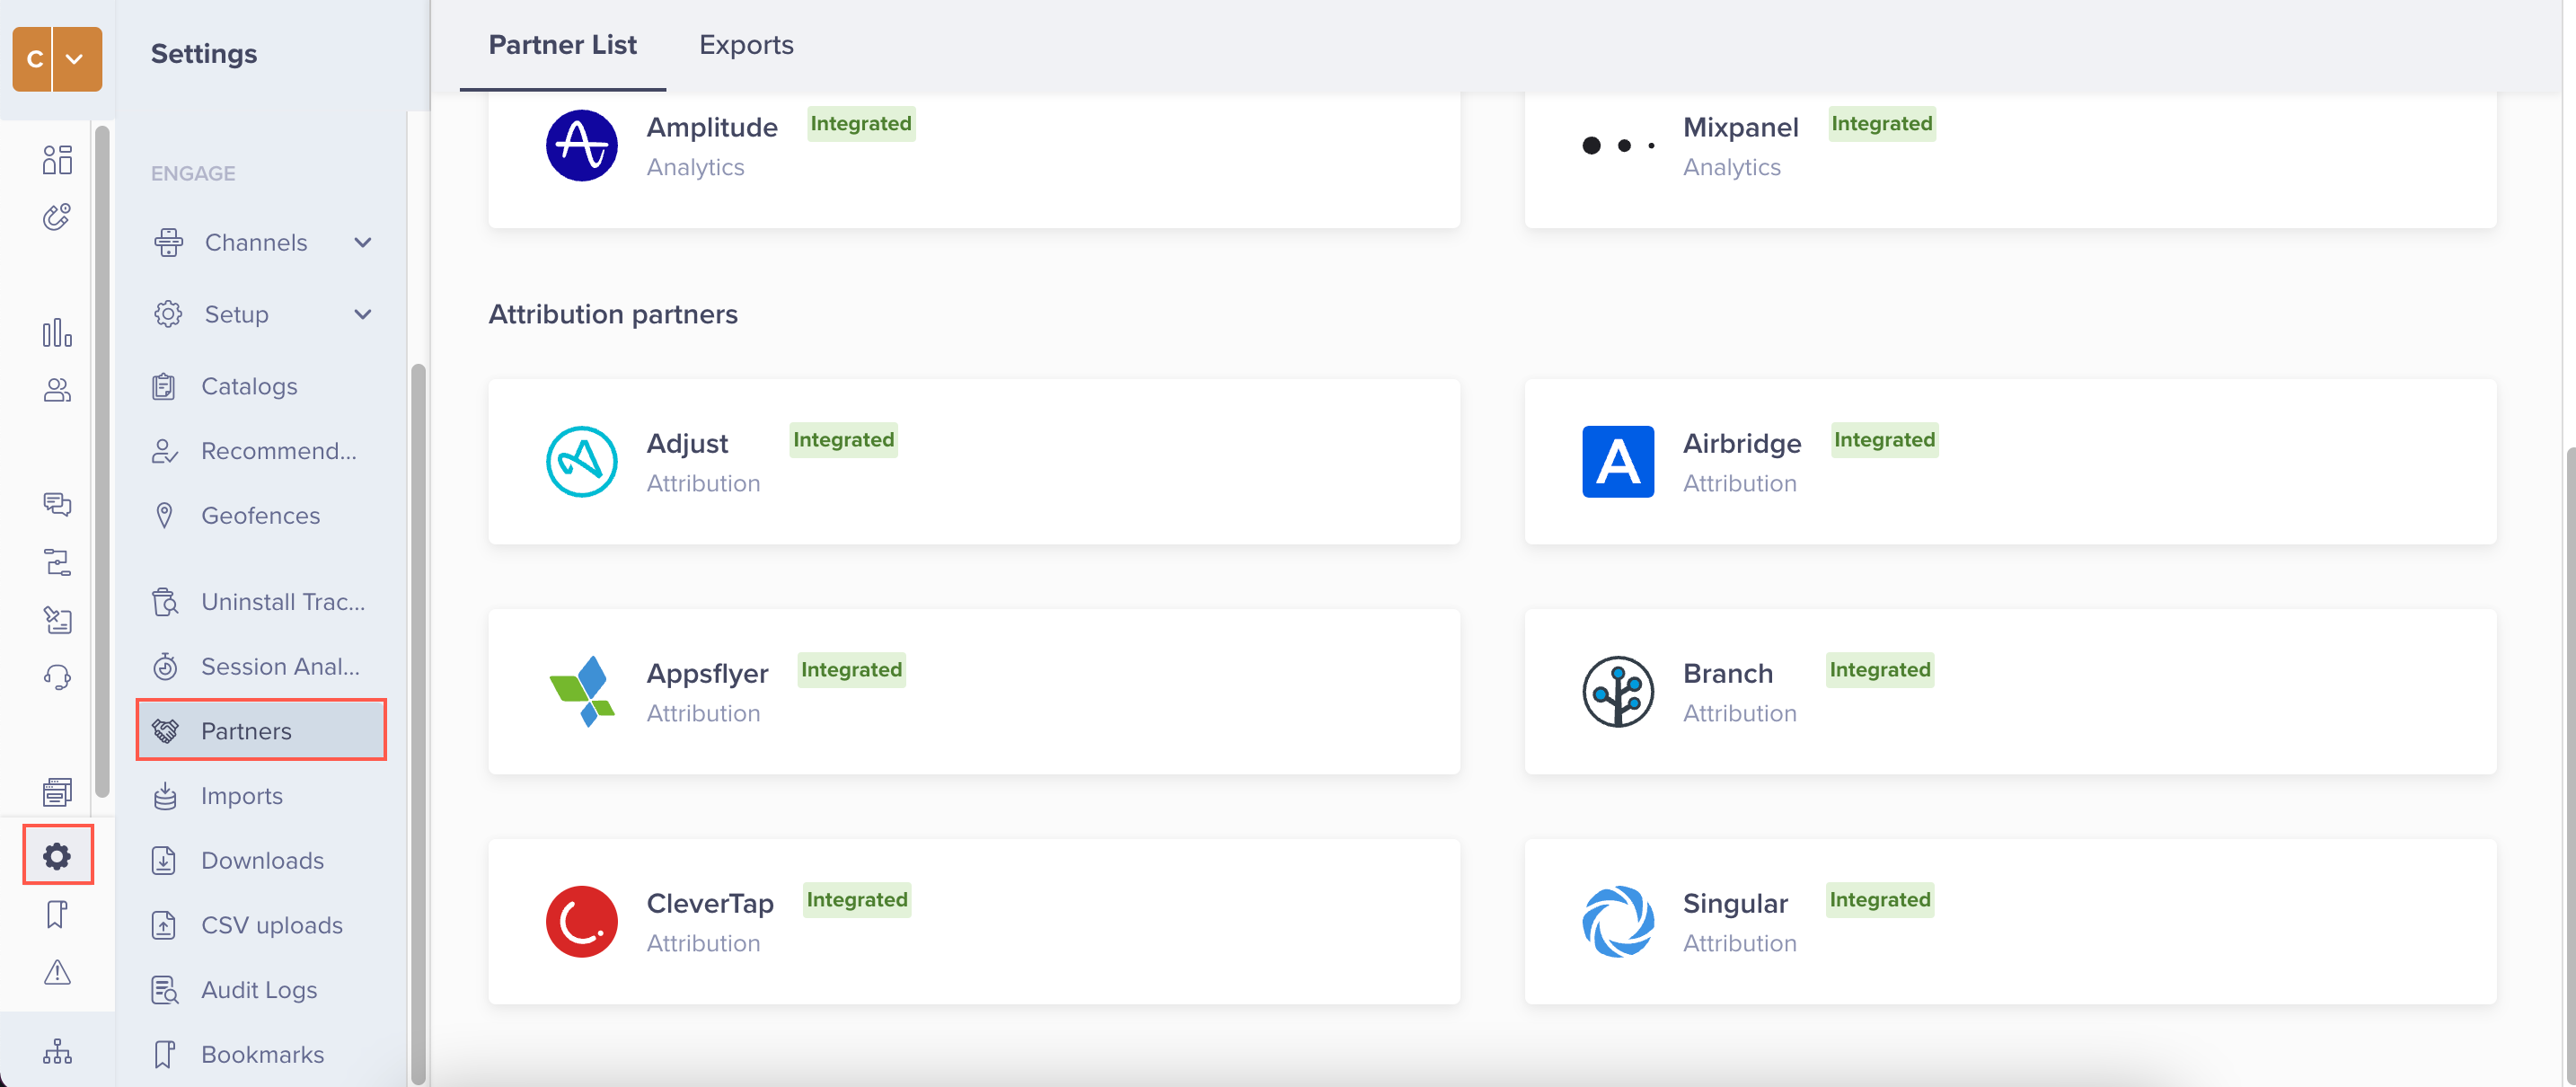
- Navigate to Settings > Partners and scroll down to the Attribution partners section.

CleverTap Attribution Partners
- Click the
 icon against the Appsflyer partner.
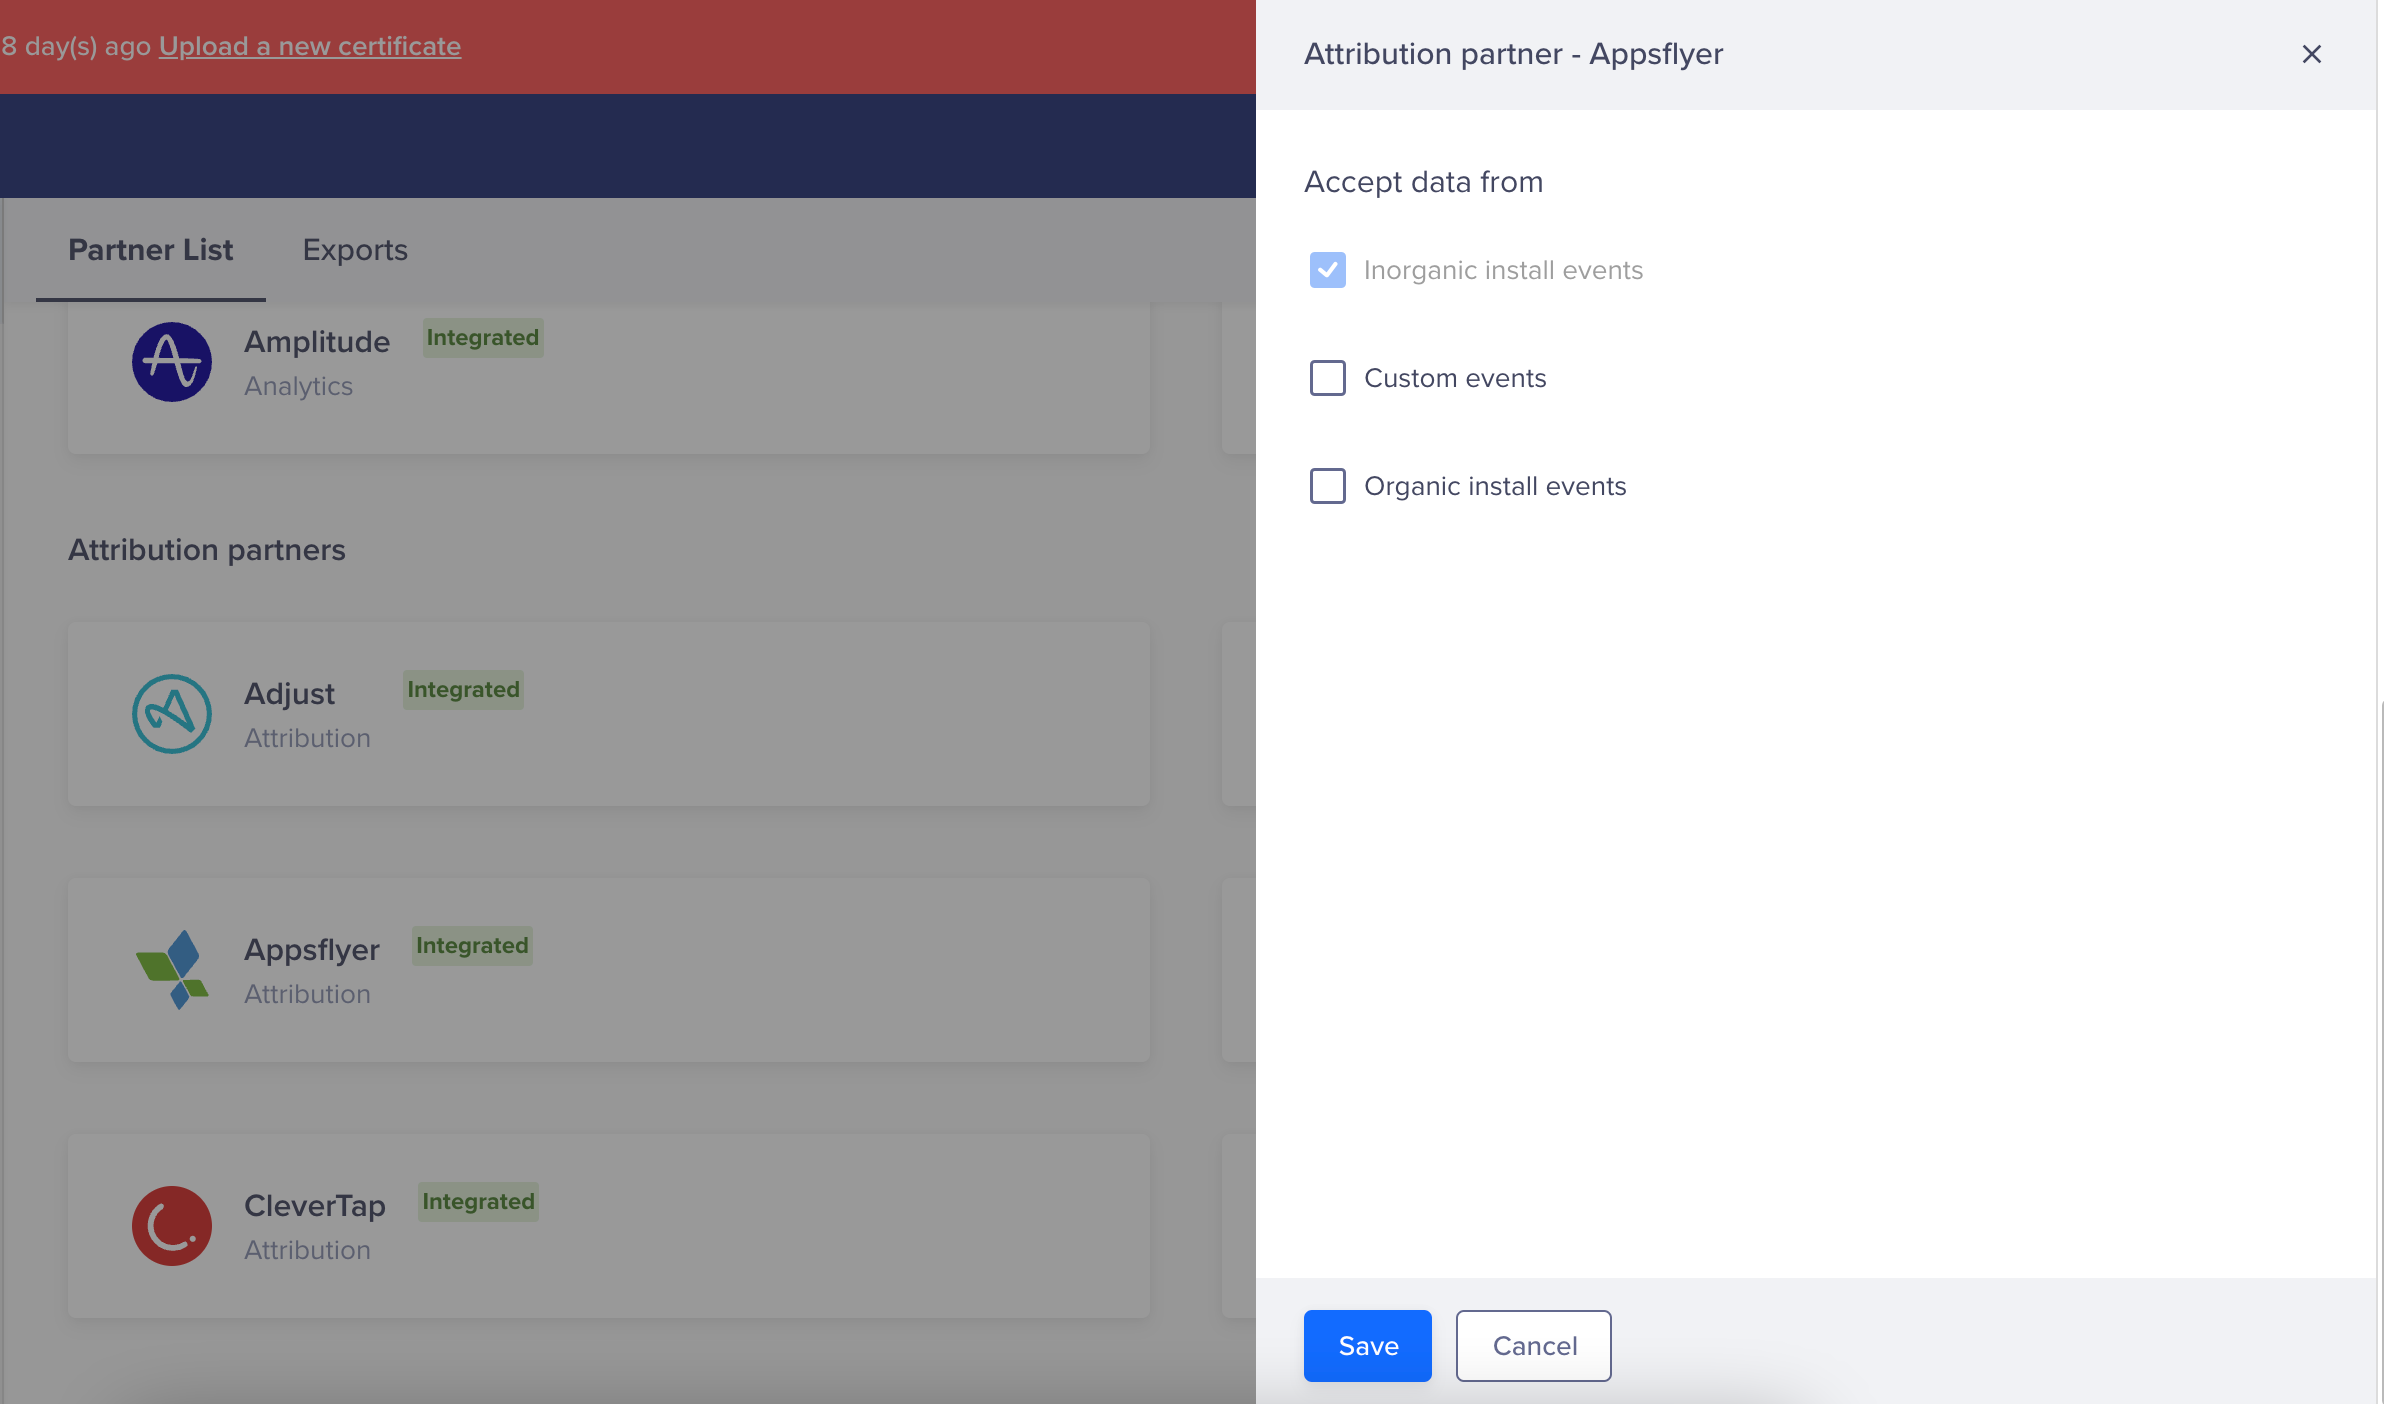
On clicking, Attribution partner - Appsflyer popup appears on the right side of the screen.

Attribution Partner - Appsflyer
- Select the required option from the options below. Selecting any of these options indicates that the CleverTap accepts event data when shared by the partner.
- Custom events
- Organic install events
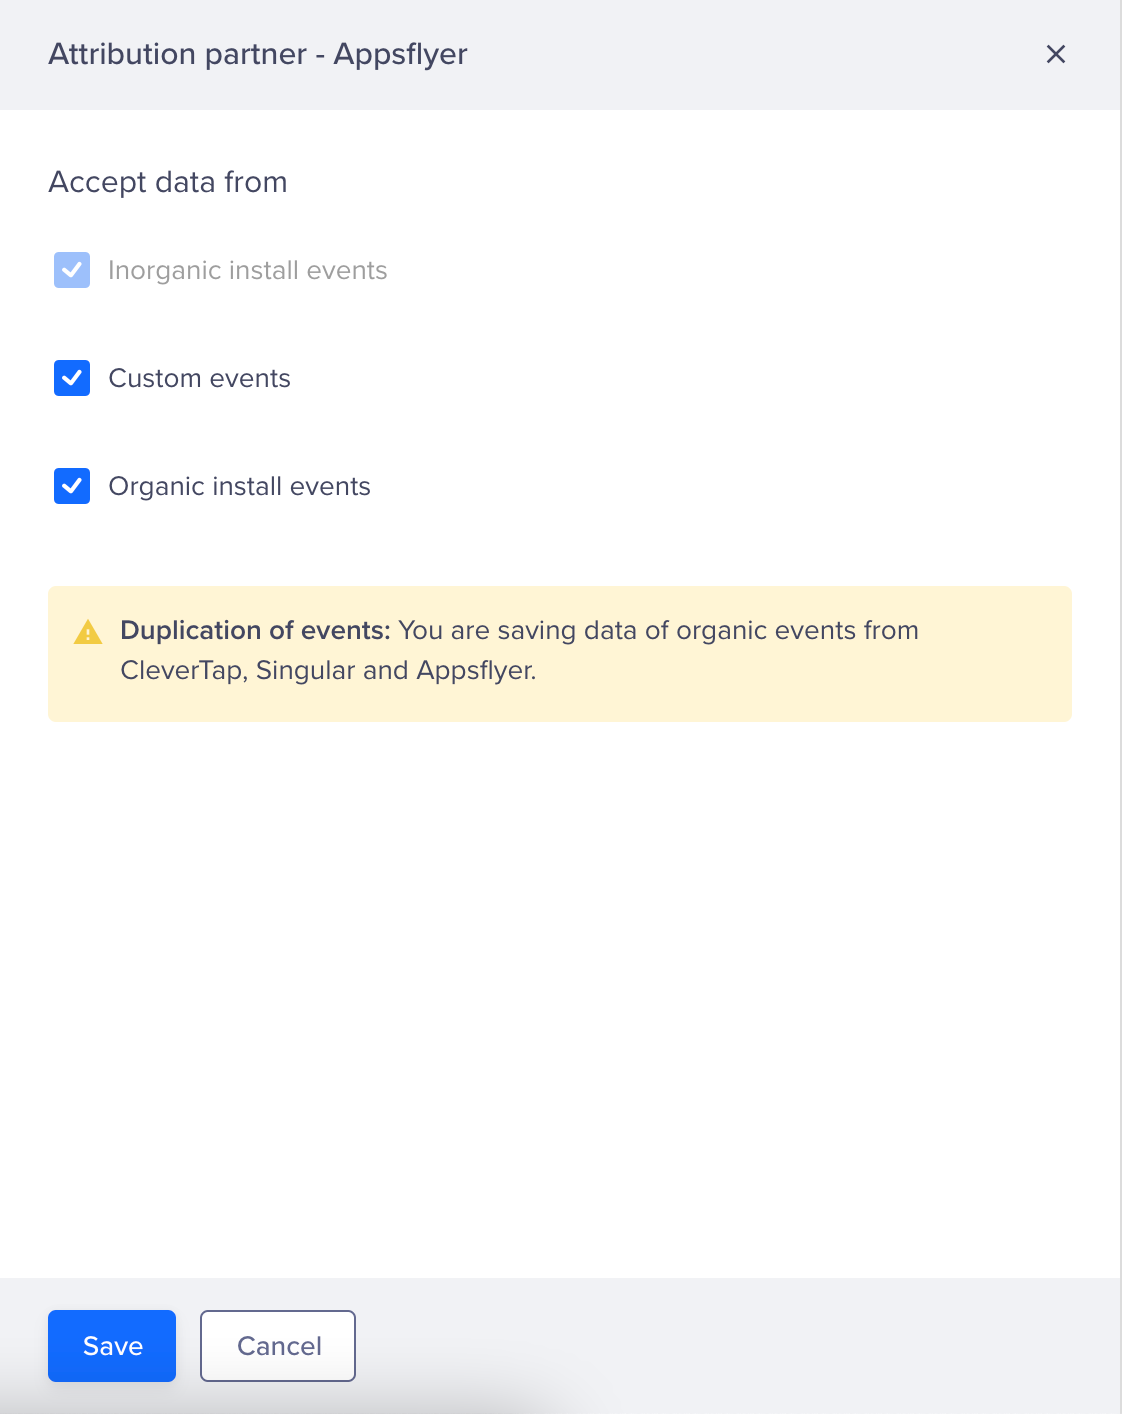
Duplication of EventsIf you select Organic install events for more than one attribution partner, a warning for duplication of events displays, as shown in the following figure. We strongly recommend tracking the organic install events from only one attribution partner.

Duplication of Events
- Click Save. On clicking, the following message displays at the top of the screen: Changes saved. Admins are notified of this via email.
Viewing Data in Dashboard
You can now view the event data on the CleverTap dashboard. To do so, proceed as follows:
- From the CleverTap dashboard, go to Analytics > Events.
- Apply the required filters for the selected event. The filters vary depending on the type of event.
- For Install Events: All the install events are tracked under the UTM Visited event.

Install Events Filter
- For Custom Events: In-app revenue events received from Appsflyer are prefixed with AF in CleverTap.
Updated 2 months ago
