Uninstall Tracking using Firebase
Learn how to set up uninstall tracking using Firebase-based implementation.
Overview
There may be multiple reasons a user might uninstall an application, such as poor user experience, technical issues, or app performance. Tracking app uninstalls can provide powerful insights into user churn and help devise ways to increase retention.
For Projects Using Google Analytics (GA4) or Cloud Functions v2
If your project uses Google Analytics (GA4) Key Events or Cloud Functions v2, this implementation does not apply. Recent updates from Google to Analytics, Events, and Cloud Functions require a revised configuration for real-time uninstall tracking.
For more information about implementation, refer to Uninstall Tracking using Google Analytics(G4) .
For more information about supported regions and versions, refer to Cloud Function Locations.
Track Uninstalls
CleverTap tracks app uninstalls in three ways:
- Silent Push Notification: Detects uninstalls by sending a silent push notification daily. This method is available only for Android devices.
Deprecation of Uninstall Tracking for iOSDue to recent changes to Apple Push Notification service (APNs), uninstall events cannot be reliably identified on iOS devices. As a result, CleverTap no longer tracks iOS uninstalls starting 20th Jan 2026.
This change does not impact push notification delivery or any other CleverTap features.
- Real-time: Detects the uninstall event as soon as a user removes the app. This method is available only for Android devices.
- Push Notification Campaign: Detects uninstalls when a push notification cannot be delivered because the device token is invalid or expired. For more information, refer to Push Campaign.
Temporary Spike in Uninstall Tracking Numbers
CleverTap has upgraded the uninstall tracking system to provide deeper insights into user behavior, now including tracking for unsubscribed devices. Starting February 22, 2024, this enhancement may lead to a temporary spike in uninstall numbers. If you have any queries, contact your Customer Success Manager.
Silent Push Notifications
A silent notification is an effective mechanism to check token validity. CleverTap supports uninstall tracking via silent push notifications for Android applications. CleverTap sends a silent push notification to the device, and an invalid token response may indicate that the app has been uninstalled.
The Uninstall board helps you monitor your app uninstalls for Android and take timely action.
Starting May 15, 2024, FCM is implementing changes regarding stale tokens for devices not connected to FCM for over 270 days. Such tokens are considered expired and invalid. Consequently, any push notification request sent to stale tokens will fail and return a 404 error (Unregistered).
Whom does this change impact?
The change solely affects customers who rely on the Silent Push Notification method for uninstall tracking.
Impact of this implementation
With this change, FCM will return a 404 (Unregistered) error for inactive apps after 270 days. Thus, CleverTap will stop marking such devices as uninstalled because this may incorrectly identify inactive users as churned, thereby inflating uninstall numbers.
To address this, CleverTap strongly recommends implementing CleverTap's Real-Time Uninstall Tracking capability, which leverages Firebase Analytics. If you fail to implement Real-Time Uninstall Tracking by May 15, 2024, Uninstall Tracking through Silent Push Notifications will be discontinued. However, the Push Unregistered event will be raised whenever a silent push notification is sent. You can view the Push Unregistered event count from the CleverTap dashboard by applying a filter where source = CT_Push.
If you have already implemented Real-Time Uninstall Tracking, this change will not affect you. For any queries or further assistance, raise a support ticket from the CleverTap Dashboard or contact your Customer Success Manager.
Enable Silent Push Notifications
Enable Silent Push notifications in CleverTap by performing the following steps:
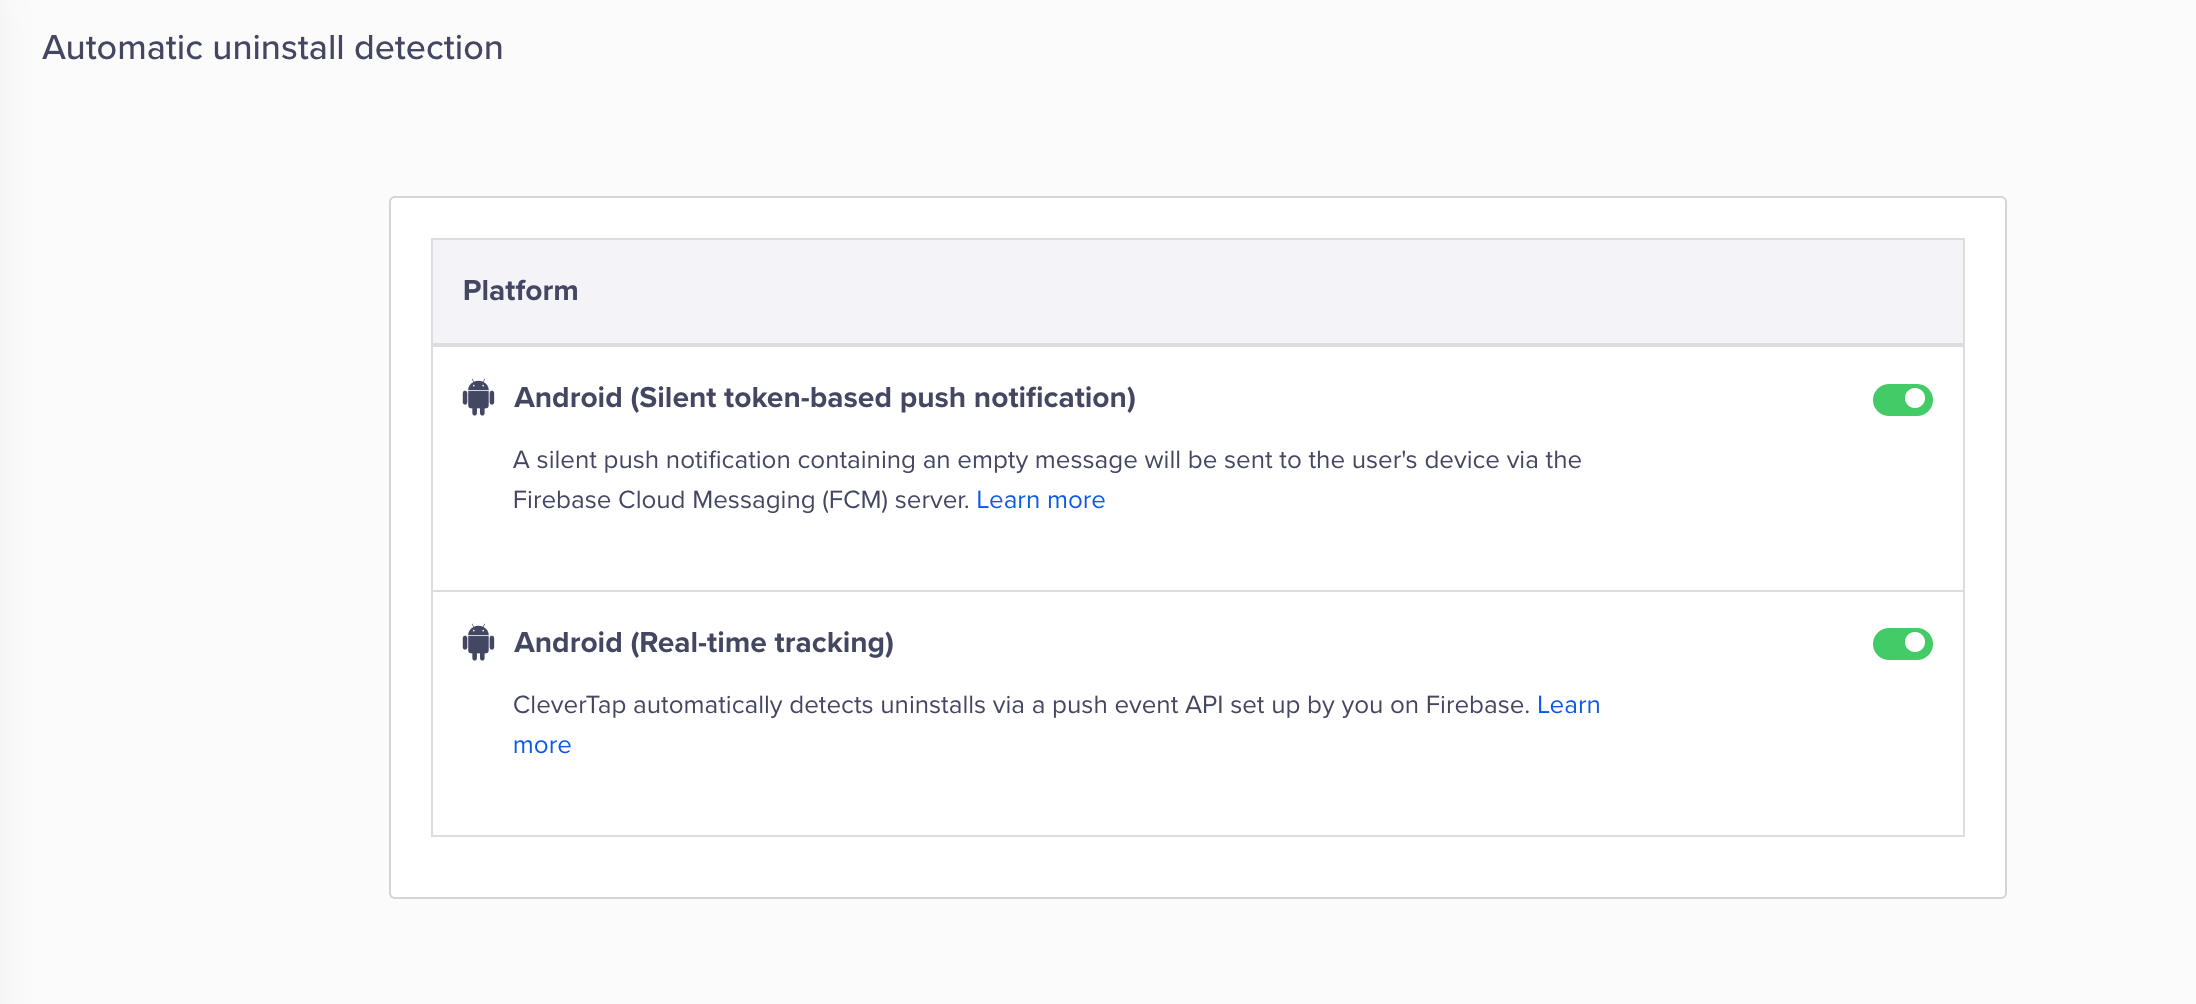
- From the CleverTap dashboard, go to Settings > Uninstall Tracking.
- Toggle ON the Silent token-based push notification option.
Enable Silent Push Notifications
Real-Time Uninstall Tracking
Verify that the Android app is integrated with Firebase Analytics for real-time uninstall tracking. Add Firebase Analytics dependency in the app SDK.
When a user uninstalls the app from an Android device, Firebase logs the app_remove event. You can send this event to CleverTap using Firebase Cloud Functions.
Uninstall Tracking Process in Google Analytics
Google has introduced changes to Google Analytics (G4), Firebase Events, and Cloud Functions that impact real-time uninstall tracking.
If you are setting up real-time uninstall tracking in v2 or updating an existing integration, refer to Uninstall Tracking Using Google Analytics. This document includes the updated GA4 Key Event flow, revised Cloud Function script, region settings, and Node.js version requirements.
Implement Real-Time Uninstall Tracking
Real-time uninstall tracking is a four-step process :
- Set up a common identifier in your app
- Set up conversion event using Firebase
- Create cloud function
- Enable real-time uninstall tracking in CleverTap
Set Up Common Identifier in App
Add the following code to your app to set up a common identifier between Firebase and CleverTap.
private FirebaseAnalytics mFirebaseAnalytics;
mFirebaseAnalytics = FirebaseAnalytics.getInstance(this);
mFirebaseAnalytics.setUserProperty("ct_objectId",Objects.requireNonNull(CleverTapAPI.getDefaultInstance(this)).getCleverTapID());
val defaultInstance = CleverTapAPI.getDefaultInstance(this)
defaultInstance?.let { ins ->
Log.i(TAG, "setting object id to firebase : ${ins.cleverTapID}")
FirebaseAnalytics.getInstance(this).setUserProperty("ct_objectId", ins.cleverTapID)
} ?: run {
Log.e(TAG, "Uninstall tracking not setup cause of non initialised instance")
}Set Up Conversion Event Using Firebase
To enable real-time uninstall tracking, ensure that the app_remove event is marked as a conversion event in the Firebase dashboard.
The app_remove event is automatically logged by Firebase Analytics. It is triggered when an Android app is uninstalled from a device, regardless of the installation source. This event is available only for Android devices.
Firebase Blaze Plan Required
To allow Firebase Cloud Functions to call a third-party HTTP endpoint (such as the CleverTap API upload endpoint), your Firebase project must be on the Blaze plan. For more information about plans and pricing, refer to Firebase Pricing.
Additionally, ensure that the API region is configured correctly.
To set up the conversion event, perform the following steps:
- Select the Firebase project that is integrated with the Android app.
- From the Firebase dashboard, select Analytics > Events.
- Toggle ON the Mark as conversion option for the app_remove event.

Enable Mark as conversion option for app_remove Event
Create Cloud Function
After the conversion is set up, use the Cloud Function for Firebase to create a function and send the app_remove data to CleverTap.
To create and publish a cloud function using Node.js, perform the following steps:
- Open a terminal and set up Node.js and the Firebase CLI.
- Run
npm install -g firebase-tools. - To initialize Firebase SDK for Cloud Functions, run the
firebase login. - From your Firebase project directory, run
firebase init functions. - Select the option to use an existing project.
- Open
index.jsand add the following code:
'use strict';

const functions = require('firebase-functions');
const admin = require('firebase-admin');
const https = require('https');
var request = require('requestretry');


admin.initializeApp();

exports.sendAndroidUninstallToCleverTap = functions.analytics.event('app_remove').onLog((event) => {

    //console.log("Event is: " + JSON.stringify(event));

    function myRetryStrategy(err, response, body, options) {
        // retry the request if we had an error or if the response was a 'Bad Gateway'
        return !!err || response.statusCode === 503;
    }

    var clevertapId = event.user.userProperties.ct_objectId.value;
    // This is where the CleverTap ID of the user who uninstalled the app is passed as an identifier in the API call.
    const data = JSON.stringify({
       "d": [{
            "objectId": clevertapId,
            "type": "event",
            "evtName" : "App Uninstalled",
            "evtData": {
            }
        }]
    });

    request({
        method: 'POST',
        headers: {
            'Content-Type': 'application/json',
            'X-CleverTap-Account-Id': '<CT_ACCOUNT_ID>',
            'X-CleverTap-Passcode': '<CT_ACCOUNT_PASSCODE>'
        },
        body: data,
        url: 'https://api.clevertap.com/firebase/upload',

        // The below parameters are specific to request-retry
        maxAttempts: 5, // (default) try 5 times
        retryDelay: 2000, // (default) wait for 2s before trying again
        retryStrategy: myRetryStrategy // (default) retry on 5xx or network errors
    }, function (err, response, body) {
        // this callback will only be called when the request succeeded or after maxAttempts or on error
        if (response && response.statusCode === 200) {
            console.log("Response Body: " + JSON.stringify(body));
            console.log('The number of request attempts: ' + response.attempts);
            return 0;
        }else{
            console.log("err: " + err + " ,response: " + JSON.stringify(response) + " , body: " + JSON.stringify(body));
            return 1;
        }
    });


});


// // Create and Deploy Your First Cloud Functions
// // https://firebase.google.com/docs/functions/write-firebase-functions
//
// exports.helloWorld = functions.https.onRequest((request, response) => {
//  response.send("Hello from Firebase!");
// });- Replace
<CT_ACCOUNT_ID>and<CT_ACCOUNT_PASSCODE>with your CleverTap ID and Passcode in theindex.jsfile. You can find these values in your dashboard from Settings > Project. - Open
package.jsonand add the following code:
{
  "name": "functions",
  "description": "Cloud Functions for Firebase",
  "scripts": {
    "serve": "firebase emulators:start --only functions",
    "shell": "firebase functions:shell",
    "start": "npm run shell",
    "deploy": "firebase deploy --only functions",
    "logs": "firebase functions:log"
  },
  "engines": {
    "node": "18"
  },
  "main": "index.js",
  "dependencies": {
    "firebase-admin": "^11.8.0",
    "firebase-functions": "^4.3.1",
    "web-push": "^3.4.4",
    "request": "^2.88.2",
    "requestretry": "^4.1.1"
  },
  "devDependencies": {
    "firebase-functions-test": "^3.1.0"
  },
  "private": true
}- Run the
firebase deploy --only functionscommand to deploy the cloud function for uninstall event listening.
Enable Real-Time Uninstall Tracking in CleverTap
After you have configured the conversion setup and created the cloud function, enable real-time uninstall tracking in CleverTap by performing the following steps:
- From the CleverTap dashboard, select Settings > Uninstall Tracking.
- Toggle ON the Android (Real-time tracking) option.
Select Android Real-Time Tracking
When you enable Silent Push notifications, CleverTap starts collecting a silent push token for each device. This token allows CleverTap to deliver background notifications that are not visible to the user. After the setting is turned on, devices become eligible to receive silent pushes from CleverTap.
FAQs
Can I run triggered campaigns on the App Uninstalled event?
Yes. You can set up live-triggered campaigns for the App Uninstalled event. Only users who are tracked in real time via uninstall will qualify for the campaign.
How do I target users who have uninstalled the app in a campaign?
Real-time uninstalls can be targeted in a campaign by using the event property filter source = REALTIME_FIREBASE.

App Uninstalled Event
Can I turn off uninstall tracking for push notifications sent via a Campaign or a Journey?
No. This is tracked by default. For more information, refer to Tracking Uninstalls Effectively.
Updated 5 months ago