Segment Native iOS Integration
Learn how to integrate Segment with CleverTap in iOS.
Overview
Segment Native iOS integration allows you to push your iOS application data to CleverTap through Segment.
With this integration, you can:
- Push User Profiles
- Push Events
- Integrate Push Notifications
Prerequisites
The following are the prerequisites for performing this integration:
- A CleverTap account
- A Segment account
- A functional iOS application
Integration
The CleverTap Segment iOS integration consists of the following major steps:
- Add Destination in Segment Dashboard
- Install SDK in the Native Application
- Initialize the Segment Client
Add Destination On Segment Dashboard
Destinations are the business tools or applications to which Segment forwards your data. Adding Destinations allows you to act on your data and learn more about your customers in real-time.
To add CleverTap details on the Segment dashboard:
- Go to Destinations in the Segment application.
- Click Add Destination and select CleverTap.
- In the Destination Catalog/CleverTap page, click Configure CleverTap.
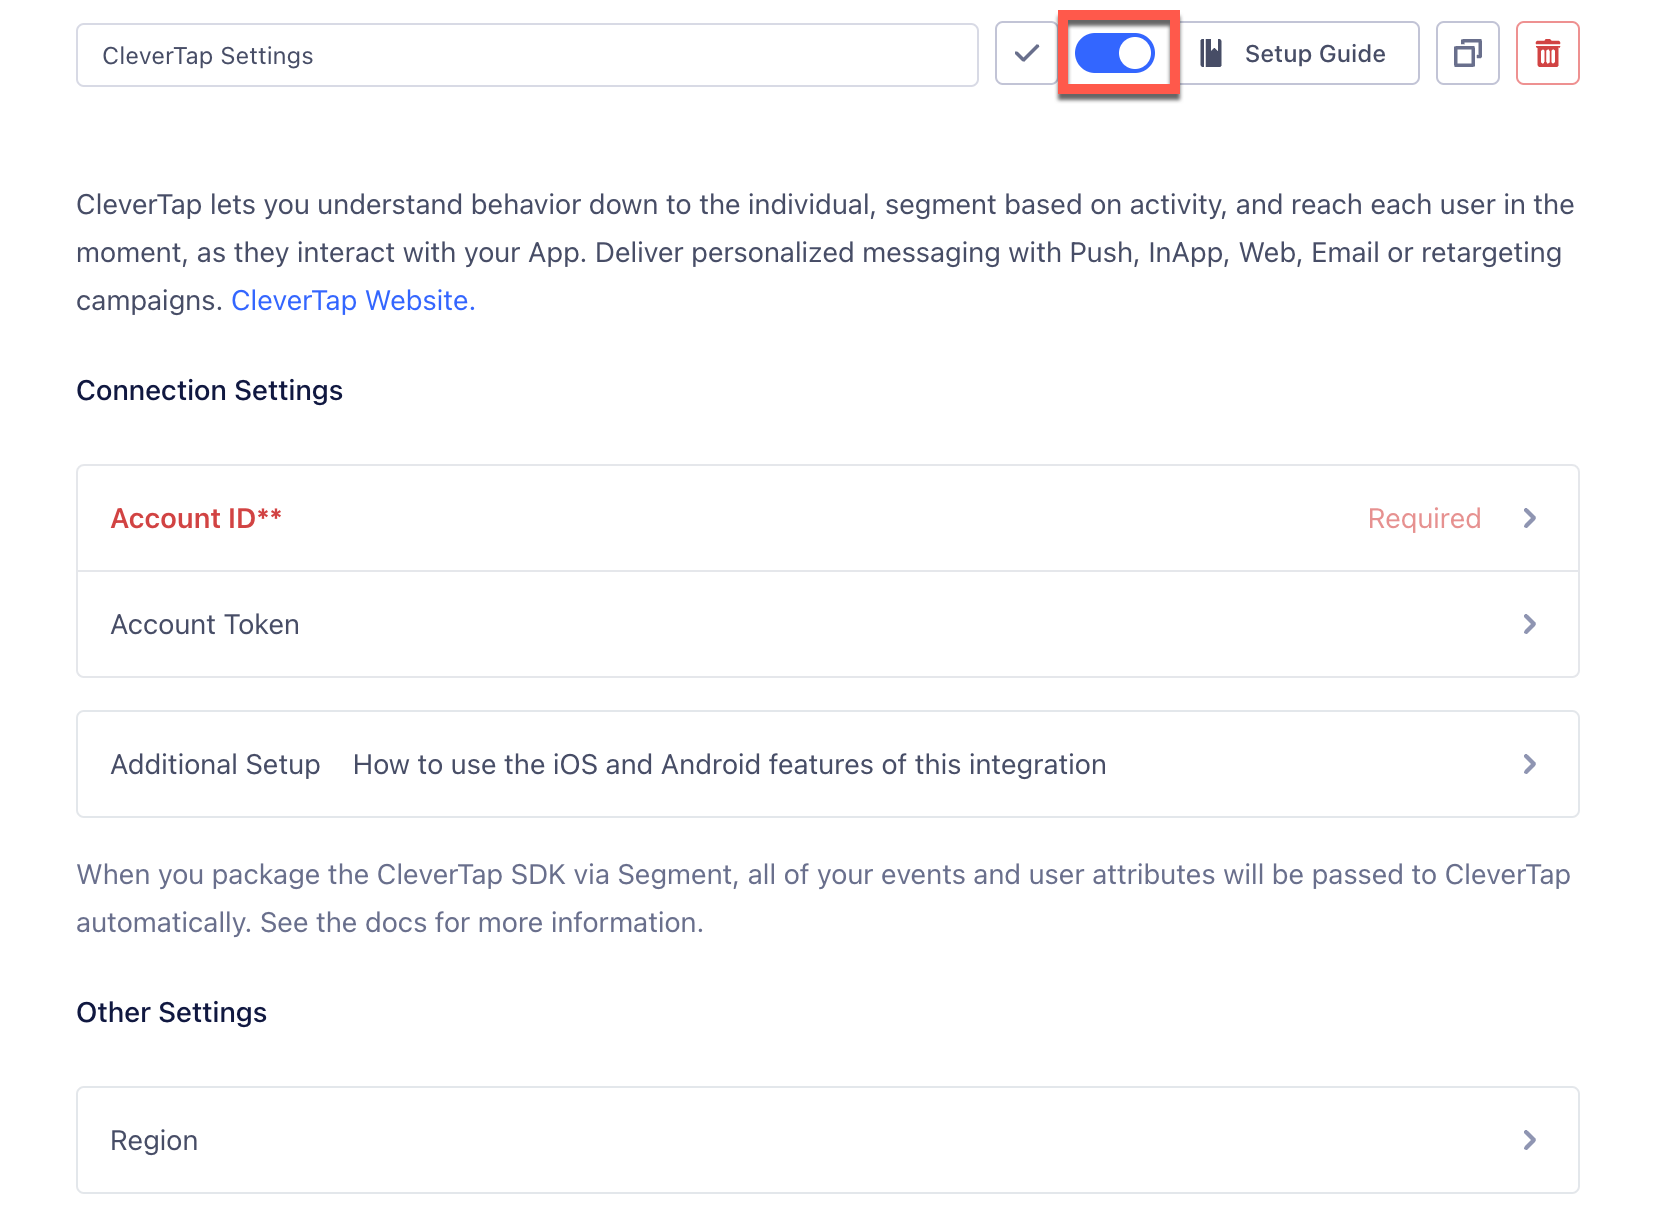
- On the CleverTap Dashboard, under Settings page, add CleverTap Account ID and Account Token.
- From the Region dropdown, select the appropriate region. To identify the region of your CleverTap account, refer to the following table:
- To enable the destination, turn on the toggle at the top of the Settings page.

Enable the CleverTap Settings
You can integrate CleverTap from the server-side or mobile destination (iOS or Android). Select mobile destinations to use CleverTap push notifications or In-App notifications.
Install SDK in the Native Application
Segment-CleverTap integration is available through the following options:
Cocoapods
CocoaPods is a dependency manager for iOS projects. To integrate CleverTap Segment SDK into your Xcode project using CocoaPods, add the following snippet to your Podfile:
pod "Segment-CleverTap"Swift Package Manager
To install the iOS SDK through Swift Package Manager:
- Navigate to File > Swift Package Manager > Add Package Dependency in Xcode.
- Choose
https://github.com/CleverTap/clevertap-segment-ios.gitwhen choosing the package repo and click Next. - Select an SDK version on the next screen(by default, Xcode selects the latest stable version) and click Next.
- Click Finish and ensure that the Segment-CleverTap integration has been added to the appropriate target.
Initialize the Segment Client
To initialize the Segment client:
- Import the module that you added in the above step to your code as follows:
import Segment_CleverTap#import "SEGCleverTapIntegrationFactory.h"- Declare CleverTap's integration in your application delegate instance as shown below:
let config = AnalyticsConfiguration(writeKey: "YOUR_WRITE_KEY_HERE")
config.use(SEGCleverTapIntegrationFactory())
Analytics.setup(with: config)
SEGAnalyticsConfiguration *config = [SEGAnalyticsConfiguration configurationWithWriteKey:@"YOUR_WRITE_KEY_HERE"];
[config use:[SEGCleverTapIntegrationFactory instance]];
[SEGAnalytics setupWithConfiguration:config];| Parameter | Description |
|---|---|
YOUR_WRITE_KEY_HERE | From the Segment dashboard, navigate to Connections > Sources > Select the source > Settings > API Keys to get this information. |
This will help to set up the analytics and communication between Segment and CleverTap.
Push User Information
The onUserLogin method in CleverTap captures multiple user logins or signup on the same device. This method is useful when the user performs a login or sign-up or you want to push data to CleverTap. Call the identify method in Segment to call the CleverTap onUserLogin method as follows:
let floatAttribute = 12.3
let intAttribute = 18
let traits: [String: Any] = [
  "email": "[email protected]",
  "bool": true,
  "floatAttribute": floatAttribute,
  "intAttribute" : intAttribute,
  "name": "Segment CleverTap",
  "phone" : "0234567891",
  "gender": "female",
]

Analytics.shared().identify("cleverTapSegementTestUseriOS", traits: traits)
NSInteger integerAttribute = 200;
float floatAttribute = 12.3f;
int intAttribute = 18;
short shortAttribute = (short)2;
[[SEGAnalytics sharedAnalytics] identify:@"cleverTapSegementTestUseriOS"
traits:@{ @"email": @"[email protected]",
@"bool" : @(YES),
@"double" : @(3.14159),
@"stringInt": @"1",
@"intAttribute": @(intAttribute),
@"integerAttribute" : @(integerAttribute),
@"floatAttribute" : @(floatAttribute),
@"shortAttribute" : @(shortAttribute),
@"gender" : @"female",
@"name" : @"Segment CleverTap",
@"phone" : @"+15555555556",
@"testArr" : @[@"1", @"2", @"3"],
@"address" : @{@"city" : @"New York",
@"country" : @"US"}}];Pushing user information applies only to Segment-CleverTap SDK version v1.1.2 and above.
Update User Property to CleverTapTo update any user property to CleverTap, pass the same user identity passed during the user login/sign-up.
For more information, refer to User Profile Considerations.
Push Events
Events track the actions performed by the users in your application.
To push the events to the CleverTap dashboard, add the following code:
Analytics.shared().track("cleverTapSegmentTrackEvent", properties: ["eventProperty":"eventPropertyValue"])[[SEGAnalytics sharedAnalytics] track:@"cleverTapSegmentTrackEvent"
properties:@{ @"eventproperty": @"eventPropertyValue",
@"testPlan": @"Pro",
@"testEvArr": @[@1,@2,@3]}];Here, cleverTapSegmentTrackEvent represents the Event Name and Value.
For more details, refer to Event Considerations.
Push Charged Events
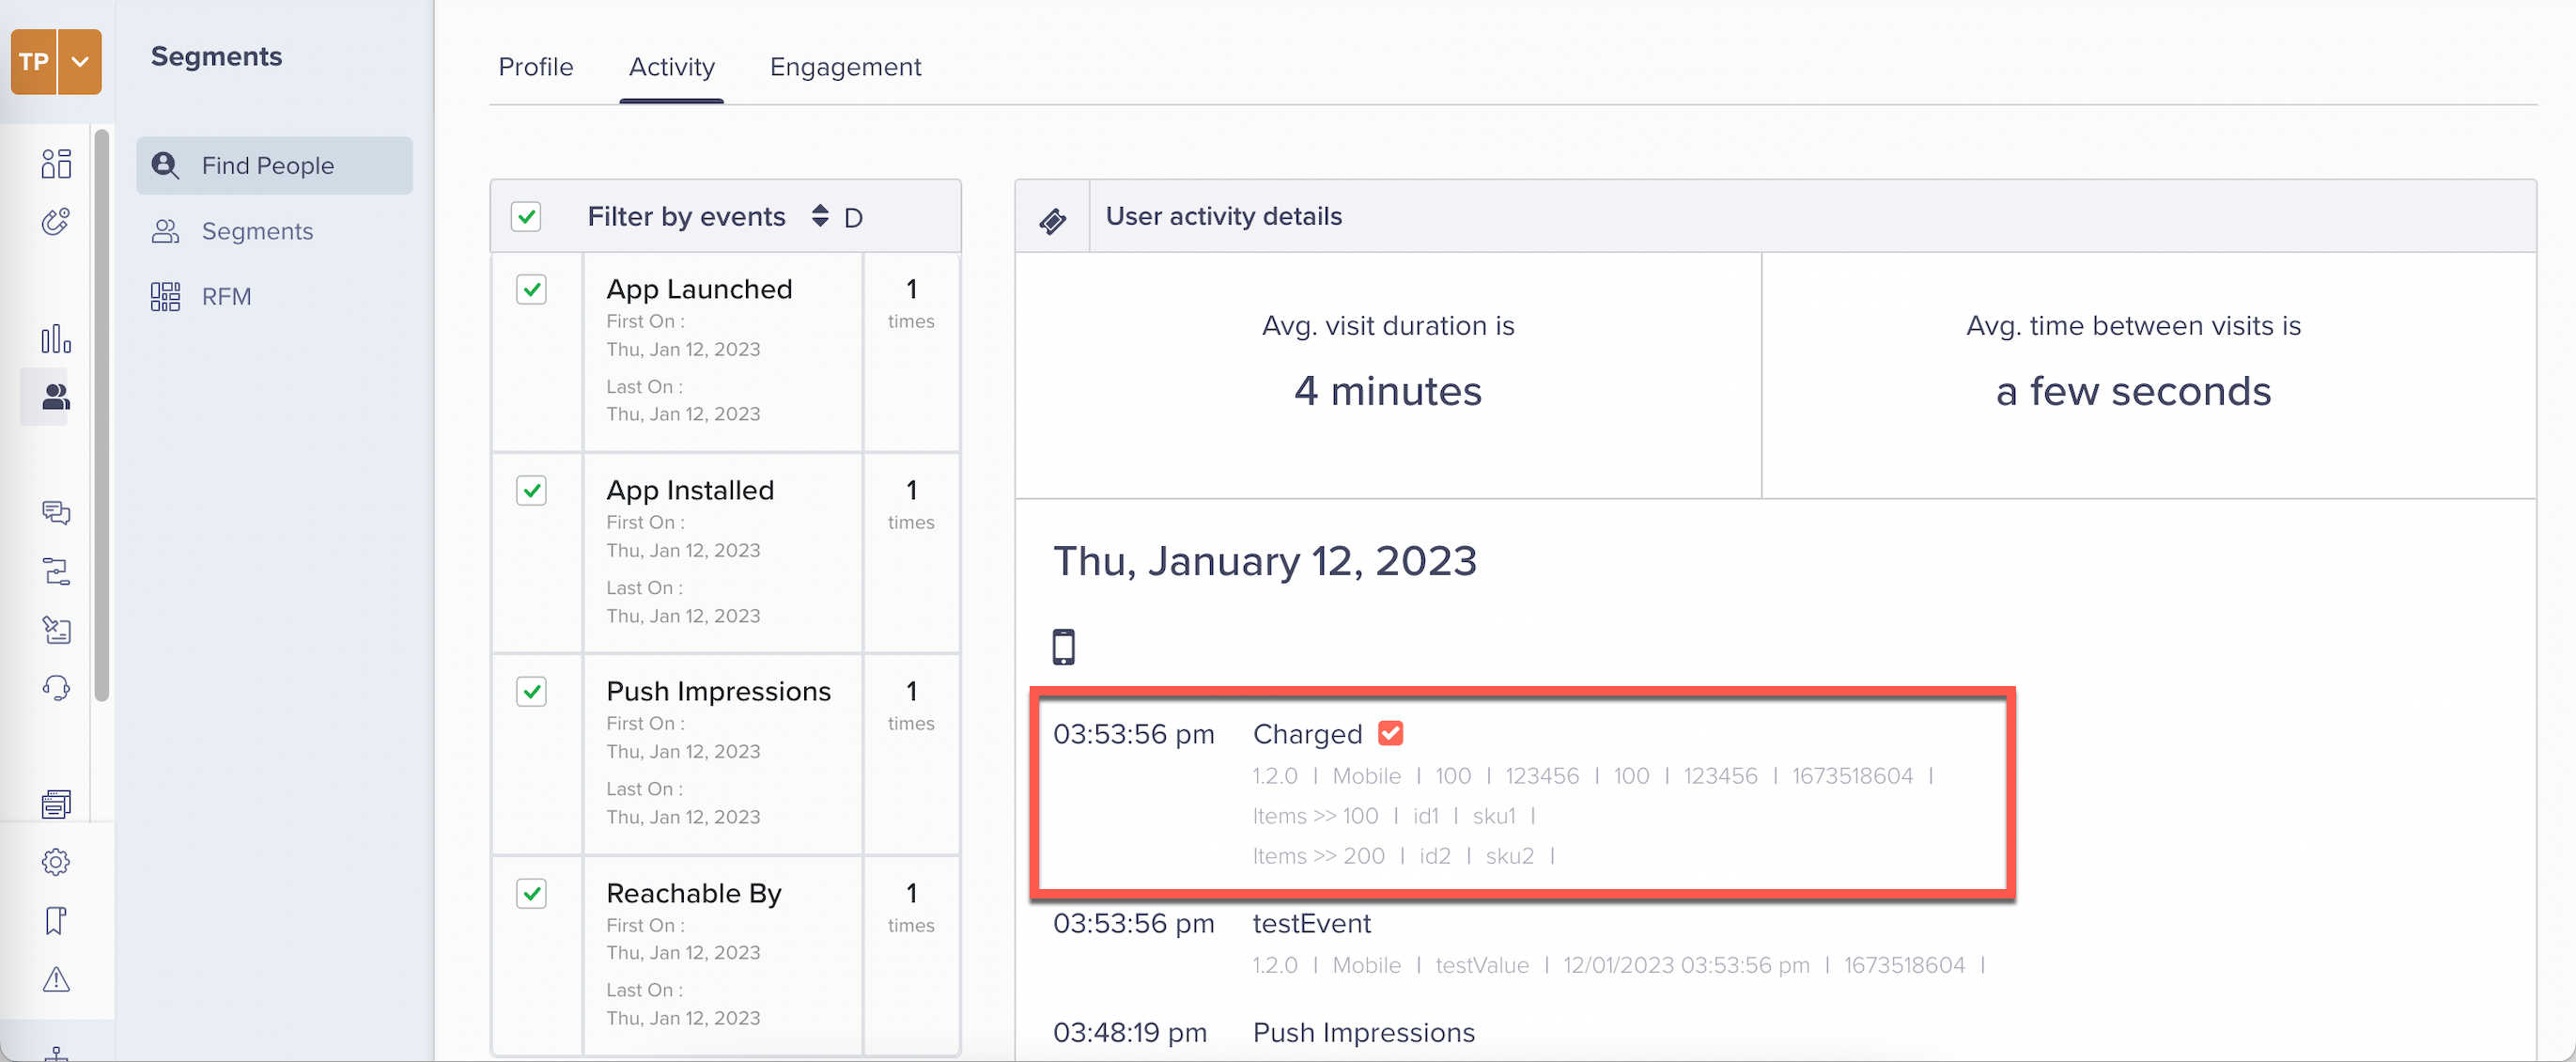
When an event is tracked using the server-side destination with the name Order Completed(as per e-commerce tracking API), Segment maps that event to CleverTap’s charged event.
Add the following code to push the charged events to the CleverTap dashboard:
Analytics.shared().track("Order Completed", properties: ["orderId": "123456",
                                                         "revenue": "100",
                                                         "Products": [["id1","sku1","100.0"],
                                                                      ["id2","sku2","200.0"]]])
[[SEGAnalytics sharedAnalytics] track:@"Order Completed"
properties:@{ @"orderId": @"123456",
@"revenue": @"100",
@"Products": @[[@"id1",@"sku1",@"100.0"],
[@"id2",@"sku2",@"200.0"]]}];It then shows up as a charged event on the CleverTap dashboard, as shown in the following graphic:

Charged Event on CleverTap Dashboard
Integrate Push Notifications
To enable push notifications support in your iOS application, perform the steps under iOS Push notifications.
To enable Segment to handle push notifications, replace the code inside the delegate methods of UNUserNotificationCenterDelegate with the following code:
func application(_ application: UIApplication, didRegisterForRemoteNotificationsWithDeviceToken deviceToken: Data) {
        Analytics.shared().registeredForRemoteNotifications(withDeviceToken: deviceToken)
}

func application(_ application: UIApplication, didReceiveRemoteNotification userInfo: [AnyHashable : Any]) {
    print("did receive remote notification \(userInfo)")

    Analytics.shared().receivedRemoteNotification(userInfo)
}

func application(_ application: UIApplication, didReceiveRemoteNotification userInfo: [AnyHashable : Any], fetchCompletionHandler completionHandler: @escaping (UIBackgroundFetchResult) -> Void) {
    print("did receive remote notification completionHandler \(userInfo)")
    Analytics.shared().receivedRemoteNotification(userInfo)
}
- (void)application:(UIApplication *)application didRegisterForRemoteNotificationsWithDeviceToken:(NSData *)deviceToken {
[[SEGAnalytics sharedAnalytics] registeredForRemoteNotificationsWithDeviceToken:deviceToken];
}
- (void)application:(UIApplication *)application didReceiveRemoteNotification:(NSDictionary *)userInfo fetchCompletionHandler:(void (^)(UIBackgroundFetchResult))completionHandler {
[[SEGAnalytics sharedAnalytics] receivedRemoteNotification:userInfo];
completionHandler(UIBackgroundFetchResultNoData);
}
- (void)userNotificationCenter:(UNUserNotificationCenter *)center didReceiveNotificationResponse:(UNNotificationResponse *)response withCompletionHandler:(void (^)(void))completionHandler {
[[SEGAnalytics sharedAnalytics] receivedRemoteNotification:response.notification.request.content.userInfo];
}Integrate In-App in iOS
All the required methods are available out of the box in the Segment-CleverTap SDK.
For more information about integrating In-App in iOS, refer to iOS In-App Notification.
Integrate App Inbox in iOS
App Inbox allows you to send permanent content directly to your application from the CleverTap dashboard. Moreover, the inbox messages target individual segments such as other messaging channels. Your inbox can look different from another user's inbox; the possibilities are endless.
Add the following code to initialize the App Inbox and register callbacks:
class ViewController: UIViewController, CleverTapInboxViewControllerDelegate {

override func viewDidLoad() {
    super.viewDidLoad()
        // Do any additional setup after loading the view, typically from a nib.
    registerAppInbox()
    initializeAppInbox()
}

func registerAppInbox() {
    CleverTap.sharedInstance()?.registerInboxUpdatedBlock({
        let messageCount = CleverTap.sharedInstance()?.getInboxMessageCount()
        let unreadCount = CleverTap.sharedInstance()?.getInboxMessageUnreadCount()
        print("Inbox Message updated:\(String(describing: messageCount))/\(String(describing: unreadCount)) unread")
    })
}

func initializeAppInbox() {
    CleverTap.sharedInstance()?.initializeInbox(callback: ({ (success) in
        if (success) {
            let messageCount = CleverTap.sharedInstance()?.getInboxMessageCount()
            let unreadCount = CleverTap.sharedInstance()?.getInboxMessageUnreadCount()
            print("Inbox Message:\(String(describing: messageCount))/\(String(describing: unreadCount)) unread")
        }
    }))
}

@IBAction func showAppInbox() {
    // config the style of App Inbox Controller
    let style = CleverTapInboxStyleConfig.init()
    style.title = "App Inbox"
    if let inboxController = CleverTap.sharedInstance()?.newInboxViewController(with: style, andDelegate: self) {
        let navigationController = UINavigationController.init(rootViewController: inboxController)
        self.present(navigationController, animated: true, completion: nil)
    }
}
@interface SEGViewController () <CleverTapInboxViewControllerDelegate>
@end
@implementation SEGViewController
- (void)viewDidLoad {
[super viewDidLoad];
[self initializeAppInbox];
[self registerAppInbox];
}
- (void)initializeAppInbox {
[[CleverTap sharedInstance] initializeInboxWithCallback:^(BOOL success) {
int messageCount = (int)[[CleverTap sharedInstance] getInboxMessageCount];
int unreadCount = (int)[[CleverTap sharedInstance] getInboxMessageUnreadCount];
NSLog(@"Inbox Message: %d/%d", messageCount, unreadCount);
}];
}
- (void)registerAppInbox {
[[CleverTap sharedInstance] registerInboxUpdatedBlock:^{
int messageCount = (int)[[CleverTap sharedInstance] getInboxMessageCount];
int unreadCount = (int)[[CleverTap sharedInstance] getInboxMessageUnreadCount];
NSLog(@"Inbox Message updated: %d/%d", messageCount, unreadCount);
}];
}
- (IBAction)showAppInbox:(id)sender {
CleverTapInboxStyleConfig *style = [[CleverTapInboxStyleConfig alloc] init];
style.navigationTintColor = [UIColor blackColor];
CleverTapInboxViewController *inboxController = [[CleverTap sharedInstance] newInboxViewControllerWithConfig:style andDelegate:self];
if (inboxController) {
UINavigationController *navigationController = [[UINavigationController alloc] initWithRootViewController:inboxController];
[self presentViewController:navigationController animated:YES completion:nil];
}
}For additional methods and App Inbox features, refer to App Inbox for iOS.
Integrate Native Display in iOS
CleverTap supports Native Display for CleverTap iOS SDK version 3.7.2 and above.
For more information about integrating Native Display in iOS, refer to Native Display for iOS.
Advanced Features
To add advanced features to your iOS app, refer to iOS Advanced Features.
Updated about 2 months ago
