Web Push (Legacy)
Learn about the basic configurations for Safari Web Push using APNs.
Feature AvailabilityIt is not recommended to use the Safari APNs configuration as it is deprecated and not available on the dashboard. If you want access to this feature, contact your Account Manager.
Overview
This section covers the deprecated configurations for Chrome FCM and Safari Web Push using Apple Push Notification Service (APNs).
Chrome FCM
Adding the CleverTap JavaScript Library
Integrate the CleverTap JavaScript library using the Web Quick Start Guide.
Integrating FCM and Chrome
FCM has deprecated its existing web push protocol after July 2019 and moved to the VAPID protocol.
If your server key is generated before July 2019, the FCM will continue to work. However, if they were generated after July 2019, only the VAPID protocol will be supported.
We recommend using the VAPID protocol due to increased security.
FCM Update: Migrate to HTTP v1 API
- Firebase will deprecate its legacy APIs starting June 20, 2023, and discontinue them from June 2024.
- To avoid disruptions in web push notifications, you must migrate to the new HTTP v1 API by June 20, 2024.
After obtaining your server keys, follow the steps below:
Chrome
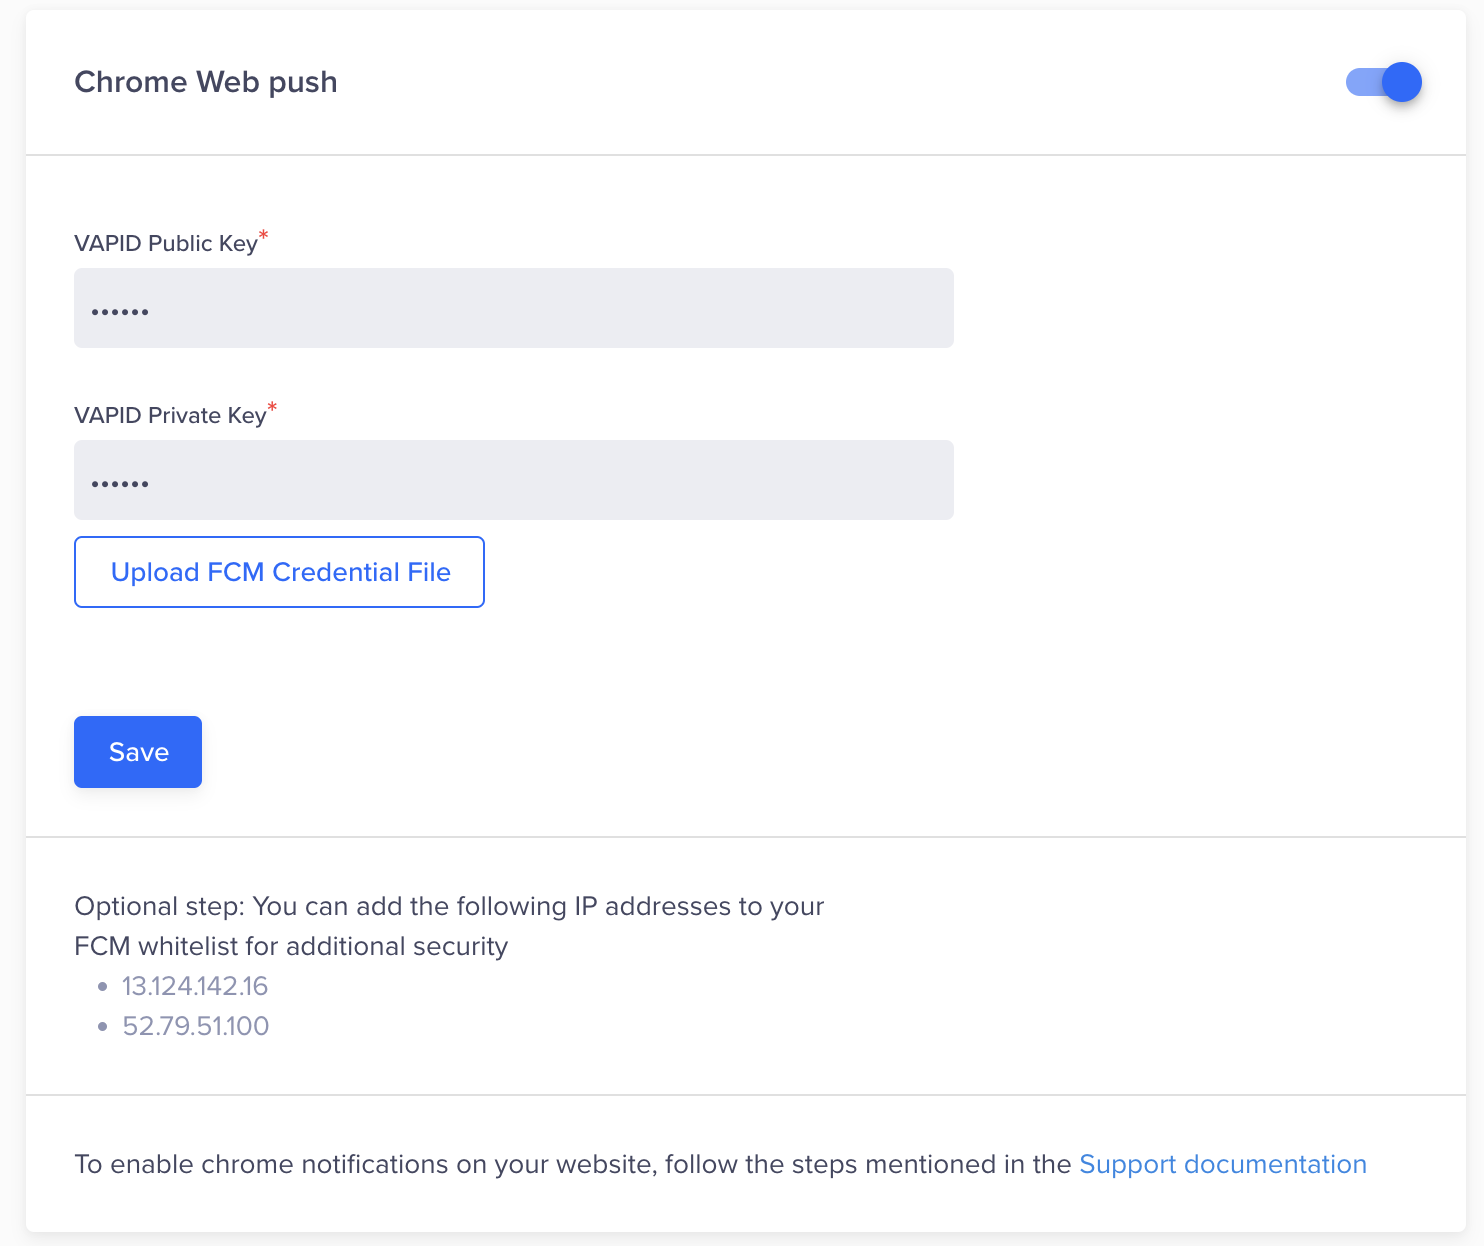
- In the CleverTap dashboard, navigate to Settings > Engage > Channels > Web Push.
- Under the Chrome Web Push section, upload your FCM Credential File using the Upload FCM Credential File button. Learn how to generate your FCM Credential File.
- Click Save.
Chrome Web Push Configuration
Safari APNS
Uploading the APNS Certificate
For Safari, you require an APNS certificate. Follow the steps below:
- In the CleverTap dashboard, navigate to Settings > Engage > Channels > Web Push.
- Under the Safari Web Push section, upload your APNS Certificate.
- Select Production or Development from the APNS push mode dropdown.
- Click Save.

Update Safari Web Push
Enabling Safari Web Push
For enabling Safari Web Push, follow the below steps:
- In the CleverTap dashboard, navigate to Settings > Engage > Channels > Web Push.
- Under the Safari Web Push section, select the toggle Safari Web Push.
- Provide your credentials.
- Click Save.
The custom service worker format for notification permission pop-up is shown below:
clevertap.notifications.push({
	"apnsWebPushId": "<apple web push id>",
	"apnsWebPushServiceUrl": "<safari package service url>",
   	"titleText": "Would you like to receive Push Notifications?",
   	"bodyText": "We promise to only send you relevant content and give you updates on your transactions",
   	"okButtonText": "Sign me up!",
   	"rejectButtonText": "No thanks",
   	"okButtonColor":"#F28046",
   	"askAgainTimeInSeconds":5,
  	"serviceWorkerPath": "/foo/my_sw.js" // path to your custom service worker file
  });
Safari Web Push Certificate
To setup a Safari web push certificate, follow the steps below:
In OS X v10.9 and later, you can dispatch Safari push notifications from your webserver to OS X users by using the Apple Push Notification service (APNs). This is different from local notifications because push notifications can reach your users even if your website or Safari browser is not open.

Safari Web Push Certificate Set Up Steps
To integrate push notifications on your website, you must first present an interface that allows the user to opt-in to receive notifications. If the user consents, Safari requests for its credentials on your website in the form of a file called a push package. The push package also contains notification assets used throughout OS X and data used to communicate to a web service that you must configure. If the push package is valid, you receive a unique identifier also known as device token for the user. The user receives the notification when you send the combination of this device token and your message, or payload to APNs.
This guide helps you with process management and maintaining a coherent way of getting your service implemented.
The following steps cover how to implement your service:
- Generate your push certificate. You will require the Apple WWDRCA certificate provided by Apple from your developer portal to send notifications. Another certificate is needed when actually sending notifications and also, while creating the push package.
While not mentioned in Apple’s official documentation, you will need two certificates:
- For registering app with APNs.
- Establishing a token-based connection to APNs.
- Configure the raw push package folder and then, use the companion PHP file to zip up your final push package. We will also check for any issues while creating the push package in the debugging section.
Your push package is a folder of icons and configurations used by each Mac device that subscribes to your notification service.
-
Create a webserver to verify your push package.
-
Run the front end Javascript to subscribe to your notifications and get the device token that is returned. Granting client access to your notifications is easy using Javascript. If a valid push package is returned, access is granted and a device token is given in a JSON response.
Generate Push Certificate
You must register in the Certificates, Identifiers & Profiles section of your developer account to send push notifications. You must have an Apple developer license to register.
- Identifier: This is your unique reverse-domain string, such as web.com.example.domain (the string must start with web). This is also known as the Website Push ID.
- Website push ID description: This is the name used throughout the provisioning portal to refer to your website. Use it for your own benefit to label your website push IDs into a more human-readable format.

Enable WebSite Push IDs

Generate Push Certificate
After the push ID is registered, create a production certificate of that push ID by clicking Create Certificate under Edit your Identifier Configuration.

Create Production Certificate
If you already have the certificate signing request, then upload the file from your local machine. If not, refer to Create a certificate signing request in the Apple documentation.

Upload a Certificate Signing Request
You can download the push certificate after the certificate signing request is uploaded:

Download Push Certificate
Double-click the downloaded certificate and add it to your keychain:
- Navigate to your Keychains > My Certificates.
- Select your certificate and private key.

Add Keychain to the Certificate
- Export both as .p12.
- Add a password. This step is very important.

Add a Password
You will require one more certificate named Apple Worldwide Developer Relations Certification Authority. You can download it from the Apple Certification Authority.
- Add the AWDRCA certificate to the keychain and export it as .pem file.
- Sign the push package with both the web push certificate and the intermediate certificate.
 Certificate")
Add Apple Worldwide Developer Relations Certification Authority (AWDRCA) Certificate
Create a Push Package
When a user is asked for permission to receive push notifications, Safari asks your webserver for a package. The package contains data that is used by the notification UI, such as your website name and icon, as well as a cryptographic signature. The signature verifies that your notification has not been intercepted by a man-in-the-middle attack and that it is indeed coming from a trusted source.
Below is the folder structure you must create:
pushpackage/
    icon.iconset/
        icon_16x16.png
        [email protected]
        icon_32x32.png
        [email protected]
        icon_128x128.png
        [email protected]
     manifest.json
     signature
     website.json
Website JSON
The website JSON dictionary named website.json contains metadata used by Safari and Notification Center to present UI to the user and to communicate with your web service.
| Key | Description |
|---|---|
| websiteName | The website name. This is the heading used in the Notification Center. |
| websitePushID | The website push ID as specified in your developer account. |
| allowedDomains | An array of websites that are allowed to request permission from the user. |
| urlFormatString | The URL to go to when the notification is clicked. Use %@ as a placeholder for arguments you fill in when delivering your notification. This URL must use the http or https scheme; otherwise, it is invalid. |
| authenticationToken | A string that helps you identify the user. It is included in later requests to your web service. This string must be 16 characters or greater. |
| webServiceURL | The location used to make requests to your web service. The trailing slash should be omitted. This should be https. |
Following is a sample valid website.json file:
{
    "websiteName": "Bay Airlines",
    "websitePushID": "web.com.example.domain",
    "allowedDomains": ["http://domain.example.com"],
    "urlFormatString": "http://domain.example.com/%@/?flight=%@",
    "authenticationToken": "19f8d7a6e9fb8a7f6d9330dabe",
    "webServiceURL": "https://example.com/push"
}
Iconset
The iconset is a directory called icon.iconset that contains PNG images in varying sizes. The images in your iconset populate the icons displayed to the user in the permission prompt, Notification Center, and the notification itself. Since your icon is static, it is unnecessary to include it in every push notification. Instead, your icons are downloaded once from your server and stored on the user’s computer.
The icons should be valid as per the Apple guidelines. Use https://tinypng.com/ to compress your icons to the required size.
Manifest
A manifest is a JSON dictionary named manifest.json that contains an entry for each file where the local file path is the entry’s key and a dictionary object is the entry’s value. This dictionary contains the hashType and hashValue which is the file’s SHA512 checksum.
Signature
The signature is a PKCS #7 detached signature of the manifest file. Sign the manifest file with the private key associated with your web push certificate that you obtained while registering with Apple.
We will use a PHP file named createPushPackage.php to generate the zip file for the pushpackage folder above. The folder to create a push package is present in the solution under the folder named “safari_push_package_creator”.
- Copy and paste the following files in one folder:
- .p12 certificate we created above by registering.
- PHP file.
- .pem file created using AWDRCA certificate.
- Create a tmp folder, then pushPackage inside it.
- Create one pushpackage.raw folder and paste the following files in it:
- icon.iconset folder and all the icons mentioned above in it.
- Website.json as per the guidelines mentioned above.
- Open the PHP file and modify it as per the following instructions:
- Change $certificate_path to path of .p12 certificate.
- Change $certificate_password to password of .p12 certificate.
- Replace "<path to .pem>" under create_signature with path to .pem file.
- Change $package_dir to path to tmp/pushPackage directory.
The AWDRCA.pem file is mandatory after 2014 for security purposes.
- After the above steps are done, run the PHP file in the terminal:
php createPushPackage.php
If run successfully under the tmp folder, a pushPackage.zip file will be created. You can place this pushPackage.zip in your web service directory which will send the pushPackage.zip to the client when a request for Safari push notifications will be requested.
ConsiderationsSome things to consider:
- All the files must be present.
- Use the zipping method used in the PHP file attached as the order of the files is important.
- Icons must be valid.
- Use the valid certificates. If they expire, renew them.
Code Overview
This overview covers the client-side and web service code that return the pushPackage.zip file to the client (Safari browser).
Webserver
When Safari requests permission to display push notifications, an HTTPS request for credentials is sent to your webserver. Configure a RESTful HTTPS web service on your webserver to respond to these requests. The web service can be hosted on any server or domain. The webserver allows the request for push notification and sends a push package (application/zip format) to Safari. This push package is verified by Safari and it sends a push token to the CleverTap SDK.
| Fragment | Description |
|---|---|
| webServiceURL | The URL to your web service; this is the same as the URL parameter in window.safari.pushNotification.requestPermission(). It must start with https. |
| version | The version of the API. Currently, “v1”. |
| deviceToken | The unique identifier for the user on the device. |
| websitePushID | The website push ID. |
Configure endpoints in a RESTful https web service on your server to respond:
- Download your website package.
This POST request contains the following information:
The URL format is webServiceURL/version/pushPackages/websitePushID
For example: https://yourwebsite.com/v1/pushPackages/web.com.yourwebsite
- Register or update the device permission policy.
This POST request contains the following information:
The URL format is webServiceURL/version/devices/deviceToken/registrations/websitePushID
For example: https://yourwebsite.com/v1/devices/deviceToken/registrations/web.com.yourwebsite
- Forget the device permission policy.
This DELETE request contains the following information:
The URL format is webServiceURL/version/devices/deviceToken/registrations/websitePushID
For example: https://yourwebsite.com/v1/devices/deviceToken/registrations/web.com.yourwebsite
- Log errors.
If an error occurs, a POST request is sent to the following URL:
The URL format is webServiceURL/version/log
For example: https://yourwebsite.com/v1/log
Client Side Code
To request permission to send the user push notifications, call the window.safari.pushNotification.requestPermission() method.
Requesting permission is an asynchronous call
window.safari.pushNotification.requestPermission(url, websitePushID, userInfo, callback);
A description of each argument is as follows:
- URL: The URL of the web service which must start with https. The webserver and the website requesting permission can have different domains.
- websitePushID: The website push ID as specified in your developer account for the generated certificate. It follows the convention on an Apple account and must start with web. For example, web.yourname.safari is a Safari certificate ID.
- userInfo: An object required to pass to the server. Include any data in this object that helps you identify the user requesting permission.
- callback: A callback function which is invoked on completion.
Following is a sample code:
//For Safari
function requestPermission() {
    if ('safari' in window && 'pushNotification' in window.safari) {

        var permissionData =
            window.safari.pushNotification.permission('web.pjay.push');
        window.safari.pushNotification.requestPermission(
            'https://localhost:8443/Push_notification_war_exploded',
            'web.pjay.push', {}, function(subscription) {
                console.log(subscription);
                if(subscription.permission === 'granted') {
                    subscriptionInfoSafari = subscription;
                    safariToken = subscription.deviceToken;
                    sending(safariToken);
                    // updateSubscriptionOnServer(subscription);
                }
                else if(subscription.permission === 'denied') {
                    // TODO:
                }
            });

    } else {
        alert("Push notifications not supported.");
    }
}
Troubleshooting
If there is an issue with downloading the push package or delivery of push notifications, the logging endpoint on your web service as described in the Log errors (section above) is contacted with an error message and error description.
The following table lists the possible errors and steps you can take to fix them:
| Error Message | Resolution |
|---|---|
| AuthenticationToken must be at least 16 characters | The authenticationToken key in your website.json file must be 16 characters or greater. |
| Downloading push notification package failed | The Safari push package could not be retrieved from the specified location. |
| Extracting push notification package failed | Check that your push package is zipped correctly. |
| Missing file in push notification package | Check that your push package contains all of the files specified in building the push package. |
| Missing image in push notification package | Check that your push package contains all of the files specified in the iconset folder. |
| Missing key in website.json | Check that your website.json file has all of the keys listed in the Website JSON dictionary. |
| Serialization of JSON in website.json failed | The website.json file in your push package is not valid JSON. |
| Signature verification of push package failed | The manifest was not signed correctly or was signed using an invalid certificate. |
| Unable to create a notification bundle for push notification package | The extracted push package could not be saved to the user’s disk. |
| Unable to generate ICNS file for push notification package | Your iconset may have malformed PNGs. |
| Unable to parse webServiceURL | Check that the value for webServiceURL in your website.json file is a valid URL. |
| Unable to save push notification package | The push package could not be saved to the user’s disk. |
| urlFormatString must have http or https scheme | Make sure that the value for urlFormatString in your website.json file starts with http or https. |
| Verifying hashes in manifest.json failed | The SHA512 checksums specified in your manifest.json file do not compute to their actual values. |
| Web Service API URL must be https | Make sure that the URL at your push package endpoint starts with https. |
| webServiceURL must be equal to URL in call to requestPermission | Cross-check that the web service URL in your JavaScript call matches the Web service URL in your website.json file. |
| websitePushID must be equal to identifier in call to requestPermission | Cross-check that the identifier in your JavaScript call matches the identifier in your website.json file. |
| x cannot be used as a format string for URLs | The URL created by inserting the notification payload’s url-args values into the placeholders specified in the push package’s urlFormatString is not valid, or there are a different number of values than placeholders. |
Updated 7 months ago