API Authentication
Understand how CleverTap authenticates API requests
Overview
CleverTap uses a header-based authentication model to authenticate requests to the API. Every CleverTap API call should include Account ID and Account Passcode as the request headers. If your CleverTap admin has opted for User-Passcode instead of Account Passcode, you must use your User-Passcode in the X-CleverTap-Passcode header. The CleverTap API expects these values to be keyed in as X-CleverTap-Account-Id and X-CleverTap-Passcode.
Obtain Your Account Credentials
To obtain your account credentials, refer to Get CleverTap Account Credentials.
Authorize Partners
If you are a CleverTap customer trying to connect your partner dashboard to the CleverTap dashboard, you must use connect API. This API enables partners to verify customer account credentials, ensuring that customers enter the correct information when connecting to CleverTap via their partner dashboard.

Authorize Customer Account Credentials
Base URL
Here is an example base URL from the account in the India region:
https://in1.api.clevertap.com/v1/connect?partner=parntername
Region
Refer to Region for more details.
HTTP Method
GET
Headers
Refer to Headers for more details.
Body Parameters
The following body parameter is sent in the URL of a GET request:
| Name | Description | Type | Sample Value | Optional/Required |
|---|---|---|---|---|
| partner | Name of the partner who wants to connect with CleverTap | String | adjust | Required |
Example Request
Here is an example cURL request showing the headers needed to authenticate the request from the account in the India region.
curl --location 'https://us1.api.clevertap.com/v1/connect?partner=partnername' \
--header 'X-CleverTap-Account-Id: YOUR_ACCOUNT_ID' \
--header 'X-CleverTap-Passcode: YOUR_ACCOUNT_PASSCODE OR YOUR_USER_PASSCODE'
require "uri"
require "net/http"
url = URI("https://us1.api.clevertap.com/v1/connect?partner=partnername")
https = Net::HTTP.new(url.host, url.port)
https.use_ssl = true
request = Net::HTTP::Get.new(url)
request["X-CleverTap-Account-Id"] = "YOUR_ACCOUNT_ID"
request["X-CleverTap-Passcode"] = "YOUR_ACCOUNT_PASSCODE"
response = https.request(request)
puts response.read_bodyFor more information on the API endpoints for the region of your account, refer to CleverTap Regions.
Example Response
{
    "message": "Authorised Successfully.",
    "status": "success"
}
Error Codes
If there are errors, you will receive a response in the following format:
{
    "status": "fail",
    "error": "Partner not whitelisted: patnername",
    "code": 403
}
The following are the possible error codes:
| Error Code | Error Message | Description |
|---|---|---|
| 400 | Invalid Credentials | Ensure that the customers enter the correct Account ID and Passcode. |
| 403 | Partner not whitelisted | Before you use this API, the partner name must be whitelisted. To get yourself whitelisted, write to [email protected]. |
| 503, 504 | Server Error | Indicates server-side errors. |
Authorize Customers
If you are a CleverTap customer looking to make API requests, you must use this authorization method. This section explains how CleverTap customers are authorized before making any API requests.
Example cURL Request
Here is an example cURL request to the Events API showing the headers needed to authenticate the request from the account in the India region.
curl "https://in1.api.clevertap.com/1/events.json?cursor=CURSOR_VALUE" \
-H "X-CleverTap-Account-Id: YOUR_ACCOUNT_ID" \
-H "X-CleverTap-Passcode: YOUR_ACCOUNT_PASSCODE OR YOUR_USER_PASSCODE" \
-H "Content-Type: application/json"
require 'net/http'
require 'uri'
uri = URI.parse("https://api.clevertap.com/1/events.json?cursor=CURSOR_VALUE")
request = Net::HTTP::Get.new(uri)
request.content_type = "application/json"
request["X-Clevertap-Account-Id"] = "YOUR_ACCOUNT_ID"
request["X-Clevertap-Passcode"] = "YOUR_ACCOUNT_PASSCODE"
req_options = {
use_ssl: uri.scheme == "https",
}
response = Net::HTTP.start(uri.hostname, uri.port, req_options) do |http|
http.request(request)
end
puts response.bodyFor more information on the API endpoints for the region of your account, refer to CleverTap Regions.
Account Passcode Vs User Passcode
There can be situations where it becomes risky to give away the account passcode of your CleverTap account to people inside and outside your organization. It exposes your account to security risks. Therefore, granting user passcodes to specific users using CleverTap APIs instead of account passcodes is best.
Account-Level Passcode
You can have multiple account-level passcodes rather than having a single account passcode used across different partners. This offers better security when using CleverTap APIs.
Account passcodes can be unique to each partner. Only admins or users with write access to the User Settings page can grant passcodes. They can create up to 100 passcodes.
Create Account Passcode
To create an account passcode:
- Navigate to Settings > Passcodes.
- Click + Passcode.

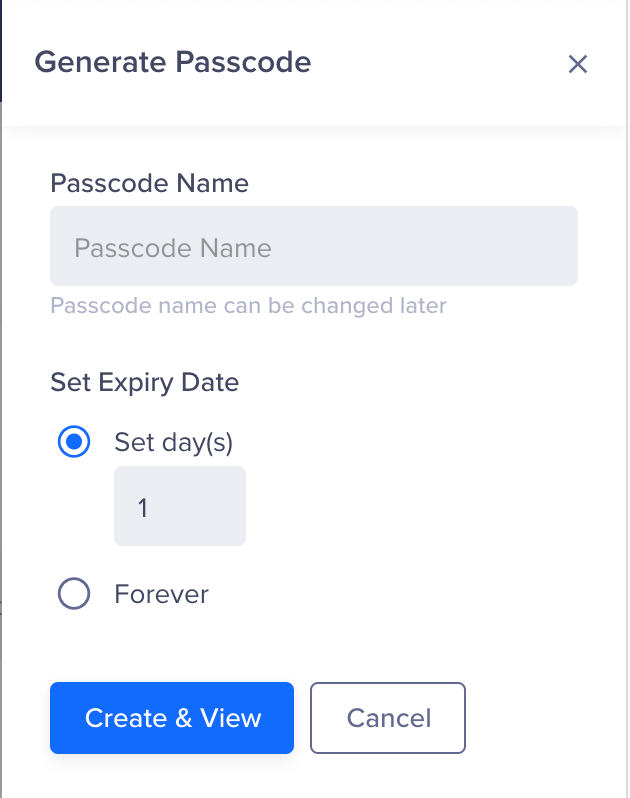
Generate Passcode
- The Generate Passcode page displays.

Add Passcode Details
- Enter the following details:
Field | Description |
|---|---|
Passcode Name | Enter the name to uniquely identify the passcode. |
Set Expiry Date | Select from the available options:
|
- Click Create & View. On clicking, the passcode displays.
- Click API Key to copy it and then click Done.
Save PasscodeFor security reasons, the passcode cannot be shown again. Copy the key and save it for later use.
- The new passcode is now visible under the Passcodes page.
Passcode Expiry
- An email notification is sent when the passcode is nearing expiration or has expired.
- The passcode status is displayed as Expiring soon from the 30 days of expiration.
- An error message displays when using the expired passcode to authenticate with CleverTap API.
- After the passcode expires, we recommend deleting the passcode.
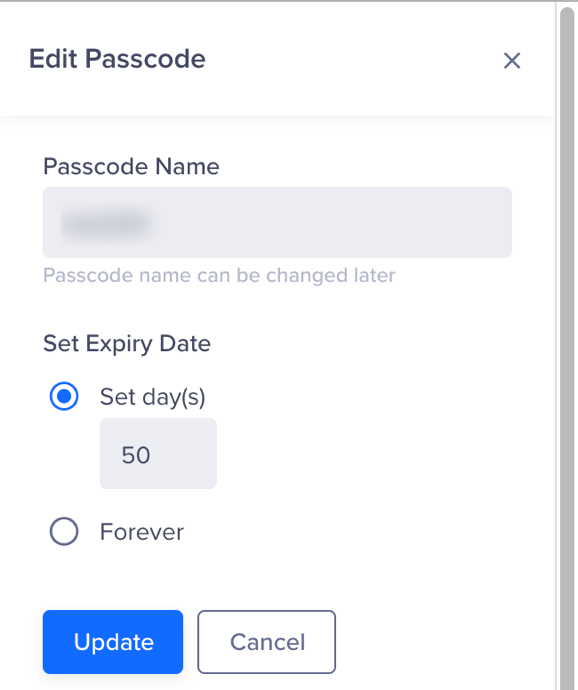
Edit Account Passcode
To edit account passcode:
- Navigate to Settings > Passcodes and then click
 icon for the passcode you want to edit. The Edit Passcode page opens.

Edit the Existing Passcode
- Modify the required fields and then click Update.
Delete Account Passcode
Navigate to Settings > Passcodes and then click ![]() icon for the passcode you want to delete. On deleting the passcode, the APIs will stop working.
icon for the passcode you want to delete. On deleting the passcode, the APIs will stop working.
User Passcode
For API authentication, you can enforce dashboard users to use user passcode rather than account passcode. User passcode offers a better security standard while using CleverTap APIs.
User passcodes are unique to each user and granted by the admin.
Enable User Passcode for a User
- If you are an admin user, go to Settings > Users to enable the user passcode.
- Select the user from the list and click Grant.

Enable User Passcode
When you grant the passcode to a user, you need to specify the period for which the passcode remains valid.
You can specify the period from the following options:
| Field | Description |
|---|---|
| Finite | Indicates that the passcode can be valid for a specific period (1-365 days). |
| Infinite | Indicates that the passcode is valid for up to 10 years. |
- After you grant the user a user passcode, the users can see their user passcode on the Settings page, as shown below:

View User Passcode
Reset and Revoke User Passcode
An admin can reset or revoke an existing user passcode by navigating to the Users page and selecting the required action.
- Reset Passcode generates a fresh new passcode for the user. Post resetting, the user has to incorporate the new passcode into APIs.

Reset User Passcode
- Revoke Passcode invalidates the existing passcode for the user, and the user can no longer fire API calls using their passcode.

Revoke User Access to the Passcode
Next Step
Now that you understand how to authenticate with the CleverTap API, you are ready to make your first API call.
Start with Get User Profiles API, which shows you how to request User Profiles from CleverTap.
Updated 2 months ago
