RudderStack Native Android Integration
Overview
The RudderStack Android SDK allows the following from your Android applications and sends it to CleverTap via RudderStack:
- Push User Profiles
- Push Events
- Integrate Push Notifications
Prerequisites
The following are the prerequisites for performing this integration:
- A CleverTap account
- A RudderStack account
- A functional Android app
Integration
For CleverTap RudderStack Android integration, the following are the major steps:
- Set Up Source and Destination at RudderStack.
- Configure CleverTap within the application.
- Install SDK in the Native application.
- Initialize the RudderStack Client.
Set Up Source and Destination at RudderStack
To set up the source and destination at RudderStack:
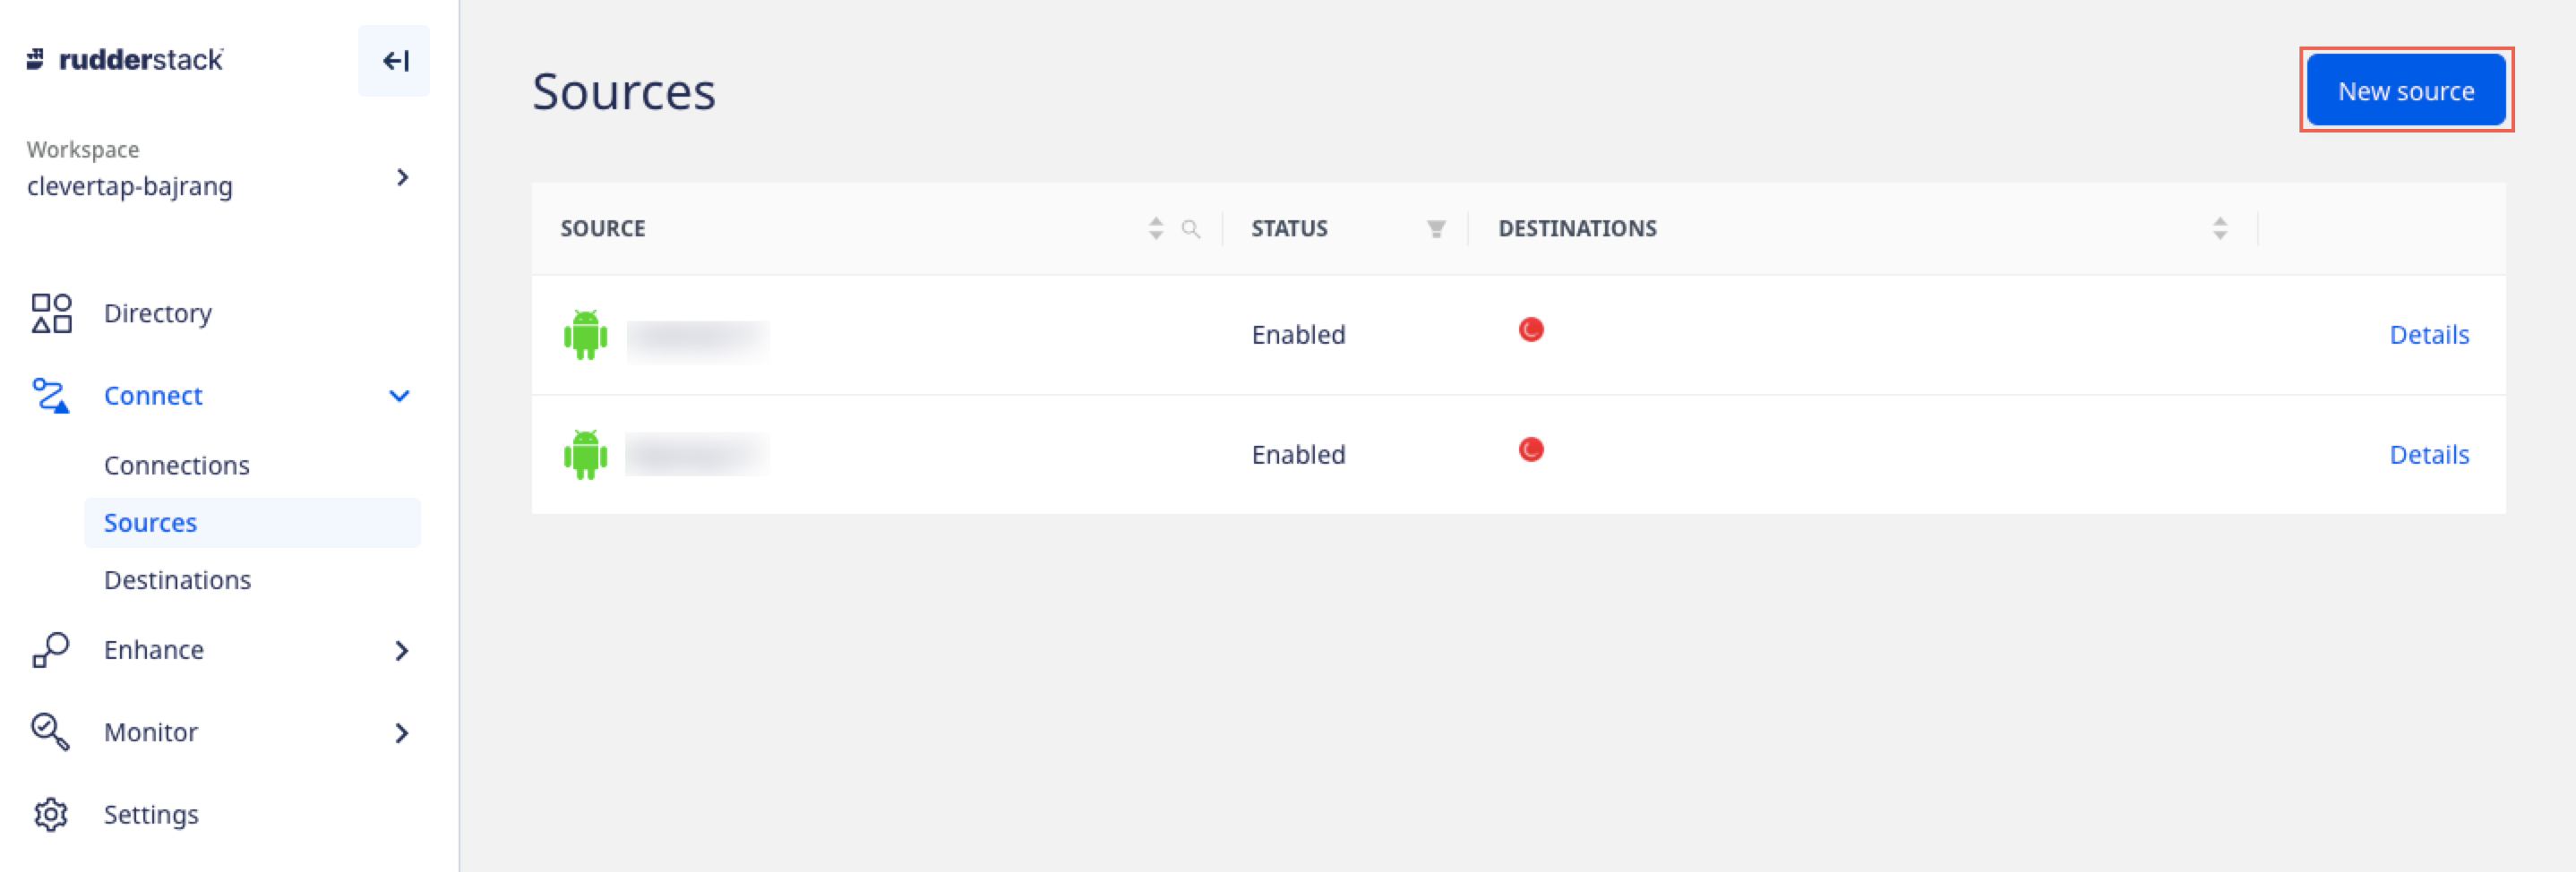
- Navigate to Connect > Sources from the RudderStack dashboard.
- Click New source to add a new source and then select Android from the list of sources.
Add New Android Source
- Enter the source name under Name this source field to identify it within your workspace and click Continue. The Write Key for this source displays, as shown in the following figure:
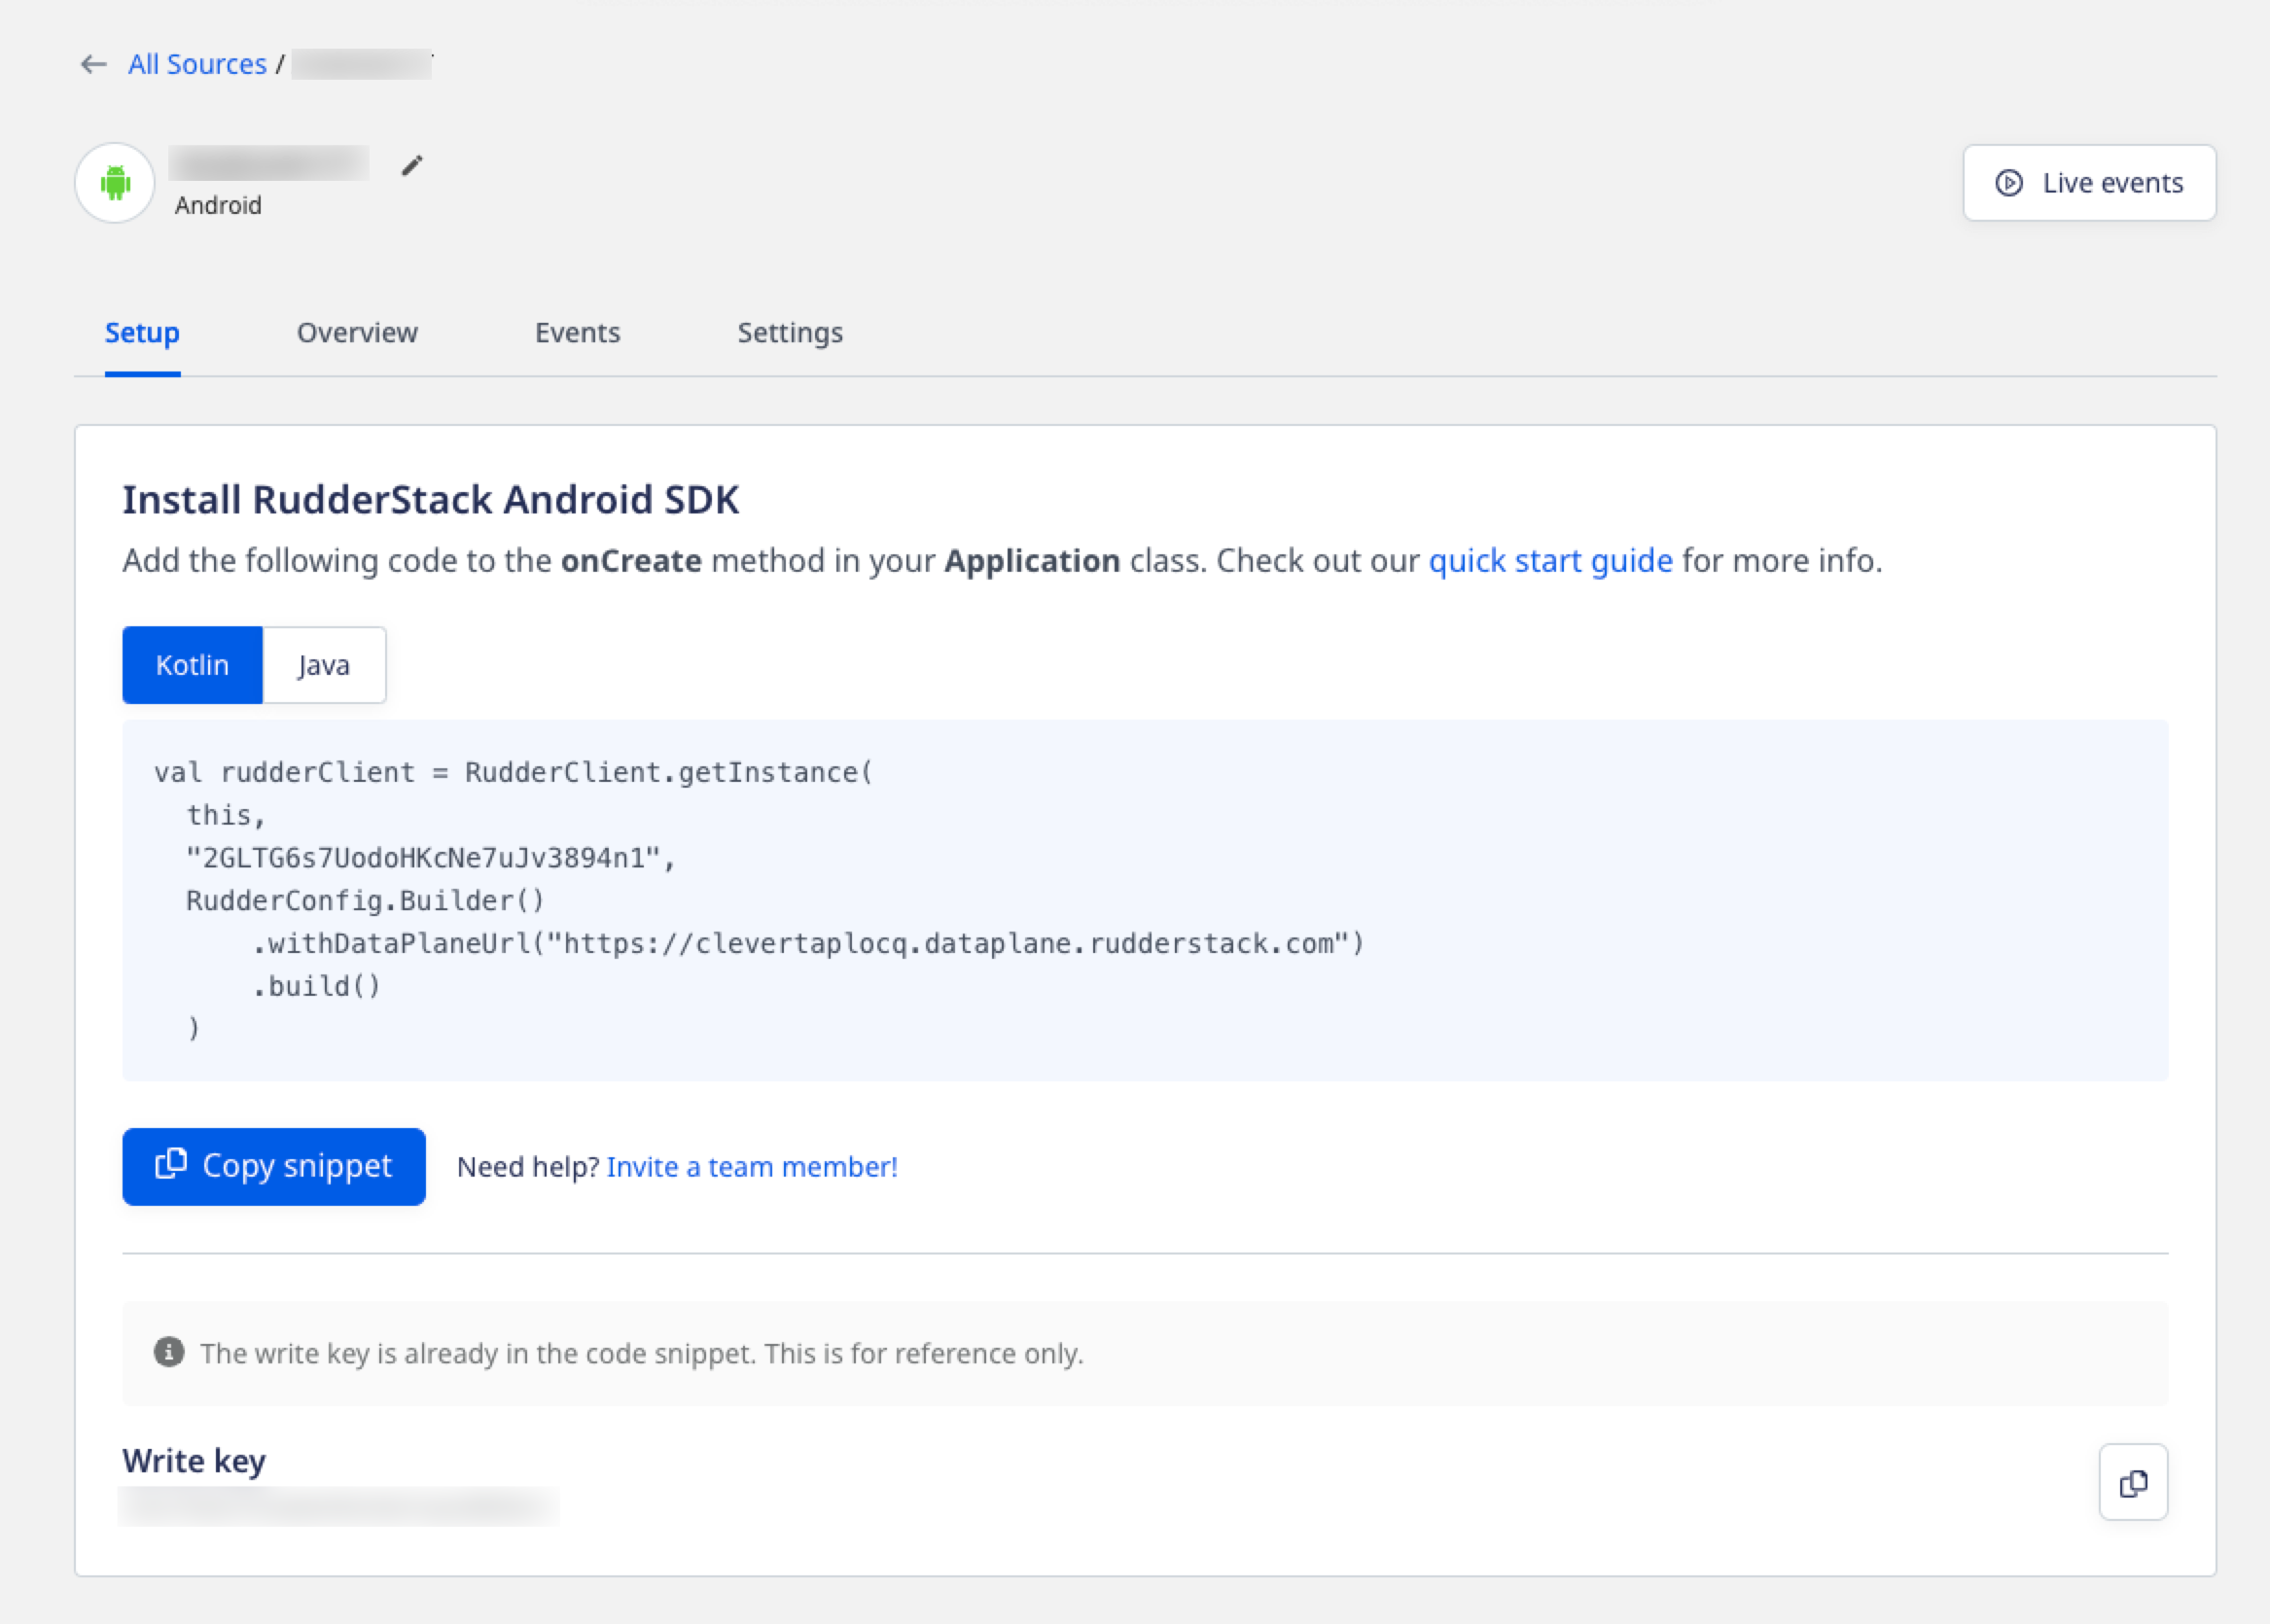
Obtain Write Key Android
- Click Add Destination and select the following options from the dropdown as per your requirement:
- Use Existing Destination: Select from the list of available destinations.
- Create new Destination: Create a new destination for your source.
- Select CleverTap from the destination list and click Continue.
- Enter the destination name under Name the destination field to identify it in your workspace and click Continue. The Connection Settings page displays.
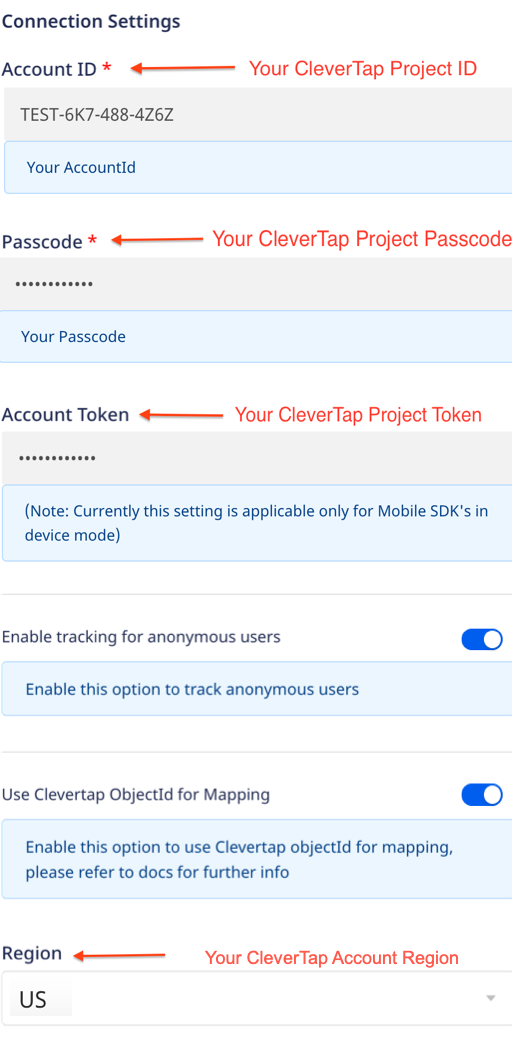
- Enter the following CleverTap details:
- Account ID: A unique ID generated for your account. It is available under Settings > Project as the Project ID.
- Passcode: A unique code generated for your account. It is available under Settings > Project as the Passcode.
- Token: A unique code generated for your account. It is available under Settings > Project as Token.
- Region: Server Only. This is the region assigned to your CleverTap account. Refer to the following table to identify it:
| CleverTap Dashboard URL | Region |
|---|---|
| https://in1.dashboard.clevertap.com/login.html#/ | India |
| https://sg1.dashboard.clevertap.com/login.html#/ | Singapore |
| https://us1.dashboard.clevertap.com/login.html#/ | US |
| https://sk1.dashboard.clevertap.com/login.html#/ | South Korea |
| https://eu1.dashboard.clevertap.com/login.html#/ | None |
| https://aps3.dashboard.clevertap.com/login.html#/ | Indonesia |
| https://mec1.dashboard.clevertap.com/login.html#/ | Middle East (UAE) |
Enter CleverTap Details
- Select the Enable tracking for anonymous user option to track anonymous users in CleverTap.
- Select the Use Clevertap ObjectId for Mapping option under React Native SDK settings section.
This option enables both CleverTapobjectIdandidentityto map events from RudderStack to CleverTap. - Click Continue. The Transformation settings page displays.
- Select No transformation needed if you do not want to customize JavaScript code functions to implement specific use cases on your event data.
Select Transformations
- Click Continue. The connection is now established between source and destination. You can check if the connection is enabled under Connect > Connections.

View the Connection
Configure CleverTap within the Application
To configure:
- Add your CleverTap Account ID and Token to your
AndroidManifest.xmlwithin the tags.
<meta-data
    android:name="CLEVERTAP_ACCOUNT_ID"
    android:value="Your CleverTap Account ID"/>
<meta-data
    android:name="CLEVERTAP_TOKEN"
android:value="Your CleverTap Account Token"/>- Add the region tag based on the region of your account. Refer to the above table listed under Set Up Source and Destination at RudderStack to identify the region of your account. Based on the region of your account, add the tag as follows:
<meta-data android:name="CLEVERTAP_REGION" android:value="in1"/><meta-data android:name="CLEVERTAP_REGION" android:value="sg1"/><meta-data android:name="CLEVERTAP_REGION" android:value="us1"/>- Register CleverTap’s ActivityLifecycleCallback methods. To do so, you can either set the
android:namein yourAndroidManifest.xmltag tocom.clevertap.android.sdk.Application. Or, if you have a custom Application class, callActivityLifecycleCallback.register(this); before super.onCreate()` in your application class.
This is important for tracking lifecycle events on CleverTap, such as App Installed and App Launched, and for the appropriate functioning of push notifications from CleverTap.
Install SDK in Native application
To install Android SDK within the application:
- Add the following lines of code to your
app/build.gradlefile:
repositories {
  mavenCentral()
}- Add the following dependencies under
dependencieswithinapp/build.gradlefile:
implementation 'com.rudderstack.android.sdk:core:1+'
implementation 'com.rudderstack.android.integration:clevertap:1+'

implementation 'com.clevertap.android:clevertap-android-sdk:4.0.0'
implementation 'com.google.android.gms:play-services-base:17.4.0'

implementation 'com.google.android.exoplayer:exoplayer:2.11.5' //Optional for Audio/Video
implementation 'com.google.android.exoplayer:exoplayer-hls:2.11.5' //Optional for Audio/Video
implementation 'com.google.android.exoplayer:exoplayer-ui:2.11.5' //Optional for Audio/Video
implementation 'com.github.bumptech.glide:glide:4.11.0' //Mandatory for App Inbox
implementation 'androidx.recyclerview:recyclerview:1.1.0' //Mandatory for App Inbox
implementation 'androidx.viewpager:viewpager:1.0.0' //Mandatory for App Inbox
implementation 'com.google.android.material:material:1.2.1' //Mandatory for App Inbox
implementation 'androidx.appcompat:appcompat:1.2.0' //Mandatory for App Inbox
implementation 'androidx.core:core:1.3.0'
implementation 'androidx.fragment:fragment:1.1.0' // InApp
//Mandatory for React Native SDK v0.3.9 and above add the following -
implementation 'com.android.installreferrer:installreferrer:2.1'
Initialize RudderStack Client
To initialize the RudderStack client:
- Import the library for the classes you desire to use in the
RudderClientlibrary.
import com.rudderstack.android.sdk.core.*;- Initialize the CleverTap-RudderStack SDK as follows:
crudderClient = RudderClient.getInstance(
                    this,
                    <YOUR_WRITE_KEY>,
                    new RudderConfig.Builder()
                            //.withDataPlaneUrl(<YOUR_DATA_PLANE_URL>)
                            .withTrackLifecycleEvents(true)
                            .withLogLevel(RudderLogger.RudderLogLevel.DEBUG)
                            .withFactory(CleverTapIntegrationFactory.FACTORY)
                            .build()
);| Parameter | Description |
|---|---|
YOUR_DATA_PLANE_URL | Navigate to Connect > Connections. page from the RudderStack dashboard to get this data plane URL. |
YOUR_WRITE_KEY | Navigate to the Connect > Source page from the RudderStack dashboard and click Details to get this information. |
trackAppLifecycleEvents | Allows you to track Rudderstack SDK to capture their Lifecycle events. |
logLevel | Allows you to check the application log when developing the application. |

Obtain Data Plane URL
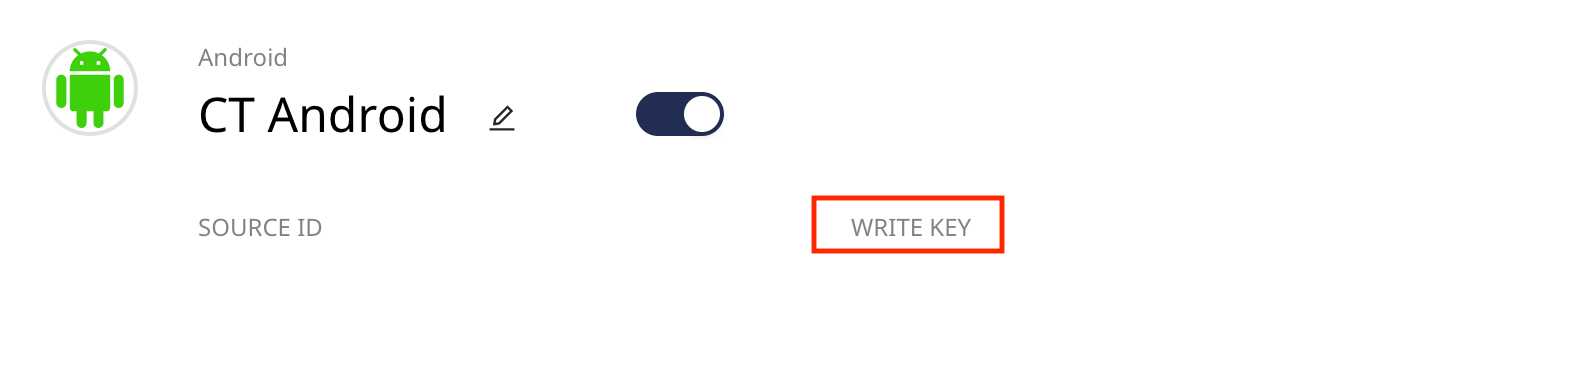
Obtain RudderStack Write Key
Push User Profiles
You can call the rudderClient.identify() method for pushing user profiles whenever you want to identify the user in your application, that is, when a user logs in or registers to your application or when you want to update any user information. After installing an app on a device, your user is assigned an "anonymous" profile. The first time when the application identifies the user on the device, the "anonymous" history on the device is associated with the newly identified user. You can call this method as follows:
RudderTraits traits = new RudderTraits();
                traits.putBirthday(new Date());
                traits.putEmail("[email protected]");
                traits.putFirstName("First");
                traits.putLastName("Last");
                traits.putGender("m");
                traits.putPhone("5555555555");
                traits.put("boolean", Boolean.TRUE);
                traits.put("integer", 50);
                traits.put("float", 120.4f);
                traits.put("long", 1234L);
                traits.put("string", "hello");
                traits.put("date", new Date(System.currentTimeMillis()));

                rudderClient.identify("test_user_id1", traits, null);
Replace userID with the unique identifier for your application. This identifier must match the identifier selected on the CleverTap dashboard. For more information, refer to RudderStack Identify.
Push Events
You can call rudderClient.track() for pushing events whenever you want to capture any user action in your application. For example, when a user adds any product, and you want to capture this event, then call this method and pass the following parameters:
- Event: For example, Product Added
- Event Properties: product id or any other property that you want to pass
For more information, refer to Rudderstack Track.
Event Property Data Types
- The value of a property can be of type Integer, Long, Double, Float, Character, String, a Boolean.
- The Date value must always be passed as $D_EPOCH value only.
Calling a push method may vary based on the type of event as follows:
- All events except the Order Completed event:
rudderClient.track(
                    "Product Added",
                    new RudderProperty()
                    .putValue("product_id", "product_001")
);- Order Completed (equivalent to the Charged event in CleverTap)
rudderClient.track("Order Completed", {
      checkout_id: "12345",
      order_id: "1234",
      affiliation: "Apple Store",
      'Payment mode': "Credit Card",
      total: 20,
      revenue: 15.0,
      shipping: 22,
      tax: 1,
      discount: 1.5,
      coupon: "Games",
      currency: "USD",
      products: [
        {
          product_id: "123",
          sku: "G-32",
          name: "Monopoly",
          price: 14,
          quantity: 1,
          category: "Games",
          url: "https://www.website.com/product/path",
          image_url: "https://www.website.com/product/path.jpg",
        },
        {
          product_id: "345",
          sku: "F-32",
          name: "UNO",
          price: 3.45,
          quantity: 2,
          category: "Games",
        },
        {
          product_id: "125",
          sku: "S-32",
          name: "Ludo",
          price: 14,
          quantity: 7,
          category: "Games",
          brand: "Ludo King"
        },
      ],
    });
For more information, see RudderStack Order Completed.
Integrate Push Notification in Android
The following are the three major steps to integrating push notifications into Android:
Add Dependency
To add a dependency:
- Get the
google-services.jsonfile from the Firebase Cloud Messaging (FCM) console and place it into your project under theandroid/appfolder. To get thegoogle-service.jsonfile, follow the steps listed under Setup Firebase Console.. - In your root-level (project-level) Gradle file (
build.gradle), add rules to include the Google Services Gradle plugin. - Ensure that you have Google's Maven repository, as well.
buildscript {

  repositories {
    // Check that you have the following line (if not, add it):
    google()  // Google's Maven repository
  }

  dependencies {
    // ...

    // Add the following line:
    classpath 'com.google.gms:google-services:4.3.5'  // Google Services plugin
  }
}

allprojects {
  // ...

  repositories {
    // Check that you have the following line (if not, add it):
    google()  // Google's Maven repository
    // ...
  }
}- Navigate to your
Android/Appfolder and add the following dependency to yourapp/build.gradlefile:
dependencies {
implementation 'com.google.firebase:firebase-messaging:20.2.4'
}
apply plugin: "com.google.gms.google-services"- Add the following service in your
AndroidManifest.xmlfile :
<service
    android:name="com.clevertap.android.sdk.pushnotification.fcm.FcmMessageListenerService"
android:exported="true">
    <intent-filter>
        <action android:name="com.google.firebase.MESSAGING_EVENT"/>
    </intent-filter>
</service>- Navigate to Settings > Channels > Mobile Push > Android from the CleverTap dashboard.
- Set up the FCM credentials.
Set Up Notification Channel Id
Android has modified the way push notifications can be sent to an app in its Oreo version and above. Starting with CleverTap SDK 3.1.7, we support Android Oreo's latest features, such as Notification Channels and Notification Badges. To create a Notification Channel Id, use the following code:
CleverTap.createNotificationChannel("CleverTapChannelId","CleverTap","This is a test channel",5,true);The following table provides an explanation for the parameter values used in the above code:
| Parameter/Parameter Value | Description |
|---|---|
CleverTapChannelId | Replace this with your Notification Channel Id. Marketers must use this Channel Id while creating the Push Notification campaigns in CleverTap. |
CleverTap | Replace this with the display name of the Notification Channel under the Application Settings > Notifications. |
This is a test channel | Replace this with the description of your Notification Channel. |
5 | Denotes the priority for rendering notifications on the user's device. Priority 5 is the highest priority. |
true | A flag for showing a badge on the user's device. |
For more information, refer to Push Notifications for Android O.
Custom Handle Android Notification
The following are steps for custom handling your Android notifications:
- Add the following code within the
MyFcmMessageListenerService.Javafile if you choose to use your customFCMMessageListenerServiceasMyFcmMessageListenerService:
package com.clevertaprudderstack; //Replace this with your Package Name

import com.google.firebase.messaging.RemoteMessage;
import com.clevertap.android.sdk.CleverTapAPI;
import android.os.Bundle;
import android.util.Log;
import java.util.Map;
import com.clevertap.android.sdk.pushnotification.NotificationInfo;

public class MyFcmMessageListenerService extends FirebaseMessagingService {

    @Override
    public void onMessageReceived(RemoteMessage message){
        try {
            if (message.getData().size() > 0) {
                Bundle extras = new Bundle();
                for (Map.Entry<String, String> entry : message.getData().entrySet()) {
                    extras.putString(entry.getKey(), entry.getValue());
                }

                NotificationInfo info = CleverTapAPI.getNotificationInfo(extras);

                if (info.fromCleverTap) {
                    CleverTapAPI.createNotification(getApplicationContext(), extras);
                } else {
                    // not from CleverTap handle yourself or pass to another provider
                }
            }
        } catch (Throwable t) {
           Log.d("MYFCMLIST", "Error parsing FCM message", t);
        }
    }
}- Add the following code to your Android manifest file:
<service android:name=".MyFirebaseMessagingService">
  <intent-filter>
     <action android:name="com.google.firebase.MESSAGING_EVENT"/>
  </intent-filter>
</service>- Additionally, add the code to push the FCM token to CleverTap:
String fcmRegId = FirebaseInstanceId.getInstance().getToken();
clevertapDefaultInstance.pushFcmRegistrationId(fcmRegId,true);
For more information, refer to Handling custom push notifications in Android.
Advanced Features
Debugging
- To view CleverTap debug logs, you need Android Studio.
- Enable debug logs by adding the following line of code in your app's build:
CleverTapAPI.setDebugLevel(CleverTapAPI.LogLevel.DEBUG); - After running the application, navigate to Android Studio > Logcat and search by CleverTap*. The printed logs display all information associated with CleverTap. You can use this log to identify your CleverTap ID, check the events and user information that are getting pushed to CleverTap, etc.
The following is a sample screenshot of the Logcat in your Android Studio:
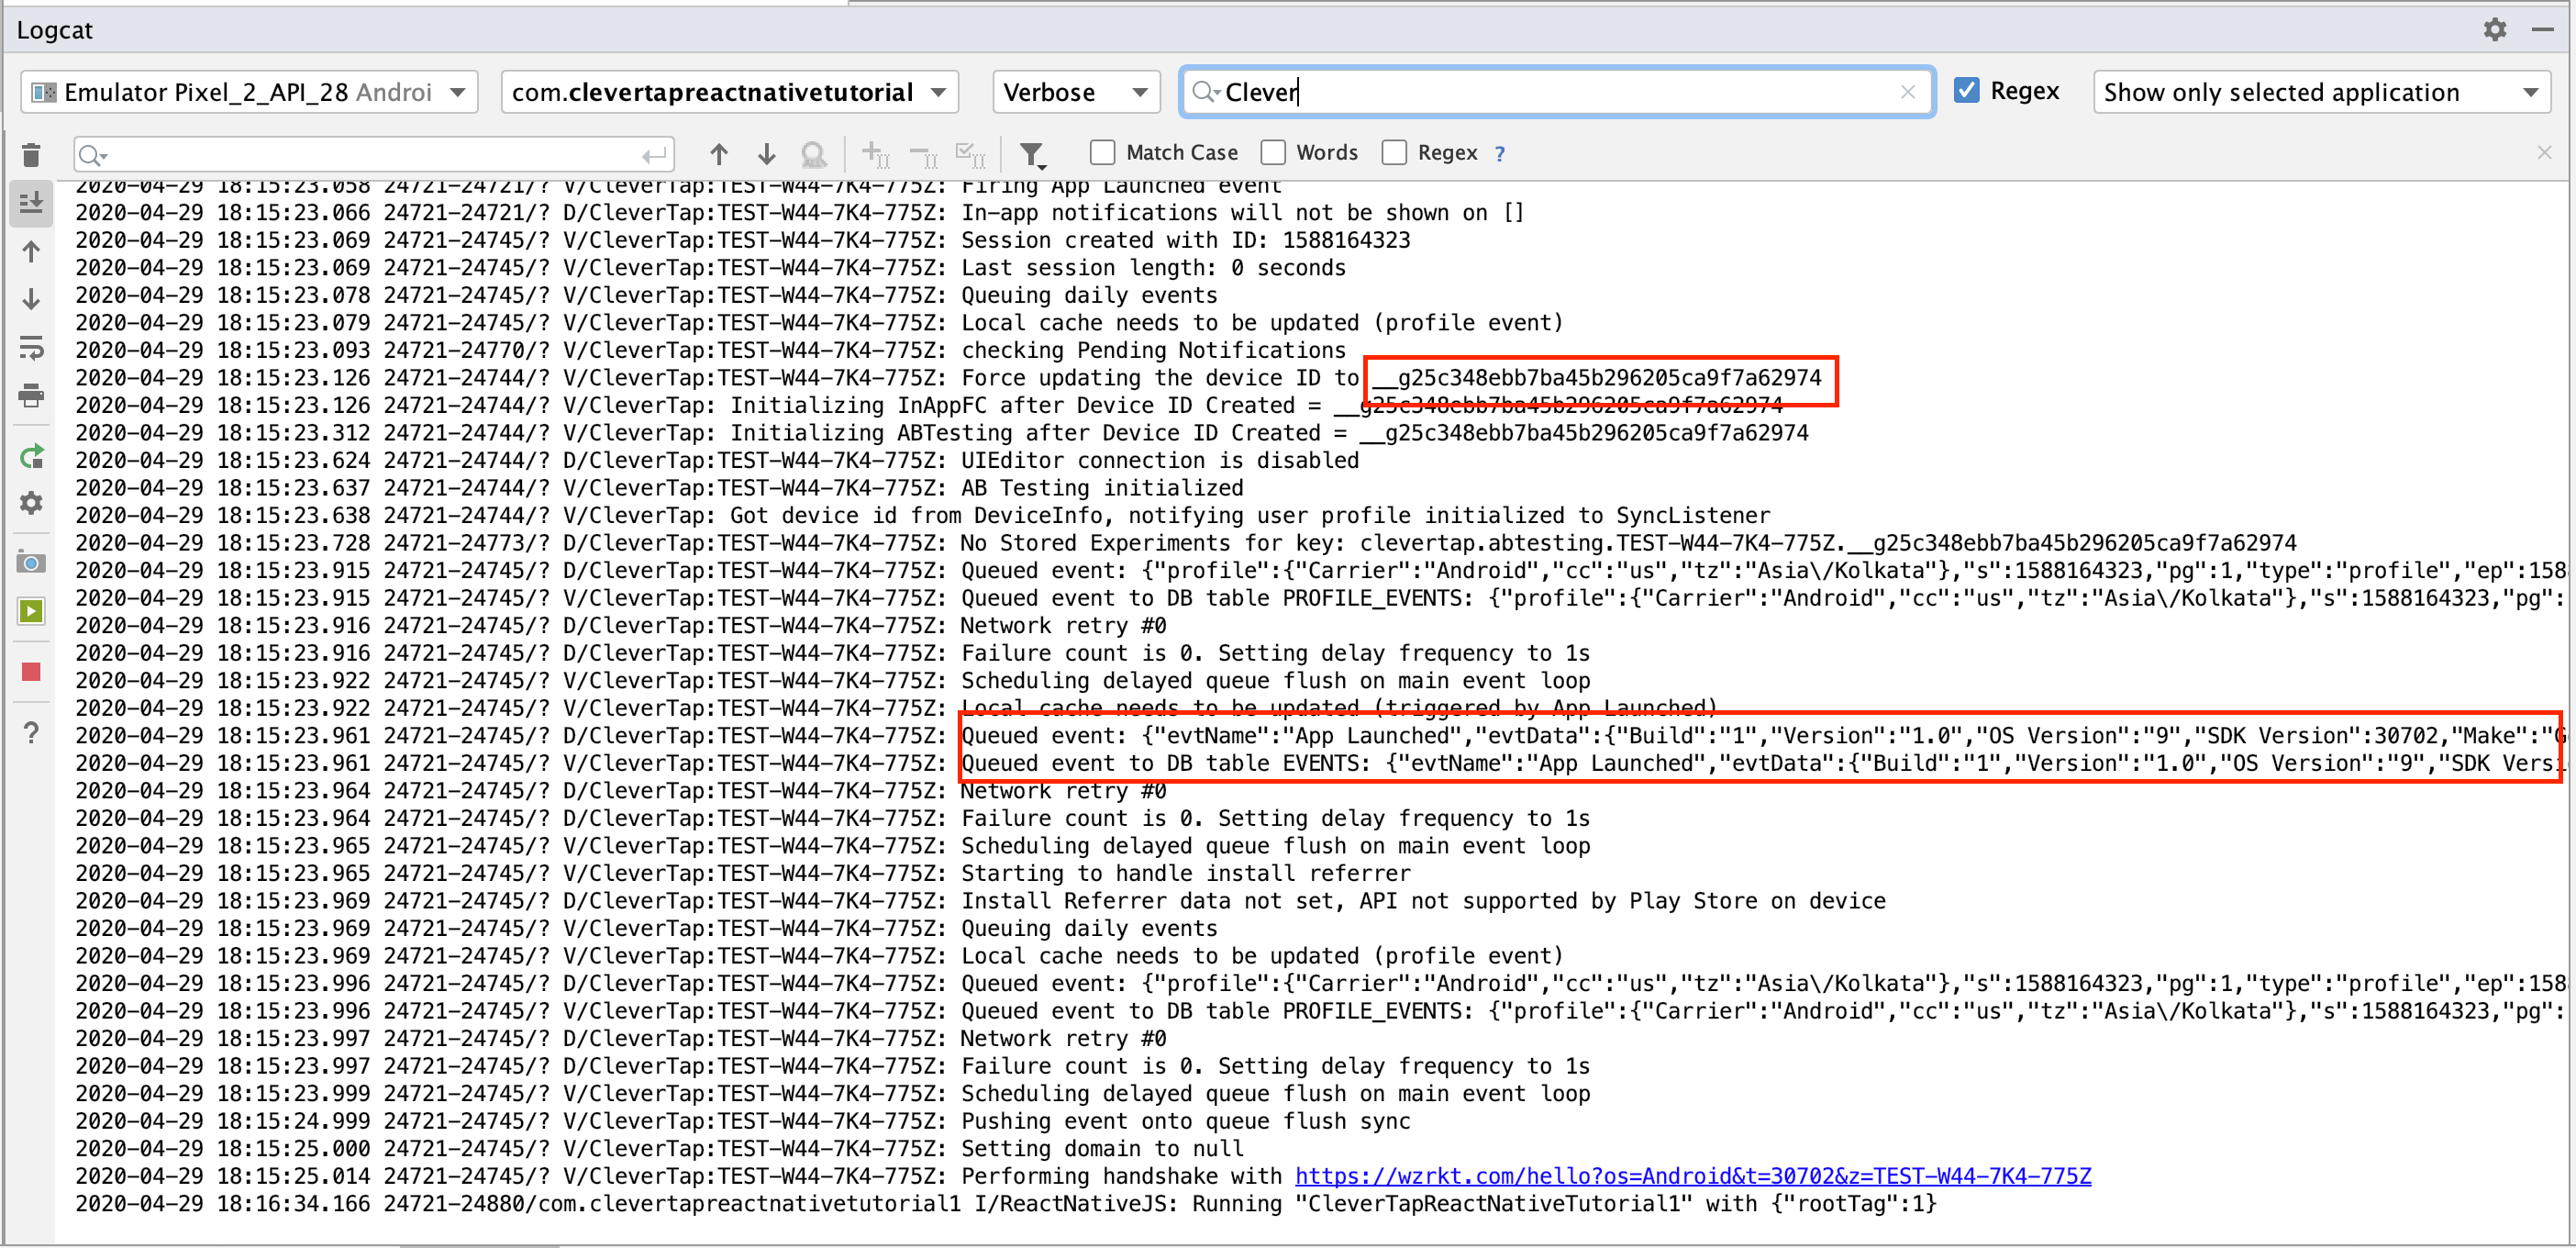
Logcat in Android Studio
For more information, refer to Debugging in Android.
Updated 7 days ago