Android O Updates
Overview
Android has modified sending push notifications to an app on the Oreo version. Starting with CleverTap SDK v3.1.7, we support Android Oreo's latest features like Notification Channels and Notification Badges.
Prerequisites
As Notification channels and badges are the features of the latest Android version, you must update your SDK and Build Tools to the latest versions. Ensure that in your build.gradle file, the compileSdkVersion is 26 (or above) and buildToolsVersion is 26.0.1 (or above).
android {
   compileSdkVersion 26
   buildToolsVersion "26.0.1"
}
Create Notification Channels
Once the CleverTap Android SDK is integrated successfully, You can create stand-alone notification channels in your app by using the following line of code.
CleverTapAPI.createNotificationChannel(getApplicationContext(),"YourChannelId","Your Channel Name","Your Channel Description",NotificationManager.IMPORTANCE_MAX,true);

// Creating a Notification Channel With Sound Support
CleverTapAPI.createNotificationChannel(getApplicationContext(),"got","Game of Thrones","Game Of Thrones",NotificationManager.IMPORTANCE_MAX,true,"gameofthrones.mp3");

// How to add a sound file to your app : https://developer.clevertap.com/docs/add-a-sound-file-to-your-android-app
CleverTapAPI.createNotificationChannel(getApplicationContext(),"YourChannelId","Your Channel Name","Your Channel Description",NotificationManager.IMPORTANCE_MAX,true)
// Creating a Notification Channel With Sound Support
CleverTapAPI.createNotificationChannel(getApplicationContext(),"got","Game of Thrones","Game Of Thrones",NotificationManager.IMPORTANCE_MAX,true,"gameofthrones.mp3")
// How to add a sound file to your app : https://developer.clevertap.com/docs/add-a-sound-file-to-your-android-appNotification Channel Importance Levels
The notification channel's importance levels allow you to customize app notifications based on user preferences. The following are the different levels and their usage:
| Notification Channel Importance | Description |
|---|---|
| IMPORTANCE_MIN or 1 | Minimum notification importance. It only shows in the shade, below the fold in the Notification Drawer. |
| IMPORTANCE_LOW or 2 | Low notification importance. It shows in the shade and potentially in the status bar. |
| IMPORTANCE_DEFAULT or 3 | Default notification importance. It shows everywhere and makes noise but does not visually intrude. |
| IMPORTANCE_HIGH or 4 | Higher notification importance. It shows everywhere, makes noise, and peeks. |
| IMPORTANCE_MAX or 5 | Deprecated in Android 8.0. Use IMPORTANCE_HIGH or 4 |
Create Notification Channel Groups
Additionally, you can also create a notification channel group. Notification channel groups allow you to manage multiple notification channels with identical names within a single app, which is helpful if your app supports multiple accounts. You can create a notification group using the following line of code:
CleverTapAPI.createNotificationChannelGroup(getApplicationContext(),"YourGroupId","YourGroupName");CleverTapAPI.createNotificationChannelGroup(getApplicationContext(), "YourGroupId", "YourGroupName")Once you have created a notification channel group, you can use the group ID to create notification channels for that specific group. You can create a notification channel specifying the group id using the following line of code.
CleverTapAPI.createNotificationChannel(getApplicationContext(),"YourChannelId","YourChannelName","YourChannelDescription",NotificationManager.IMPORTANCE_MAX,"YourGroupId",true);CleverTapAPI.createNotificationChannel(getApplicationContext(), "YourChannelId", "YourChannelName", "YourChannelDescription", NotificationManager.IMPORTANCE_MAX, "YourGroupId", true)You can create more than one channel using the above lines of code. Just make sure that the channel ID differs in every Notification Channel. Also, this Channel ID will be used to send Push Notifications using the CleverTap dashboard.
Delete Notification Channels
You can delete the notification channels created previously in your app. There is no error thrown when you try to delete a notification channel that doesn't exist. You can delete the notification channels using the following line of code.
CleverTapAPI.deleteNotificationChannel(getApplicationContext(),"YourChannelId");CleverTapAPI.deleteNotificationChannel(getApplicationContext(),"YourChannelId")Delete Notification Groups
CleverTap SDK also allows you to remove the notification groups you have created previously. Note that you will need to delete all the channels associated with a group before deleting a group. You can delete a notification group using the following line of code:
CleverTapAPI.deleteNotificationChannelGroup(getApplicationContext(),"YourGroupId");CleverTapAPI.deleteNotificationChannelGroup(getApplicationContext(),"YourGroupId")Send Notifications via Dashboard
To send Push Notifications, login to the CleverTap Dashboard and perform the following steps:
- Go to Messages > Campaigns from the left navigation.
- Click + Campaign and select Mobile Push.
- Set up your Push Notification campaign by defining when you want to send out your notification, who you want to send it out to (in this case, it will be Android users), and what kind of push notification you want to send.
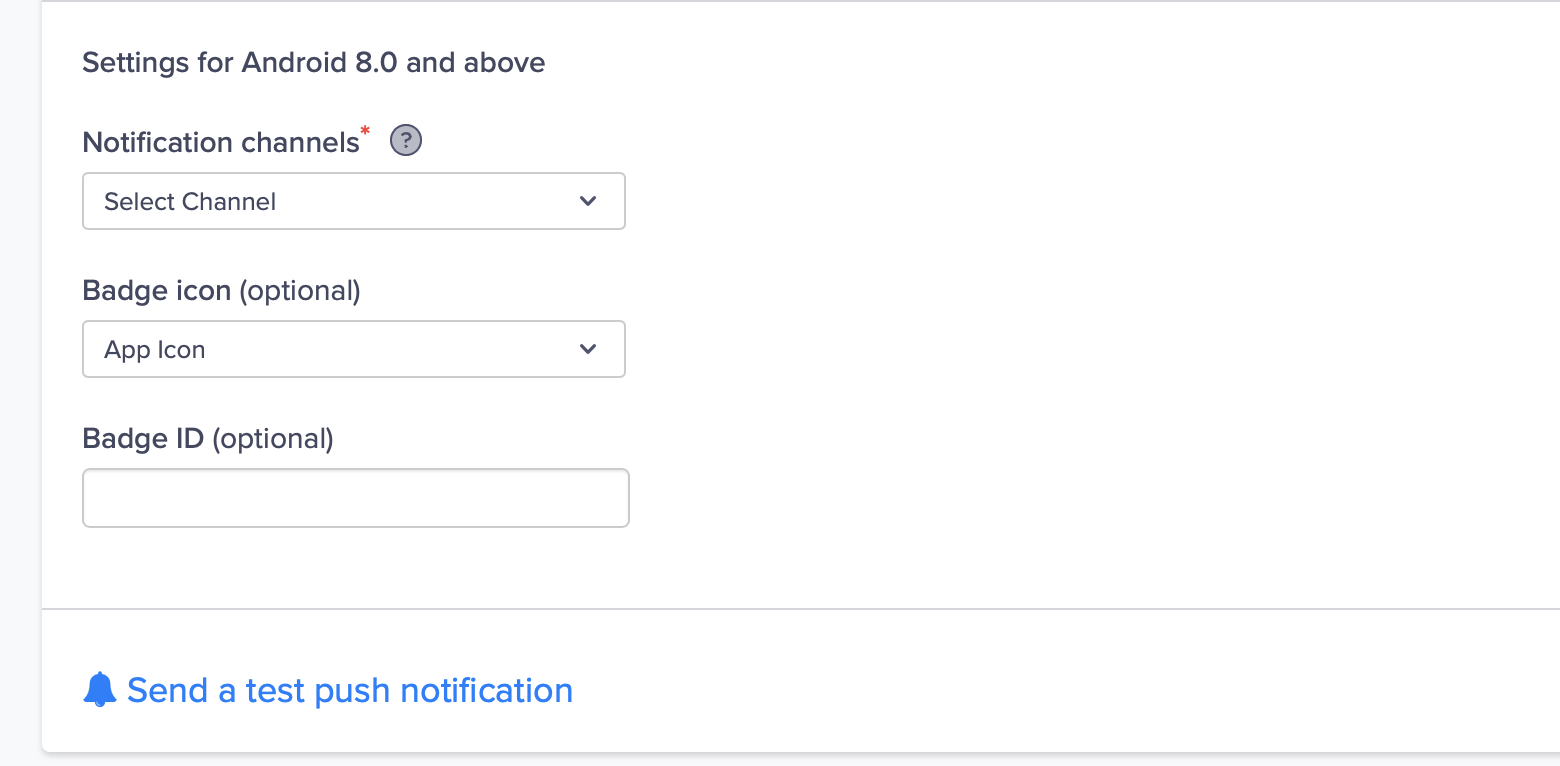
- Under the What section, select the Single Message option and then select Send Message to Android O.
- Fill in the Channel with the channel ID you used to create the notification channel in your app. This field is mandatory, as Android O requires a valid channel to send notifications. The Badge Icon can be set as the app icon or a small icon to denote push notifications. The default is the app icon. The Badge ID is the number you want to set the Notification Badge with. By default, it auto-increments. Both Badge Icon and Badge ID are optional.

Settings for Android 8.0 and Above
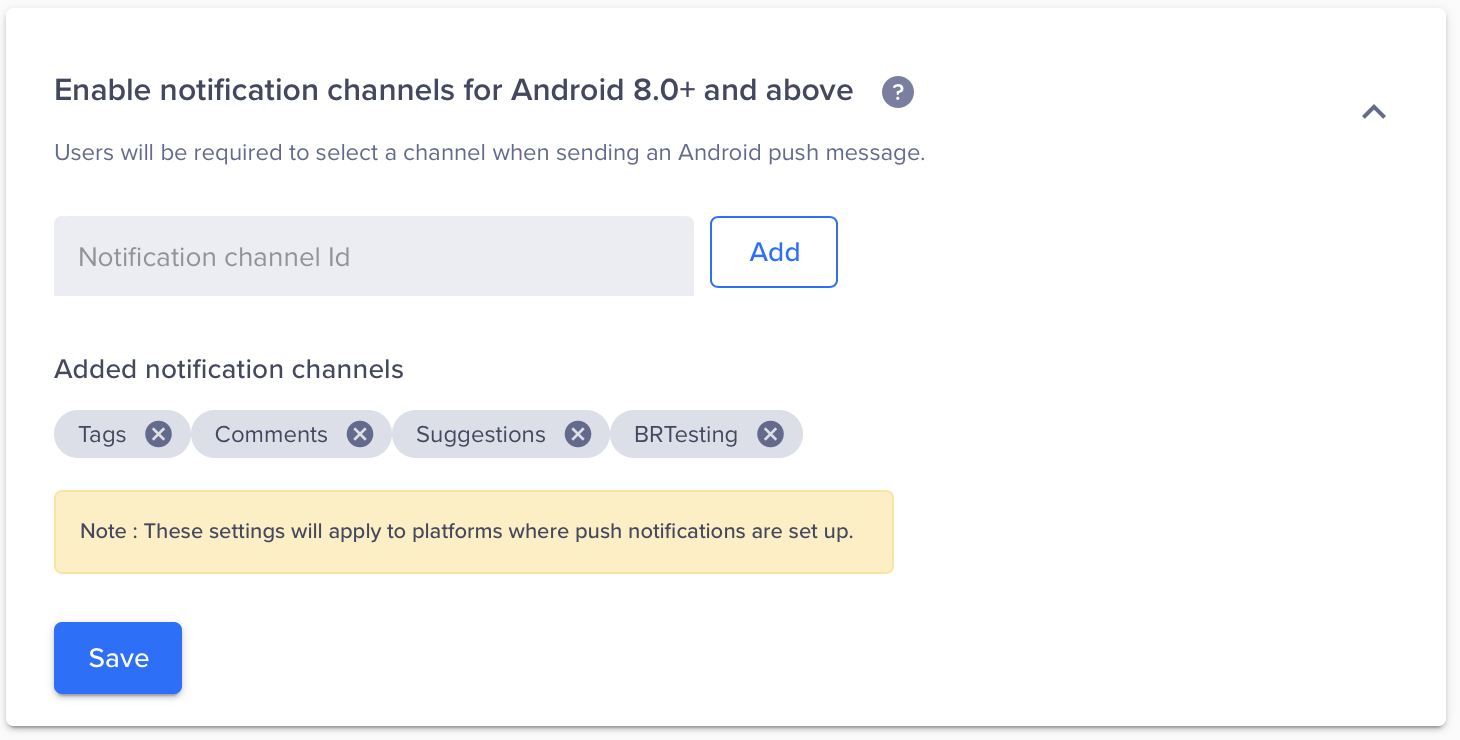
Save a Channel ID
You can choose a Notification channel Id as optional or mandatory for creating a campaign. Select Add notification channels for Android 8.0 and above option. It is available from Settings > Channel > Mobile Push. You can create a selection list of channel IDs for your messages.

Save the Notification Settings
Add a Custom Notification Icon
If your app targets devices with Android version Lollipop and above, you can set up a custom notification icon for your notifications. For more information, refer to Set the Small Icon Notification.
Default Notification Channel
Starting from core v5.1.0we have introduced a new feature that allows developers to define a
default notification channel for their app. This feature provides flexibility in handling push
notifications.
NotePlease note that this is only supported for CleverTap core notifications. Support for
push templates will be released soon.
To specify the default notification channel ID, you can add the following metadata to your app's
manifest file:
<meta-data
    android:name="CLEVERTAP_DEFAULT_CHANNEL_ID"
    android:value="your_default_channel_id" />
By including this metadata, you can define a specific notification channel that CleverTap will use
if the channel provided in the push payload is not registered by your app. This ensures that push
notifications are displayed consistently even if the app's notification channels are not set up.
In case the SDK does not find the default channel ID specified in the manifest, it will
automatically fall back to using a default channel called Miscellaneous. It ensures that push
notifications are still delivered, even if no specific default channel is specified in the manifest.
This enhancement provides developers with greater control over the default notification channel used
by CleverTap for push notifications, ensuring a seamless and customizable user experience.
Updated 2 months ago
