Android Quick Start Guide
Learn how to integrate and start using the CleverTap Android SDK.
Overview
This section shows how to install the CleverTap SDK, track your first user event, and see this information within the CleverTap dashboard in less than ten minutes. CleverTap provides an Android SDK that enables app developers to track, segment, and engage their users.
Install SDK
To use the CleverTap Android SDK, you have two options. You can install it automatically using Gradle in Android Studio or manually by including the SDK source code in your Android Studio project.
Note
When minifying is enabled for Gradle wrapper 8.0+ and Android Gradle plugin 8.0.0+, R8 reports missing classes as errors (previously reported as warnings) and the build fails.
- Upgrade to
com.clevertap.android:clevertap-android-sdk v6.1.1andcom.clevertap.android:clevertap-hms-sdk v1.3.4to fix this issue.- This occurs due to change in behaviour in the Android Gradle Plugin (AGP). When R8 traces the program, it tries to handle all the classes, methods and fields that it finds in the part of the program it considers live. Earlier during this tracing, it returned a warning that allowed building the APK. But these are now converted into errors.
For more information, refer to the Android Gradle Plugin 8.0.0 document.
- For developers that have BACKGROUND_SYNC (Android Pull Notification) enabled in their older apps and are now upgrading to CleverTap Android SDK v6.1.1, please add the below code snippet to your
AndroidManifest.xmlto avoidClassNotFoundExceptionerror.< service android: name = "com.clevertap.android.sdk.pushnotification.amp.CTBackgroundJobService" android: exported = "false" android: enabled = "false" tools: ignore = "MissingClass" / >
Option A: Install using Android Studio and Gradle (Recommended)
-
For FCM, add the dependencies below in your application's
build.gradlefile. You will also have to add the FCM-generatedgoogle-services.jsonfile to your project. -
Add the following configuration to your gradle properties file.
dependencies {
    implementation 'androidx.core:core:1.13.0'

    implementation 'com.clevertap.android:clevertap-android-sdk:7.8.0' // checkout the latest sdk version at https://github.com/CleverTap/clevertap-android-sdk/blob/master/README.md#-installation
    implementation 'com.google.firebase:firebase-messaging:24.0.0'
}

// at the end of the build.gradle file
apply plugin: 'com.google.gms.google-services'- Once you have updated your
build.gradlefile, sync your project by clicking on Sync Project with Gradle Files button.
Option B: Manual Install
For a manual install, follow these steps:
- Download the latest SDK's AAR file from the Releases section
- Copy the AAR file to your projects'
app/libsdirectory. - Add the following line in your module's
build.gradle:
dependencies {
    implementation fileTree(include: ['*.jar', '*.aar'], dir: 'libs')

    implementation 'androidx.core:core:1.13.0'
}

// at the end of the build.gradle file
apply plugin: 'com.google.gms.google-services'
Add Your CleverTap Credentials in the AndroidManifest.xml File
AndroidManifest.xml FileTo associate your Android app with your CleverTap account, you must add your CleverTap credentials to your application's AndroidManifest.xml file.
-
Navigate to the
AndroidManifest.xmlfile in your project navigator. -
Add your CleverTap Account ID and Token to
AndroidManifest.xmlwithin the<application></application>tags.
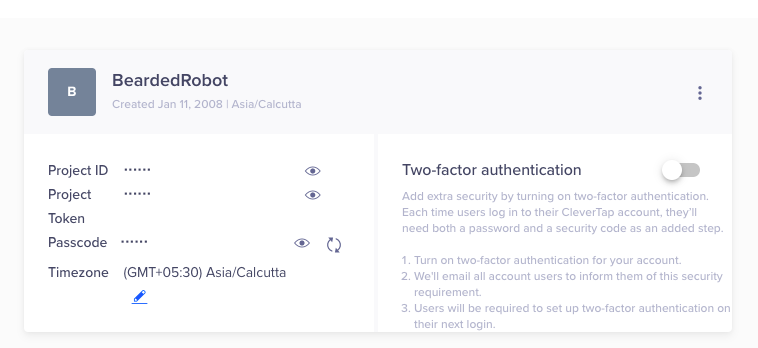
Credentials and AccessThe CleverTap Account ID and CleverTap Token are available as Project ID and Project Token, respectively, on the CleverTap dashboard. You can find these details by navigating to Settings > Projects from the dashboard.
Member and Creator roles in the project do not have access to view the Passcode and Project Token of the account on the dashboard.
<meta-data
    android:name="CLEVERTAP_ACCOUNT_ID"
    android:value="Your CleverTap Account ID"/>
<meta-data
    android:name="CLEVERTAP_TOKEN"
    android:value="Your CleverTap Account Token"/>
<!-- IMPORTANT: To force use Google AD ID to uniquely identify  users, use the following meta tag. GDPR mandates that if you are using this tag, there is prominent disclousure to your end customer in their application. Read more about GDPR here - https://clevertap.com/blog/in-preparation-of-gdpr-compliance/ -->
<meta-data
    android:name="CLEVERTAP_USE_GOOGLE_AD_ID"
    android:value="1"/>
Key Points to Remember When Using Google AD ID to Uniquely Identify Users
GDPR mandates that if you use Google AD ID to identify users uniquely, there should be prominent disclosure in your application that explains this to your end customer. For more information, refer to the GDPR article.
If you still want to use Google AD ID to generate a user's identity to identify users across re-installs, add the meta tag that forces the use of the Google AD ID to generate an identity in CleverTap.
You must also integrate the Google Ads SDK to ensure that the CleverTap Android SDK picks up the Google Ad ID to generate the user's identity. To integrate the Google Ads SDK, refer to Mobile Ads SDK Integration
Declare the following permission when using Google Ad ID for apps targeting Android 13 and above:
<uses-permission android:name="com.google.android.gms.permission.AD_ID"/>.
- Insert the Account ID (Project ID) and Account Token values from your CleverTap account. You can obtain this information by navigating to the Settings > Project page from the CleverTap dashboard.

CleverTap Account Credentials
Add Region Code
To know how to add region code in Android SDK, refer to Region Codes.
Initialize the CleverTap SDK
Option A: Custom Application Class
If you have an already registered custom application class, call ActivityLifecycleCallback.register(this); before super.onCreate() in your class.
Option B: No Application Class
You can add CleverTap's class as your application class to capture system events correctly.
- In your AndroidManifest.xml file, add the following snippet within the
tags.
<application
    android:label="@string/app_name"
    android:icon="@drawable/ic_launcher"
    android:name="com.clevertap.android.sdk.Application">
Initialize the CleverTap SDK
Enable Tracking by Adding Permissions
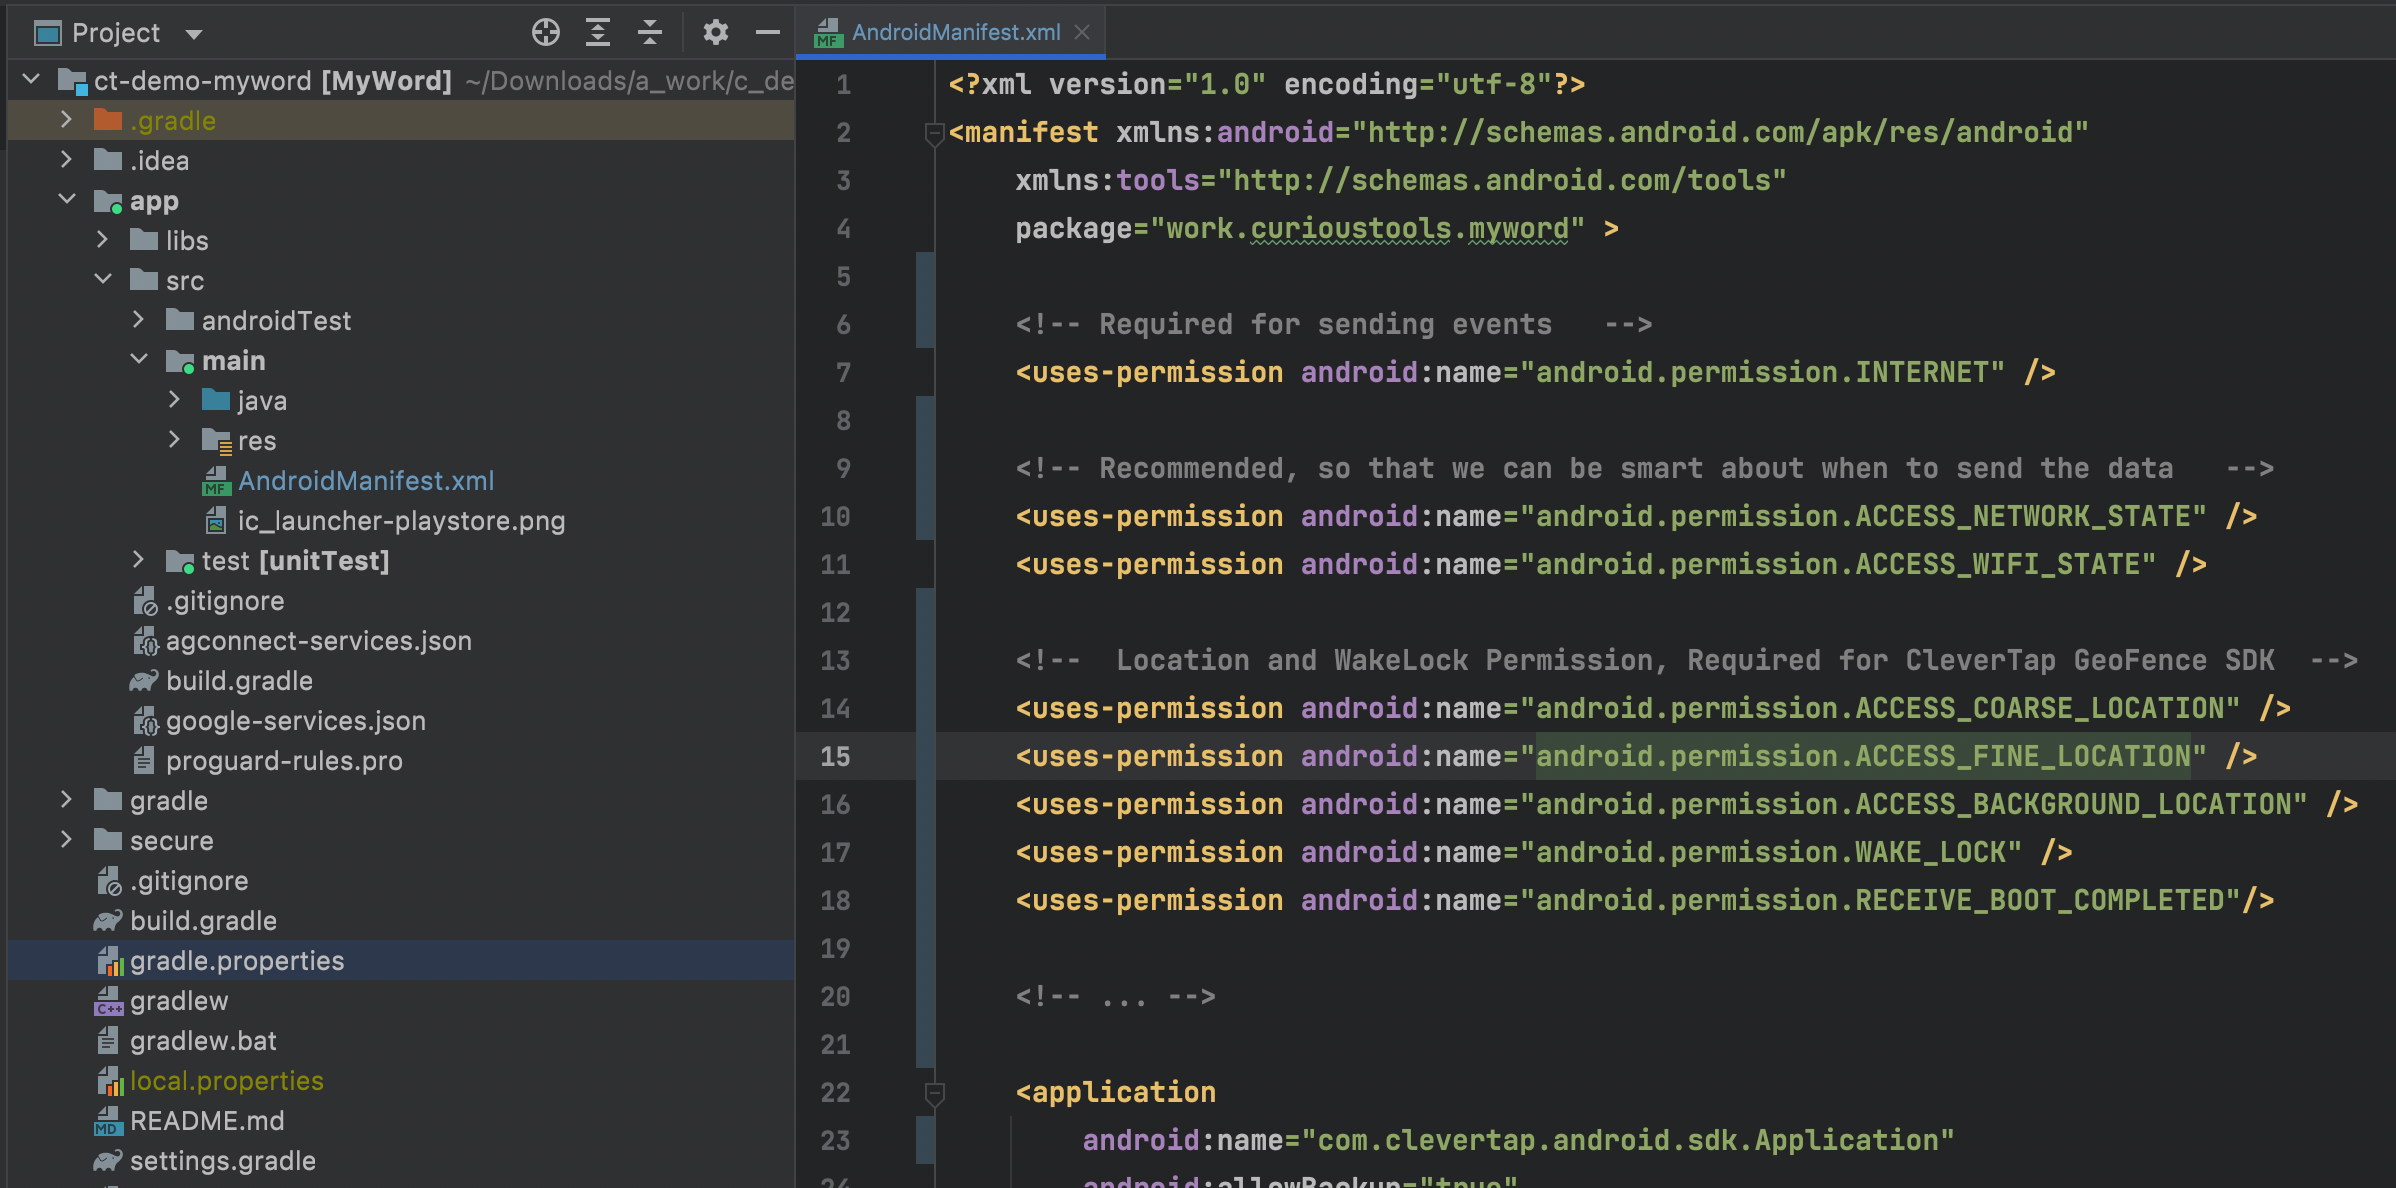
Add the snippet below in the AndroidManifest.xml file so that the CleverTap SDK can access the internet.
<!-- Required to allow the app to send events and user profile information -->
<uses-permission android:name="android.permission.INTERNET"/>
<!-- Recommended so that CleverTap knows when to attempt a network call -->
<uses-permission android:name="android.permission.ACCESS_NETWORK_STATE"/>
Enable Tracking by Adding Permissions
Access CleverTap Instance
Include the code below in the onCreate() method of your app's main activity. This code initialises the CleverTap SDK.
CleverTapAPI clevertapDefaultInstance = CleverTapAPI.getDefaultInstance(getApplicationContext());var cleverTapDefaultInstance: CleverTapAPI? = null
cleverTapDefaultInstance = CleverTapAPI.getDefaultInstance(applicationContext)Verify Integration
To check if the integration was performed correctly, you can run the application.
After the application is launched on the emulator or Android device, navigate to your CleverTap dashboard > Boards > Mobile App. You will see a new active user if you successfully integrated the CleverTap SDK.

View Active Users on the Dashboard
Identify Users
A user profile is automatically created in CleverTap for each user launching your application.
Initially, the user profile starts as anonymous, which means the profile does not contain any identifiable information about the user. You can enrich the profile with pre-defined attributes from the CleverTap data model, such as name and email. You can also add custom attributes that you define to extend the CleverTap data model.
Sending user profile information to CleverTap using our Android SDK requires two steps:
- You have to build a HashMap with the profile properties.
- You have to call the SDK's
OnUserLoginmethod and pass the HashMap you created as a parameter.
// each of the below mentioned fields are optional
HashMap<String, Object> profileUpdate = new HashMap<String, Object>();
profileUpdate.put("Name", "Jack Montana");    // String
profileUpdate.put("Identity", 61026032);      // String or number
profileUpdate.put("Email", "[email protected]"); // Email address of the user
profileUpdate.put("Phone", "+14155551234");   // Phone (with the country code, starting with +)
profileUpdate.put("Gender", "M");             // Can be either M or F
profileUpdate.put("DOB", new Date());         // Date of Birth. Set the Date object to the appropriate value first
// optional fields. controls whether the user will be sent email, push etc.
profileUpdate.put("MSG-email", false);        // Disable email notifications
profileUpdate.put("MSG-push", true);          // Enable push notifications
profileUpdate.put("MSG-sms", false);          // Disable SMS notifications
profileUpdate.put("MSG-whatsapp", true);      // Enable WhatsApp notifications
ArrayList<String> stuff = new ArrayList<String>();
stuff.add("bag");
stuff.add("shoes");
profileUpdate.put("MyStuff", stuff);                        //ArrayList of Strings
String[] otherStuff = {"Jeans","Perfume"};
profileUpdate.put("MyStuff", otherStuff);                   //String Array

clevertapDefaultInstance.onUserLogin(profileUpdate);
// each of the below mentioned fields are optional
val profileUpdate = HashMap<String, Any>()
profileUpdate["Name"] = "Jack Montana" // String
profileUpdate["Identity"] = 61026032 // String or number
profileUpdate["Email"] = "[email protected]" // Email address of the user
profileUpdate["Phone"] = "+14155551234" // Phone (with the country code, starting with +)
profileUpdate["Gender"] = "M" // Can be either M or F
profileUpdate["DOB"] = Date() // Date of Birth. Set the Date object to the appropriate value first
// optional fields. controls whether the user will be sent email, push etc.
// optional fields. controls whether the user will be sent email, push etc.
profileUpdate["MSG-email"] = false // Disable email notifications
profileUpdate["MSG-push"] = true // Enable push notifications
profileUpdate["MSG-sms"] = false // Disable SMS notifications
profileUpdate["MSG-whatsapp"] = true // Enable WhatsApp notifications
val stuff = ArrayList<String>()
stuff.add("bag")
stuff.add("shoes")
profileUpdate["MyStuff"] = stuff //ArrayList of Strings
val otherStuff = arrayOf("Jeans", "Perfume")
profileUpdate["MyStuff"] = otherStuff //String Array
CleverTapAPI.getDefaultInstance(applicationContext)?.onUserLogin(profileUpdate)When the OnUserLogin method is called, the user profile information will be sent to CleverTap.
To see how this information displays within the CleverTap dashboard, perform the following:
- Navigate to Segments > Find People.
- In the By Identity box, enter the email you set on the user profile record, then click the Find button.

Find People on CleverTap Dashboard
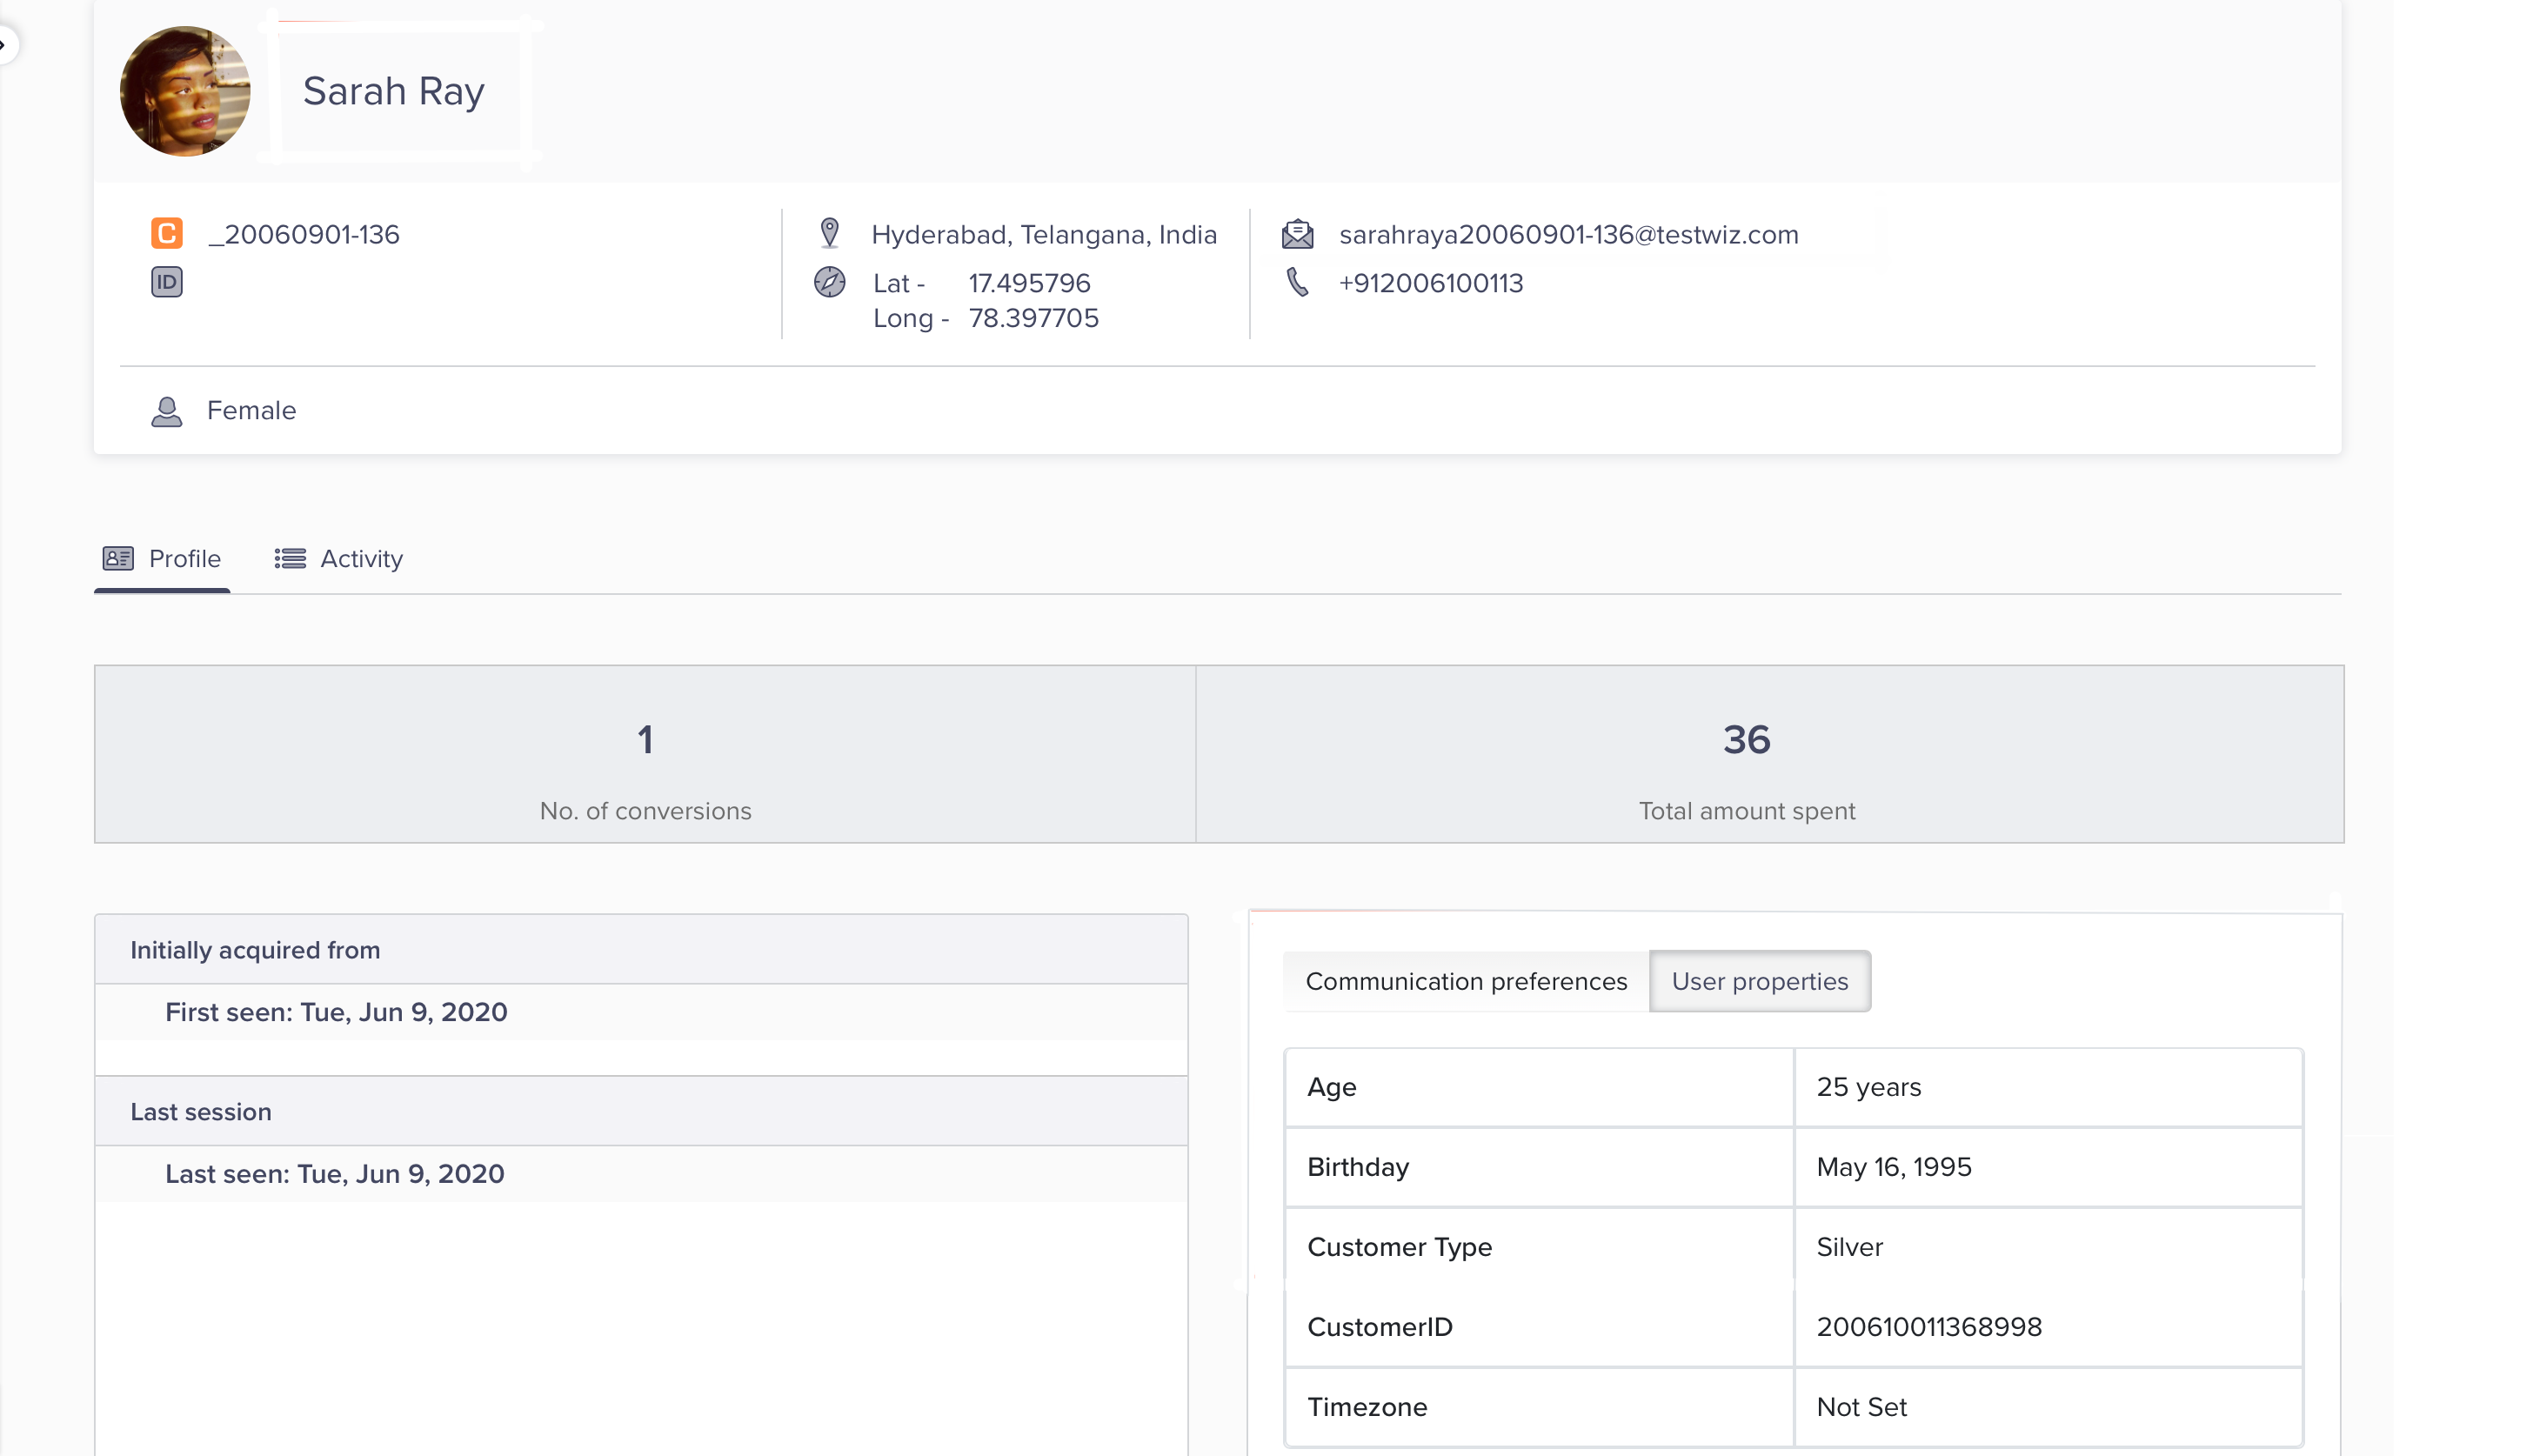
If CleverTap finds a user profile with this email, you will be taken to that user record. On that page, you will see the name and email as pre-defined fields and Customer type and Age as custom fields.

User Profile
Update the User Profile
The Onuserlogin method identifies the individual users on the device. However, you may need to add additional user properties to the user profile such as gender, date of birth, and so on. You can update these properties with the clevertap.profilePush method. For more information, refer to User Profiles.
Track Custom Events
Once you integrate the CleverTap SDK, we automatically track events, such as App Launch and Notification Viewed. In addition to the default (system) events tracked by CleverTap you can also track custom events.
To send custom events to CleverTap using our Android SDK, you have to call the pushEvent method with the name of the custom event you want to track.
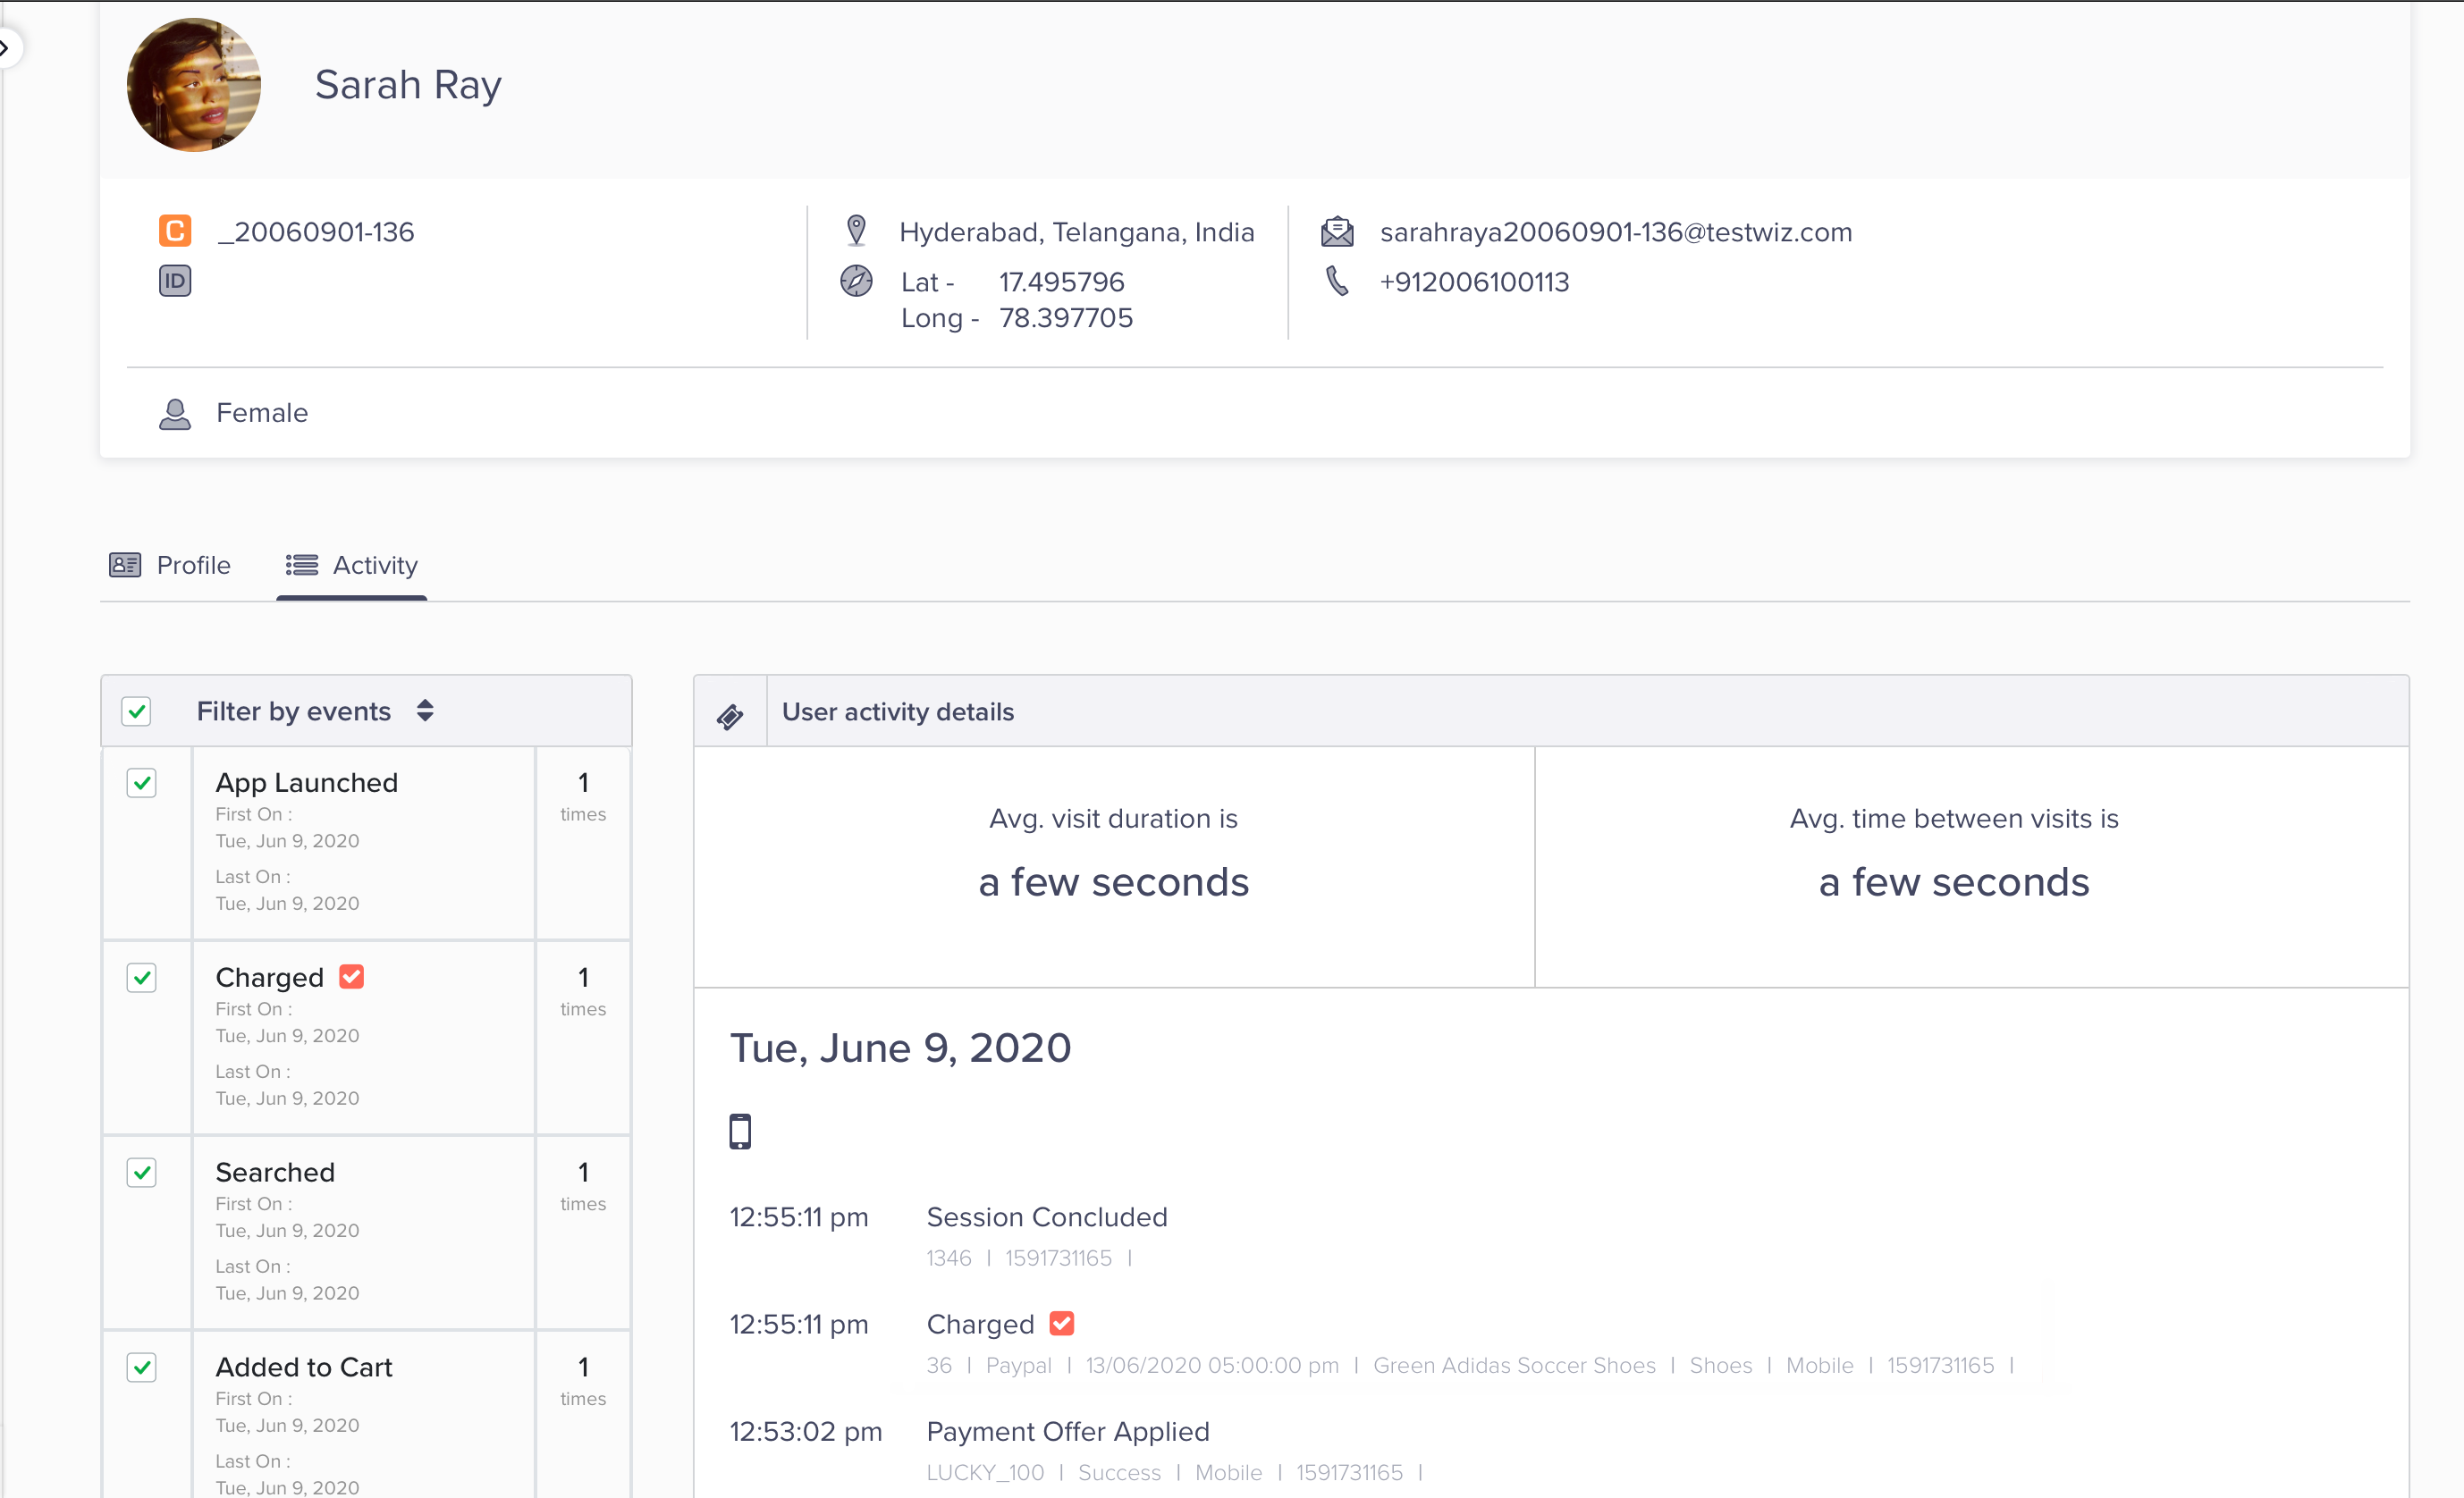
clevertapDefaultInstance.pushEvent("Product viewed");clevertapDefaultInstance?.pushEvent("Product viewed")To view the same user profile in CleverTap from the last section, click on the Activity button within the user profile record. This shows a list of activities associated with the user profile.
If the custom event was successfully sent from your application to CleverTap, you would see it in this list.

User Profile Activity
Debugging
CleverTap SDK generates a verbose number of logs that provide information about the working and integration of the SDK, which is beneficial during app development. To learn how to enable/disable these logs and use them for debugging, refer to the Advance Features section.
GDPR Compliance
From CleverTap Android SDK 3.1.9 onwards, CleverTap provides APIs to support GDPR compliance. For more information, refer to Advance Features.
Next Steps
By completing this guide, you automatically track user events like app launches and associate that information with profiles for each of your users. Also, learn how to add information to a user profile and track custom events. You now have integrated CleverTap into your Android application
In the following sections, you will learn more advanced options for tracking custom events and enriching user profiles.
Updated 24 days ago
