iOS Quick Start Guide
Overview
CleverTap provides an iOS SDK that enables app developers to track, segment, and engage users. This guide shows how to install the CleverTap SDK in your application, track your first user event, and quickly see user profiles and user events within the CleverTap dashboard.
Install SDK
To use the CleverTap iOS SDK, you have the following options:
- Install it with CocoaPods
- Install it with SPM
- Install it manually by including the SDK source code in your Xcode project
Install using CocoaPods (Recommended)
To install SDK using CocoaPods:
- Add the CleverTap SDK to your Podfile, as shown below:
pod "CleverTap-iOS-SDK"- After you have updated your Podfile, run
pod installin your terminal to download automatically. - Install the SDK in your project.
Install using Swift Package Manager
- Open the
cleverTap-ios-sdkproject page on GitHub and copy the clone URL https://github.com/CleverTap/clevertap-ios-sdk of the project. - Now integrate CleverTap SDK in your application in Xcode. Go to File > Add Packages to add a new dependency.
- Specify the clone URL of the cleverTap-ios-sdk library. Keep the default version settings - the library will be updated after the next major release.
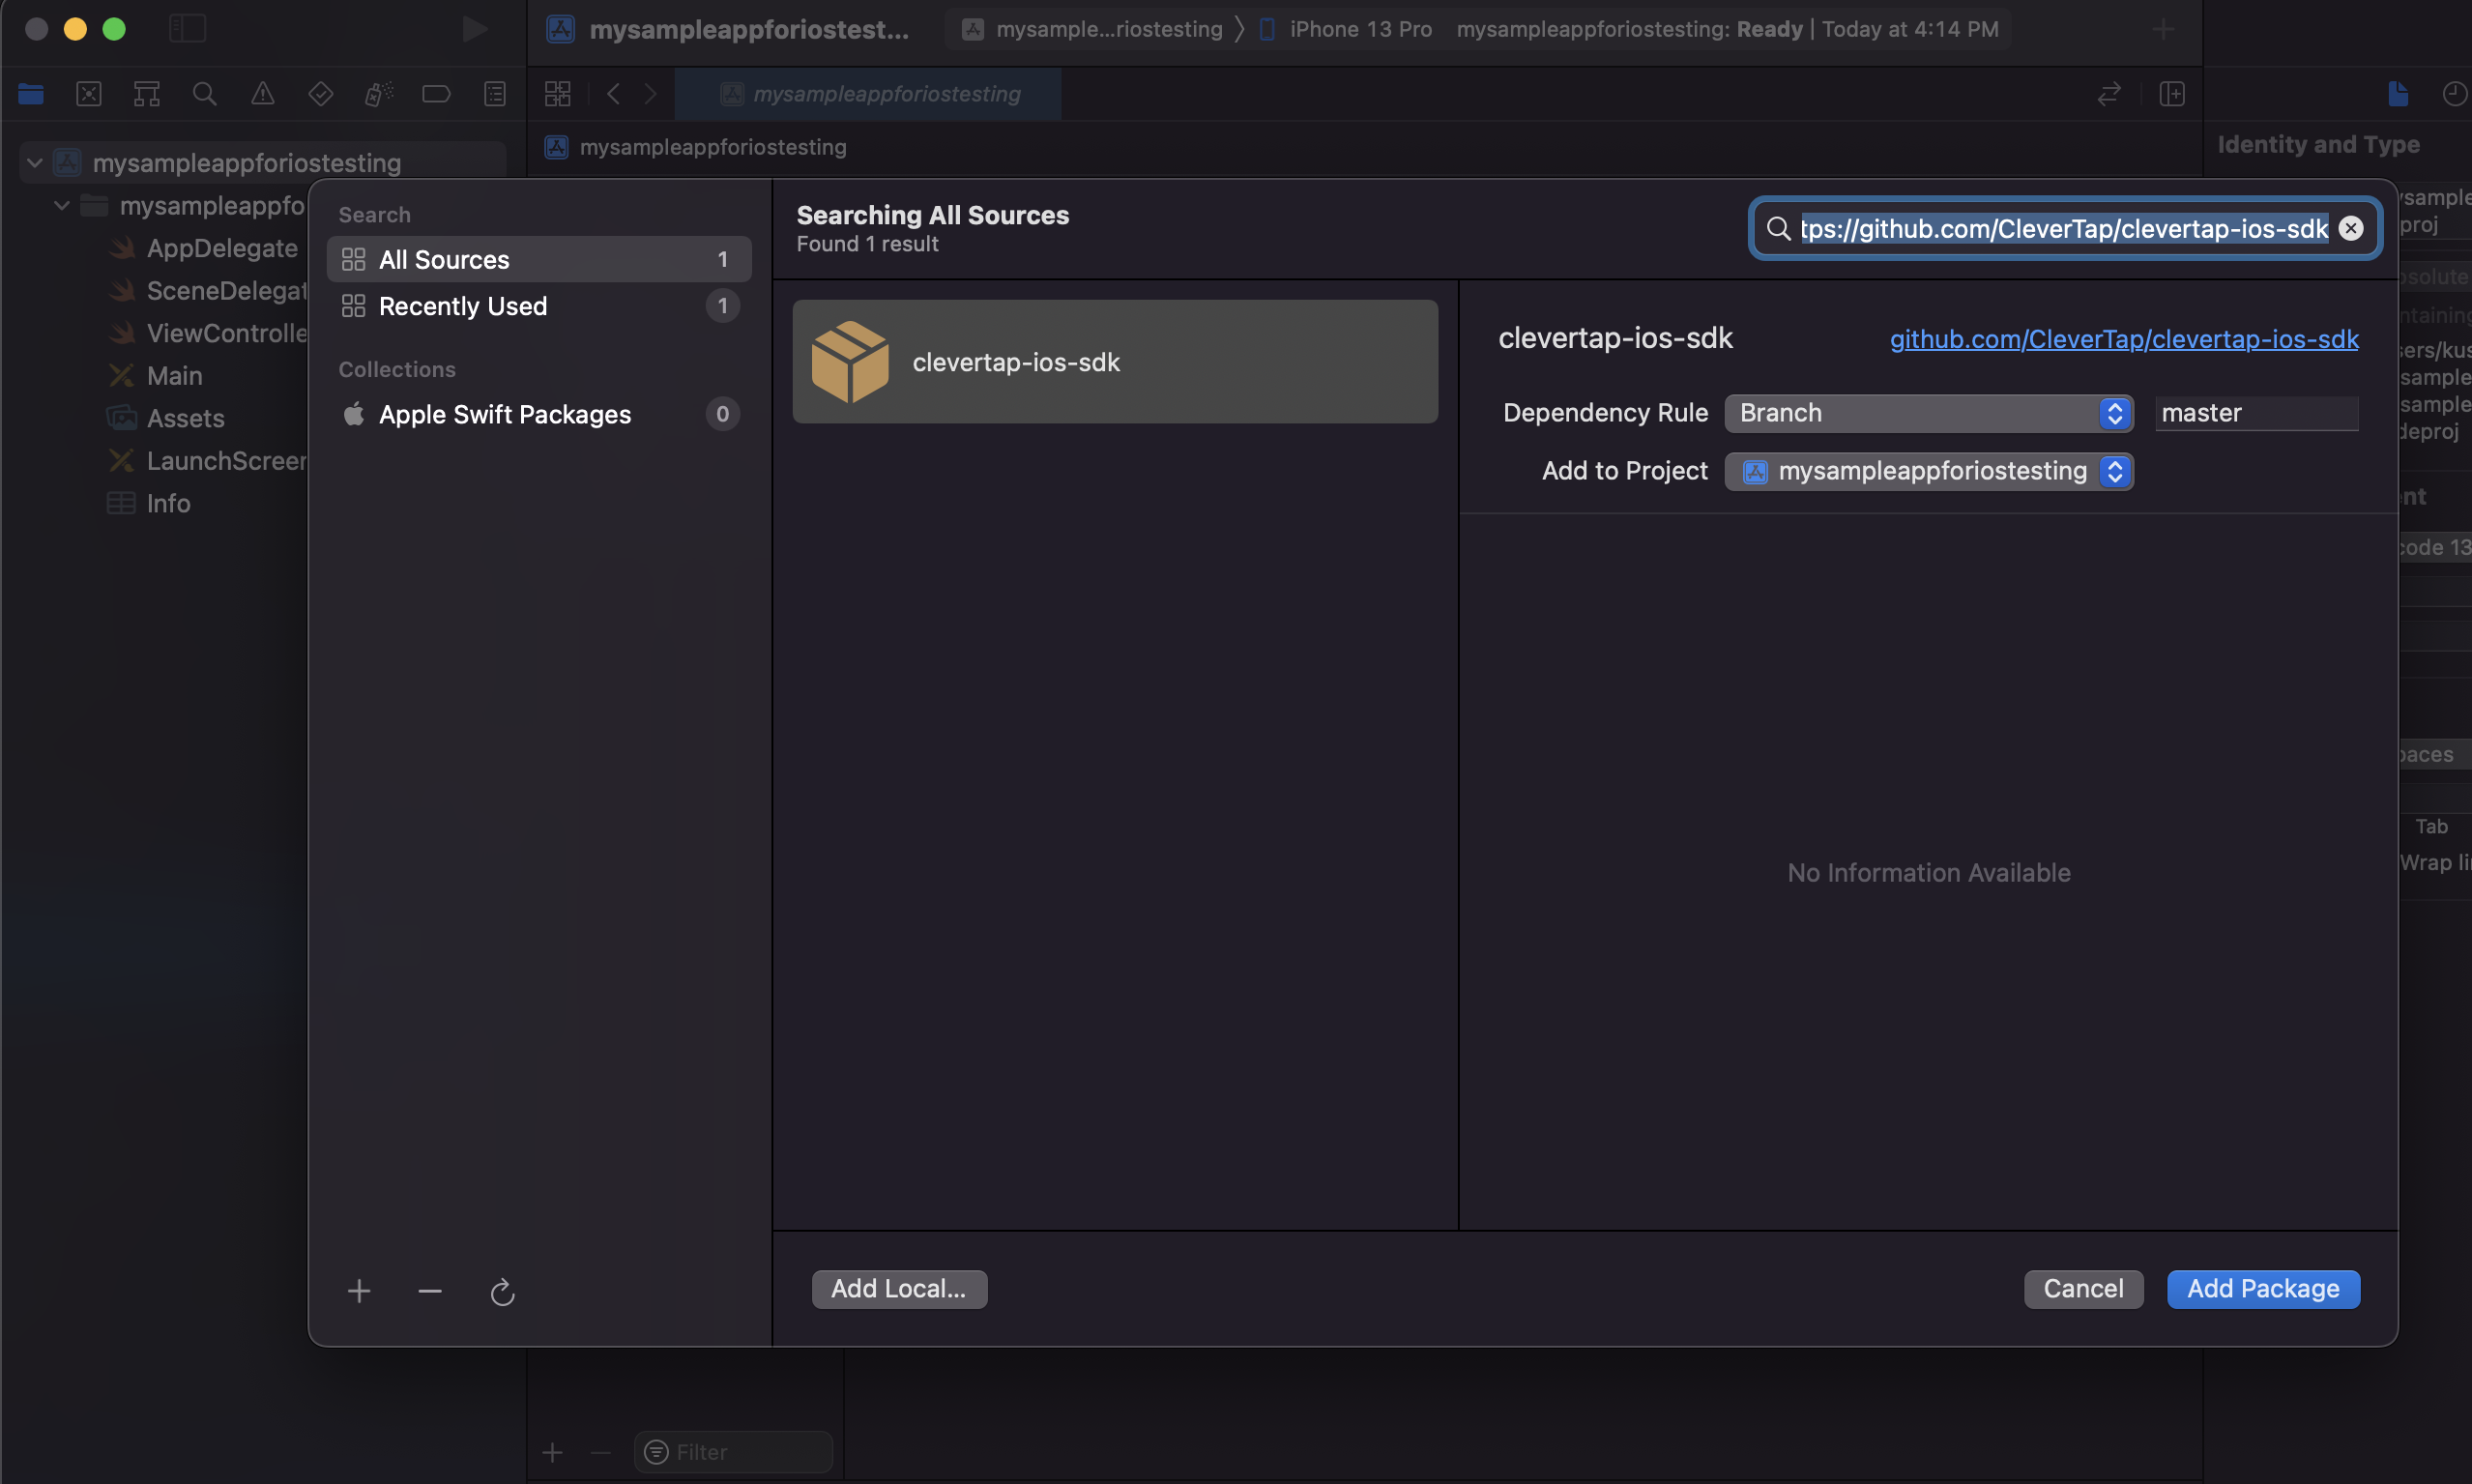
Clone URL of the CleverTap iOS SDK Library
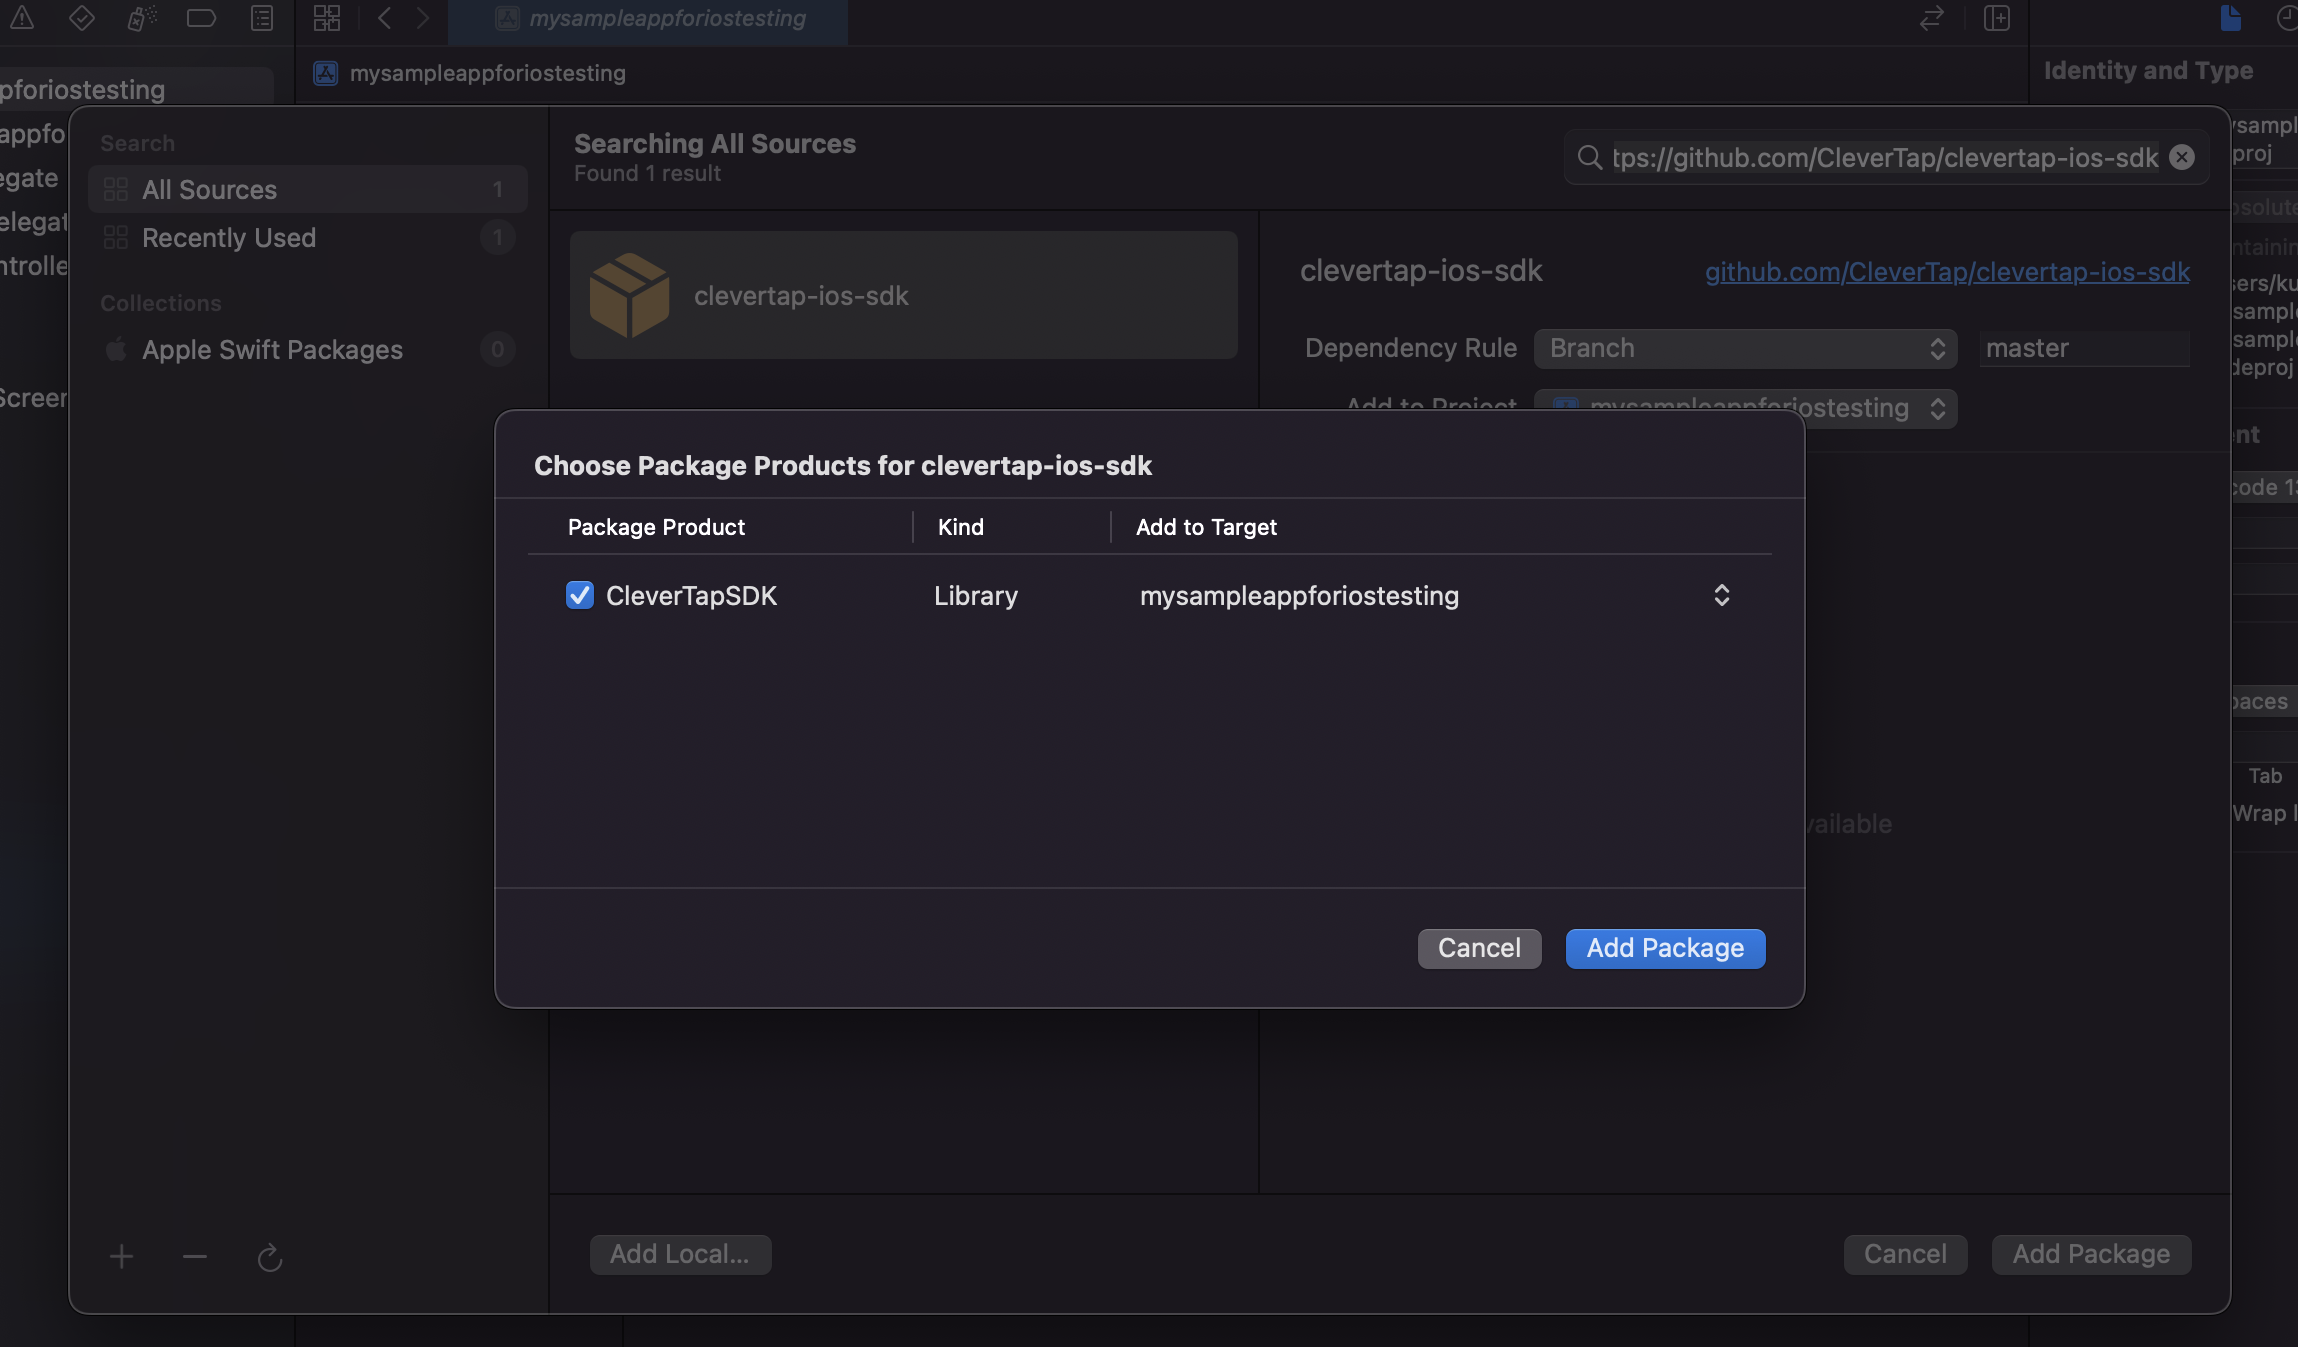
Add Package
Install Manually
To install the SDK manually:
- Download and unzip the CleverTap SDK.
- Drag the
CleverTapSDK.xcodeprojinside your project under the main project file. - Embed the framework.
- Select your
app.xcodeprojfile. - Under General, add the CleverTapSDK framework as an embedded binary.
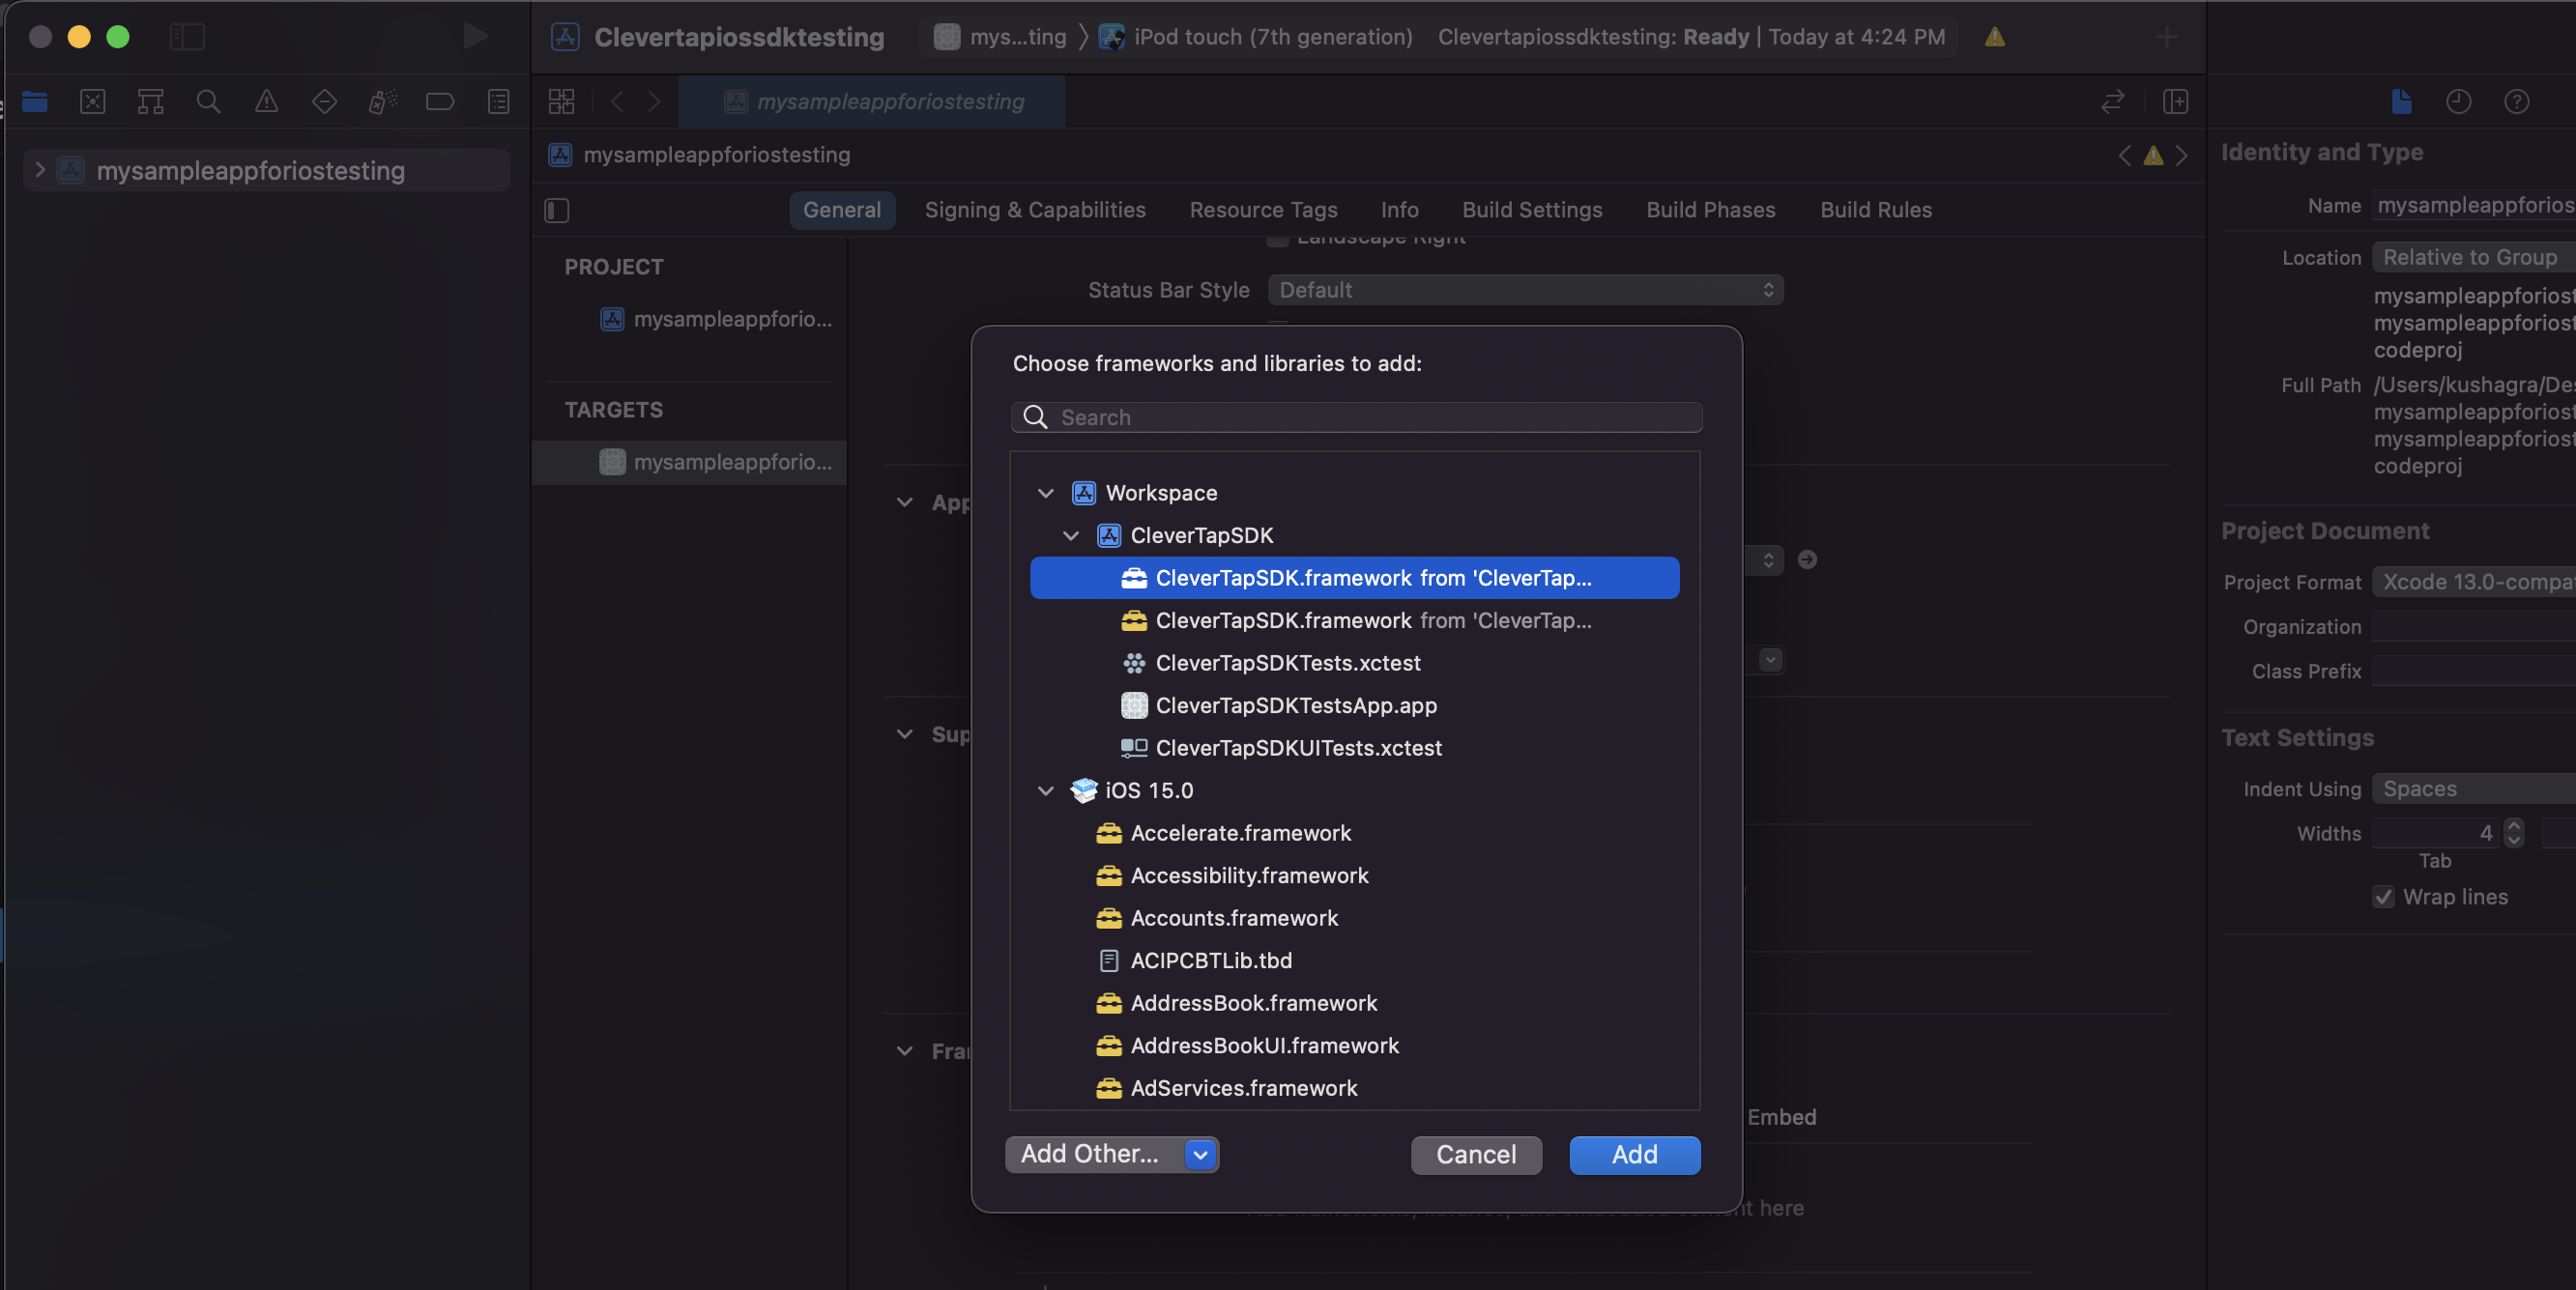
Add CleverTap SDK Framework
AdditionalSDWebImageLibrary Required for Manual IntegrationYou must integrate the
SDWebImagelibrary for supporting images and GIFs in App Inbox and Native In-Apps for manual integration. Follow the steps for integrating SDWebImage:
- Navigate to the _Vendors/SDWebImage _directory found under the cloned CleverTap iOS SDK repository.
- Drag and drop
SDWebImage.xcodeprojinto the main project file.- Navigate to the project application’s target settings, open General, click the + button under the Frameworks, Libraries, and Embedded Content, add
SDWebImage.frameworkas an embedded binary.
- Add the CleverTapSDK package product to the app target.
Add CleverTap Credentials
To associate your iOS app with your CleverTap account, you need to add your CleverTap credentials in the Info.plist file in your application. To do so:
- Navigate to the
Info.plist filefrom your project navigator.
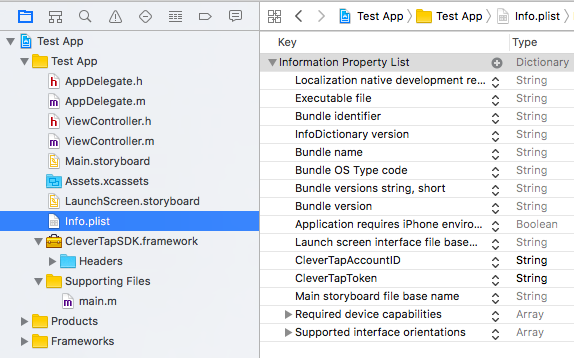
Key value Pairs in Info.plist File
- Create a key called
CleverTapAccountIDwith a type string. - Create a key called
CleverTapTokenwith a type string. - Insert the Project ID and account Project Token values from your CleverTap account. These values are available under the Settings page.
Credentials and AccessThe
CleverTapAccountIdandCleverTapTokenare available as Project ID and Project Token respectively on the CleverTap dashboard.
Member and Creator roles in the project don’t have access to view the Passcode and Project Token of the account on the dashboard.

CleverTap Project Credentials
Disable IDFV UsageOptionally, starting from CleverTap iOS SDK 3.9.4, you can disable the generation of CleverTap ID basis IDFV value. Add
CleverTapDisableIDFVwith type Boolean and set its value as 1 in yourInfo.plistfile.
This is recommended for apps that send data from different iOS apps to a common CleverTap account.
Add Region Code
To know how to add region code in iOS SDK, refer to Region Codes.
Integrate CleverTap SDK in iOS Applications
Objective-C Installation
To integrate the CleverTap SDK for Objective-C:
- Import
CleverTap.hto yourAppDelegate.hfile.
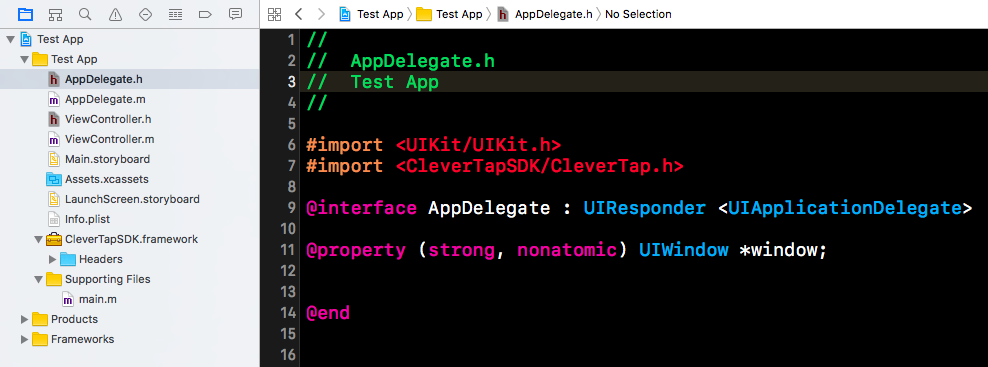
Import CleverTap.h File
- Import
CleverTap.hinto every class where you plan to record user events.
For example, in the application below, we record user events in theViewControllerclass by importingCleverTap.hin theViewController.hfile.
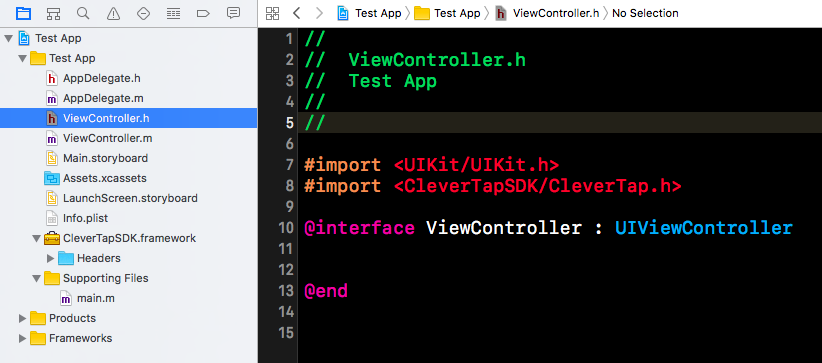
Record User Events in the ViewController Class
Autointegrate CleverTap in your Obj-C Application
This creates an instance of the CleverTap class used to track app launches, receive in-app notifications, and enable deep-link tracking.
In your AppDelegate.m file, add [CleverTap autoIntegrate] within the application:didFinishLaunchingWithOptions: method.
- (BOOL) application:(UIApplication *)application didFinishLaunchingWithOptions:(NSDictionary *)launchOptions {
    ...
    [CleverTap autoIntegrate];
    ...
}
Auto Integrate CleverTap in Obj-C Application
Debug CleverTap SDK in Obj-C application
In your AppDelegate.m file, add [CleverTap setDebugLevel:CleverTapLogDebug]; within the application:didFinishLaunchingWithOptions: method. This is an optional step.
By default, CleverTap logs are set to CleverTapLogLevel.info. During development, we recommend that you set the SDK to DEBUG mode, in order to log warnings or other important messages to the iOS logging system. This can be done by setting the debug level to CleverTapLogLevel.debug. If you want to disable CleverTap logs for production environment, you can set the debug level to CleverTapLogLevel.off.
- (BOOL)application:(UIApplication *)application didFinishLaunchingWithOptions:(NSDictionary *)launchOptions {
    // Override point for customization after application launch.
    [CleverTap autoIntegrate];
    [CleverTap setDebugLevel:CleverTapLogDebug];
}
Swift Installation
To integrate CleverTap SDK for Swift:
- Import
CleverTapSDKto yourAppDelegate.swiftfile as given in the application below. Similarly importCleverTapSDKin every class file where you plan to record user events.
Bridging Headers for CleverTap v3.1.4 and below for Swift installation:For bridging header on the CleverTap iOS SDK github, refer to the example implementation.
Starting with v3.1.4, the SDK now includes a module map, which allows importing the SDK as a module rather than using a bridging header.
Autointegrate CleverTap in your Swift Application
In your AppDelegate.swift file, add CleverTap.autoIntegrate() within the
application:didFinishLaunchingWithOptions: method.
This creates an instance of the CleverTap class used to track app launches, receive in-app notifications, and enable deep-link tracking.
func application(application: UIApplication, didFinishLaunchingWithOptions launchOptions: [NSObject:AnyObject]?) -> Bool {
    ...
    CleverTap.autoIntegrate()
    ...
}
Auto Integrate CleverTap in Swift Application
Debug CleverTap SDK in your Swift Application
In your AppDelegate.swift file, add CleverTap.setDebugLevel(CleverTapLogLevel.debug.rawValue) within the
application:didFinishLaunchingWithOptions: method. This is an optional step. By default, CleverTap logs are set to CleverTapLogLevel.info. During development, we recommend that you set the SDK to DEBUG mode, in order to log warnings or other important messages to the iOS logging system. This can be done by setting the debug level to CleverTapLogLevel.debug. If you want to disable CleverTap logs for production environment, you can set the debug level to CleverTapLogLevel.off.rawValue.
func application(_ application: UIApplication, didFinishLaunchingWithOptions launchOptions: [UIApplication.LaunchOptionsKey: Any]?) -> Bool {

        // Configure and init the default shared CleverTap instance (add CleverTap Account ID and Account Token in your .plist file)
        CleverTap.autoIntegrate()
        CleverTap.setDebugLevel(CleverTapLogLevel.debug.rawValue)
}
Debug CleverTap SDK in Swift Application
Get Location Information in Application
You can use the CleverTapLocation module to get the user's location (and possibly track the location for events). The CTLocationManager class has a getLocationWithSuccess method to track the location of users. You must install and integrate CleverTapLocation via Cocoapods, SPM or manually for this purpose.
Please refer to the Location doc for more details.
Installation
- Cocoapods
- Swift Package Manager
- Manual Installation
Cocoapods
Add the following to your Podfile:
target 'YOUR_TARGET_NAME' do
    pod 'CleverTapLocation'
end
Then run pod install.
Swift Package Manager
- Open your project and navigate to the project's settings. Select the tab named Swift Packages and click on the add button (+) at the bottom left.
- Enter the URL of CleverTap GitHub repository - https://github.com/CleverTap/clevertap-ios-sdk.git and click Next.
- On the next screen, select the preferred SDK version and click Next.
- Click finish and ensure that the CleverTapLocation has been added to the appropriate target.
Manual Installation
-
Clone the CleverTap iOS SDK repository recursively:
git clone --recursive https://github.com/CleverTap/clevertap-ios-sdk.git -
Navigate to
CleverTapLocationfolder and add theCleverTapLocation.xcodeprojto your Xcode Project, by dragging theCleverTapLocation.xcodeprojunder the main project file. -
Navigate to the project application’s target settings, open "General", click the "+" button under the
Frameworks, Libraries, and Embedded Content, addCleverTapLocation.frameworkas an embedded binary.
Manual IntegrationIn a single line of code, the
autoIntegratemethod lets you automatically track app launches, receive in-app notifications, and enable deep-link tracking.You can manually turn on different CleverTap SDK features as an alternative to the automatic integration method. For more information on the manual integration steps for setting up push notifications, refer to iOS Push Notifications.
Run Your Application
To run your application, navigate to your CleverTap dashboard. If you integrate the CleverTap SDK successfully, you see a new active user on the dashboard.

View Active Users on CleverTap Dashboard
Identify Users
A user profile is automatically created in CleverTap for each user launching your application.
Initially, the user profile starts out as anonymous which means the profile does not contain any identifiable information about the user. You can enrich the profile with pre-defined attributes from the CleverTap data model, such as name and email. You can also add custom attributes that you define to extend the CleverTap data model.
Sending user profile information to CleverTap using our iOS SDK requires two steps:
- Build a
NSDictionaryobject with the profile properties. - Call the SDK's
Onuserloginmethod and pass theNSDictionaryobject you created as a parameter.
The following example shows how to do this in Objective-C and Swift:
let profile: Dictionary<String, AnyObject> = [
    //Update pre-defined profile properties
    "Name": "Jack Montana",
    "Email": "[email protected]",
    //Update custom profile properties
    "Plan type": "Silver",
    "Favorite Food": "Pizza"
]

CleverTap.sharedInstance()?.onUserLogin(profile)
NSDictionary *profile = @{
//Update pre-defined profile properties
@"Name": @"Jack Montana" as AnyObject,
@"Email": @"[email protected]" as AnyObject,
//Update custom profile properties
@"Plan Type": @"Silver" as AnyObject,
@"Favorite Food": @"Pizza" as AnyObject
};
[[CleverTap sharedInstance] onUserLogin:profile];When the Onuserlogin method is called, the user profile information is sent to CleverTap.
To see how this information displays within the CleverTap dashboard:
- Log in to the CleverTap dashboard.
- Click Find People under the Segment tab. In the By Identity box, enter the email you set on the user profile record and click Find.

Find People on CleverTap Dashboard
If CleverTap finds a user profile with this email, the user record is displayed. On that page, you will see name and email as pre-defined fields and any other custom fields.
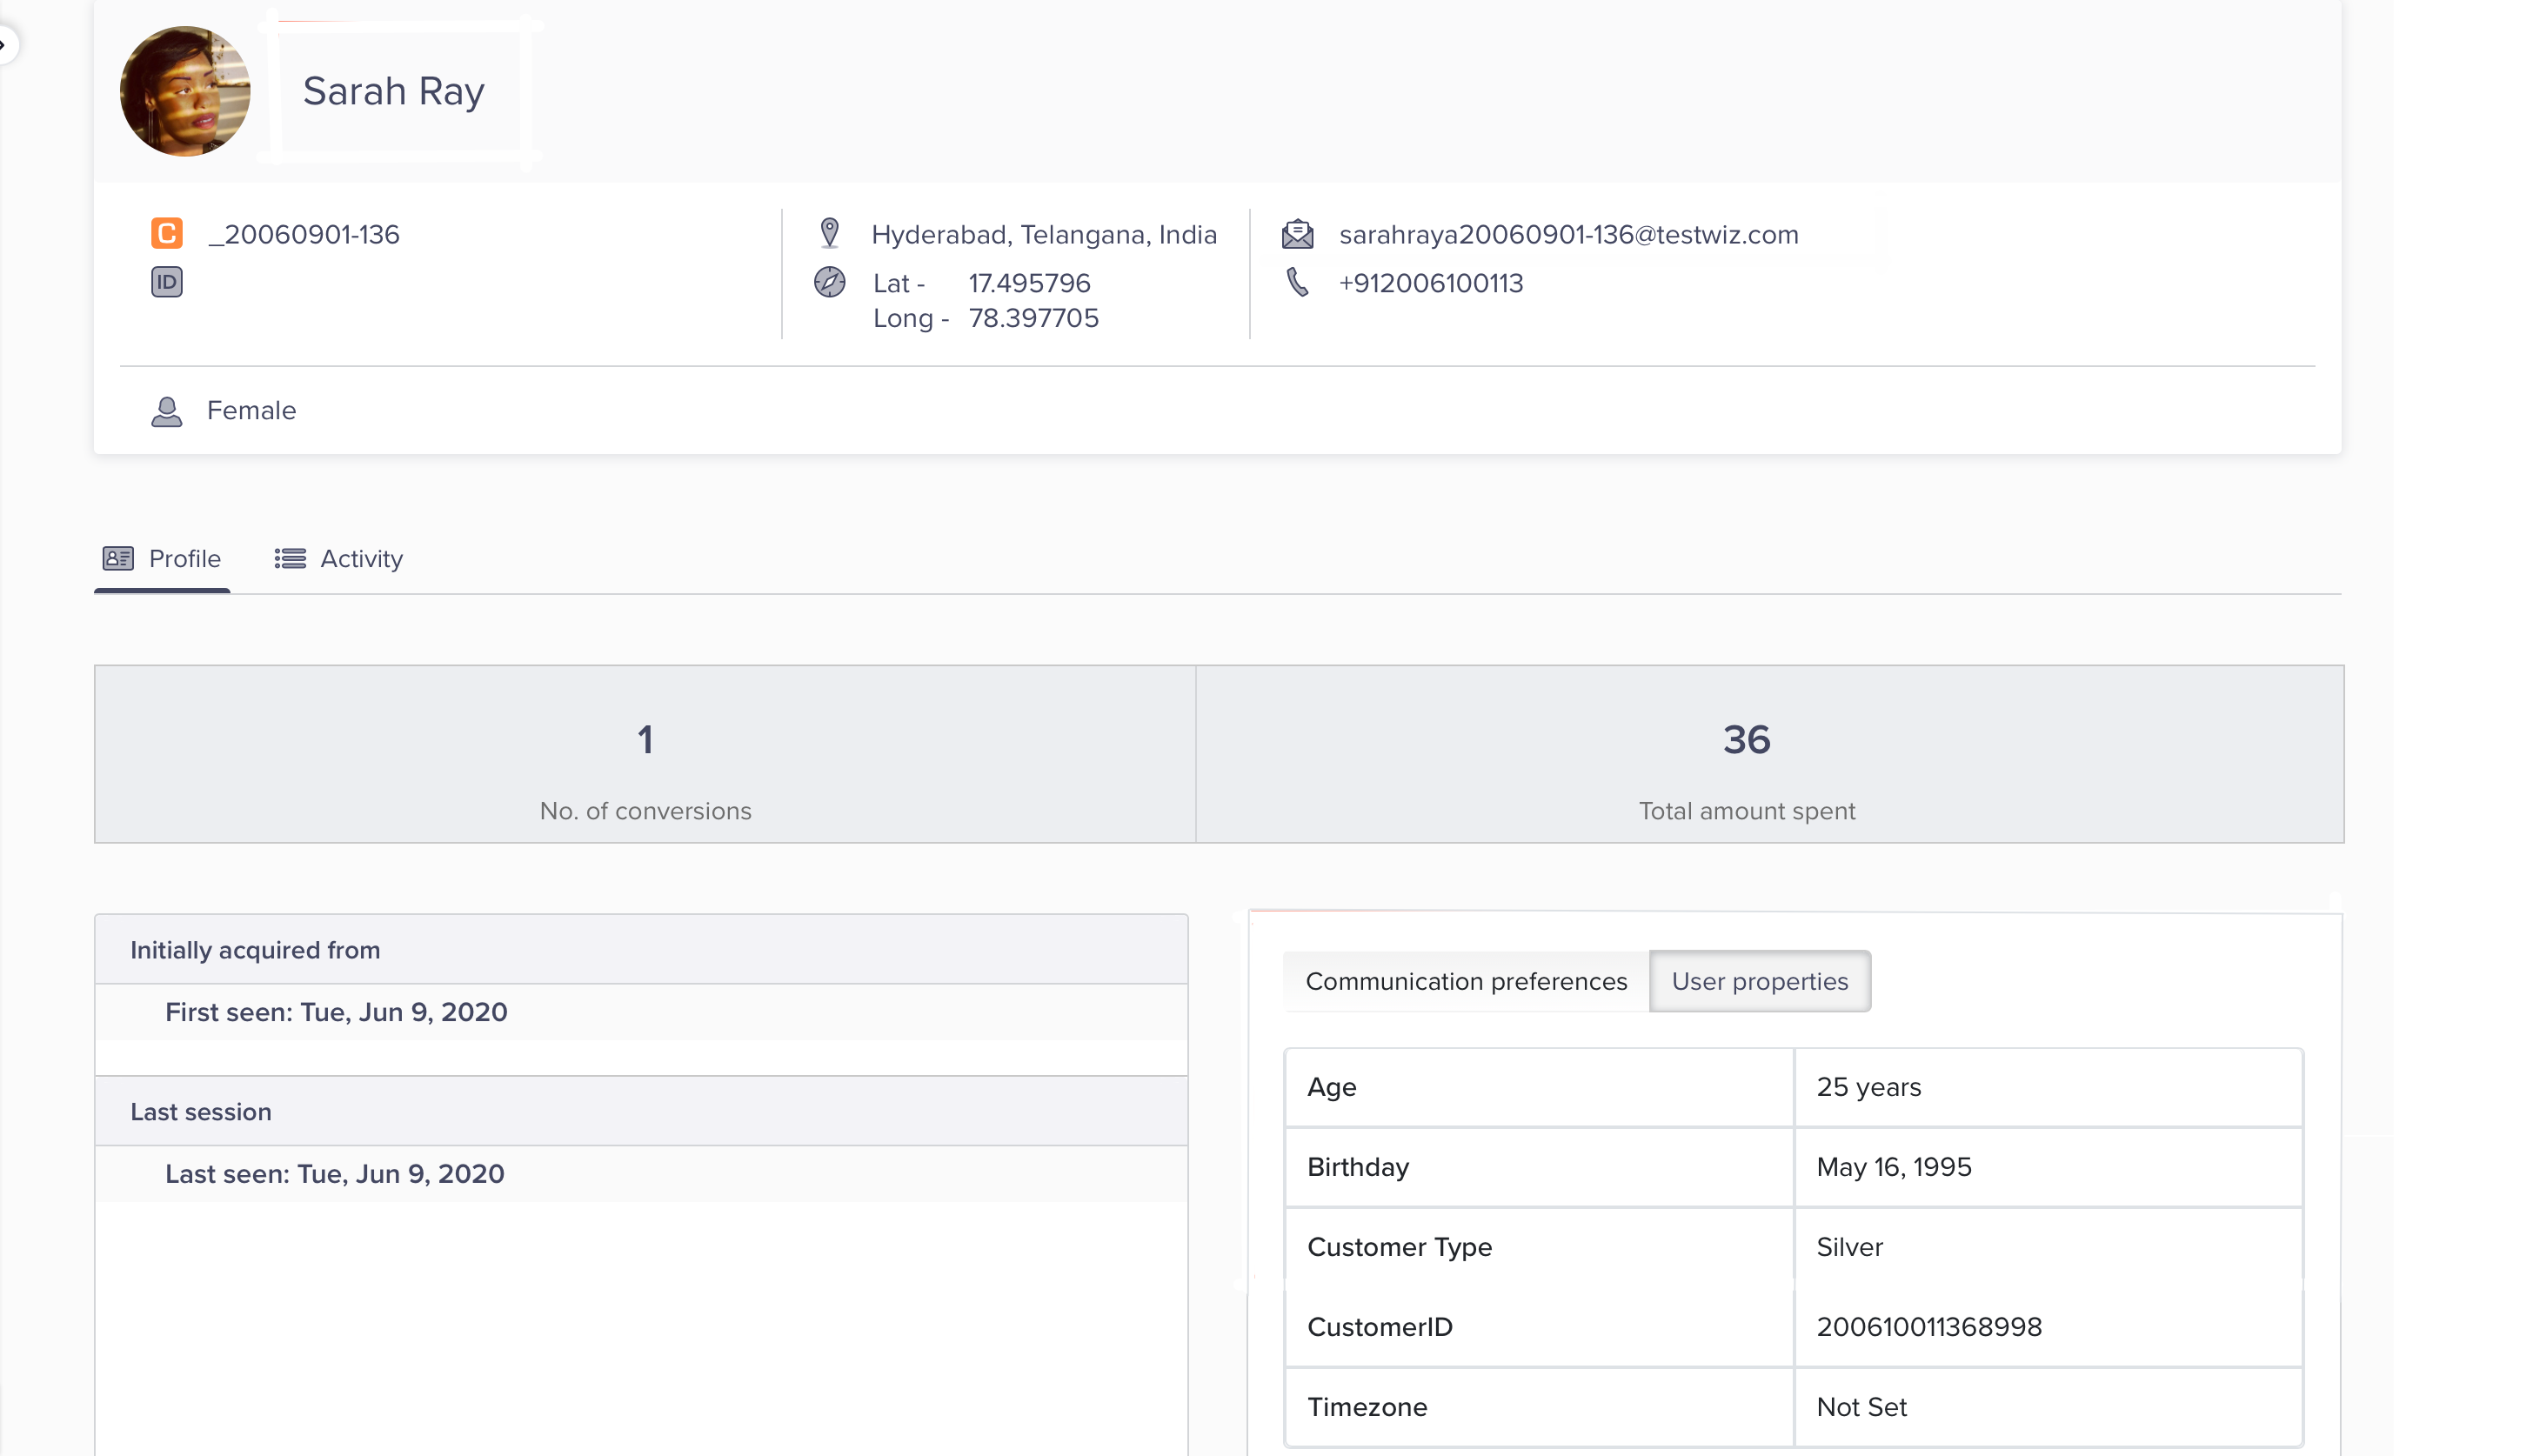
User Profile
Update the User Profile
The Onuserlogin method identifies the individual users on the device. However, you may need to add additional user properties to the user profile such as gender, date of birth, and so on. You can update these properties with the profilePush() method. For more information, refer to our User Documentation.
Track Custom Events
After you integrate the CleverTap SDK, we automatically start tracking events, such as App Launch and Notification Viewed. In addition to the default (system) events tracked by CleverTap, you can also track custom events.
To send custom events to CleverTap using our iOS SDK, you will have to call the recordEvent method with the name of the custom event you want to track.
The following example shows how to do this in both Objective-C and Swift:
CleverTap.sharedInstance()?.recordEvent("Product viewed")[[CleverTap sharedInstance] recordEvent:@"Product Viewed"];Now, looking at the same user profile in CleverTap from the previous step, click Activity within the user profile record, which shows a list of activities associated with the user profile. If the custom event is successfully sent from your application to CleverTap, you can see it in this list.

User Activity
GDPR Compliance
From CleverTap iOS SDK 3.1.7 onwards, CleverTap provides APIs to support GDPR compliance. For more information, refer to iOS GDPR Compliance.
Sample Projects demonstrating direct implementation of CleverTap features:
-
For an example project of integrating CleverTap SDK and using all its features in your Swift application, refer to the Github Swift Starter Project.
-
For an example project of integrating CleverTap SDK and using all its features in your ObjC application, refer to the Github Objective-C Starter Project. Follow the same steps.
-
For an example project of implementing CleverTap advanced push notifications and various push templates refer to CleverTap Notification Content. We have Swift starter and Obj-C starter applications in the repository for reference.
Next Steps
By completing this guide, you are now automatically tracking user events such as app launches and associating that information with profiles for each of your users. You have also learned how to debug, how to add information to a user profile and how to track custom events.
In the next iOS User Profiles, you will learn more advanced options for enriching user profiles.
Updated about 2 months ago
