Android Push
Learn how to deliver push notifications to your Android application.
Overview
CleverTap allows you to send push notifications to your applications from our dashboard. The following are the two ways to implement push notifications on an Android device:
-
Default CleverTap Implementation - This is the easiest way to implement push notifications. For more information, refer to Adding CleverTap's listener service.
-
Custom Android Push - Use it only if you already have your implementation or use another push provider. For more information, refer to Custom Android Push Notifications Handling.
Configure Push Notifications
The following are the steps to configure push notifications for your Android app:
- Find FCM Credentials.
- Set Up FCM Credentials.
OR
Safeguard Admin Credentials and Upload Credentials File to CleverTap.
FCM Update: Migrate to HTTP v1 APIFirebase will deprecate its legacy APIs starting June 20, 2023, and discontinue them from June 2024. To avoid disruptions in push notifications, you must migrate to the new HTTP v1 API by June 20, 2024. Failure to do so may result in all push notifications not being delivered to users and result in errors instead.
For detailed migration steps, refer to Configure Push Notifications. CleverTap has already completed this migration to ensure uninterrupted service.
To ensure uninterrupted delivery of the push notifications, you must migrate to the latest FCM APIs.
Find FCM Credentials
Firebase Cloud Messaging is a service that allows you to send notifications to your applications and receive information from them. Your FCM Sender ID and API key authenticate against CleverTap, enabling you to send notifications to your users from CleverTap.
To find the FCM credentials:
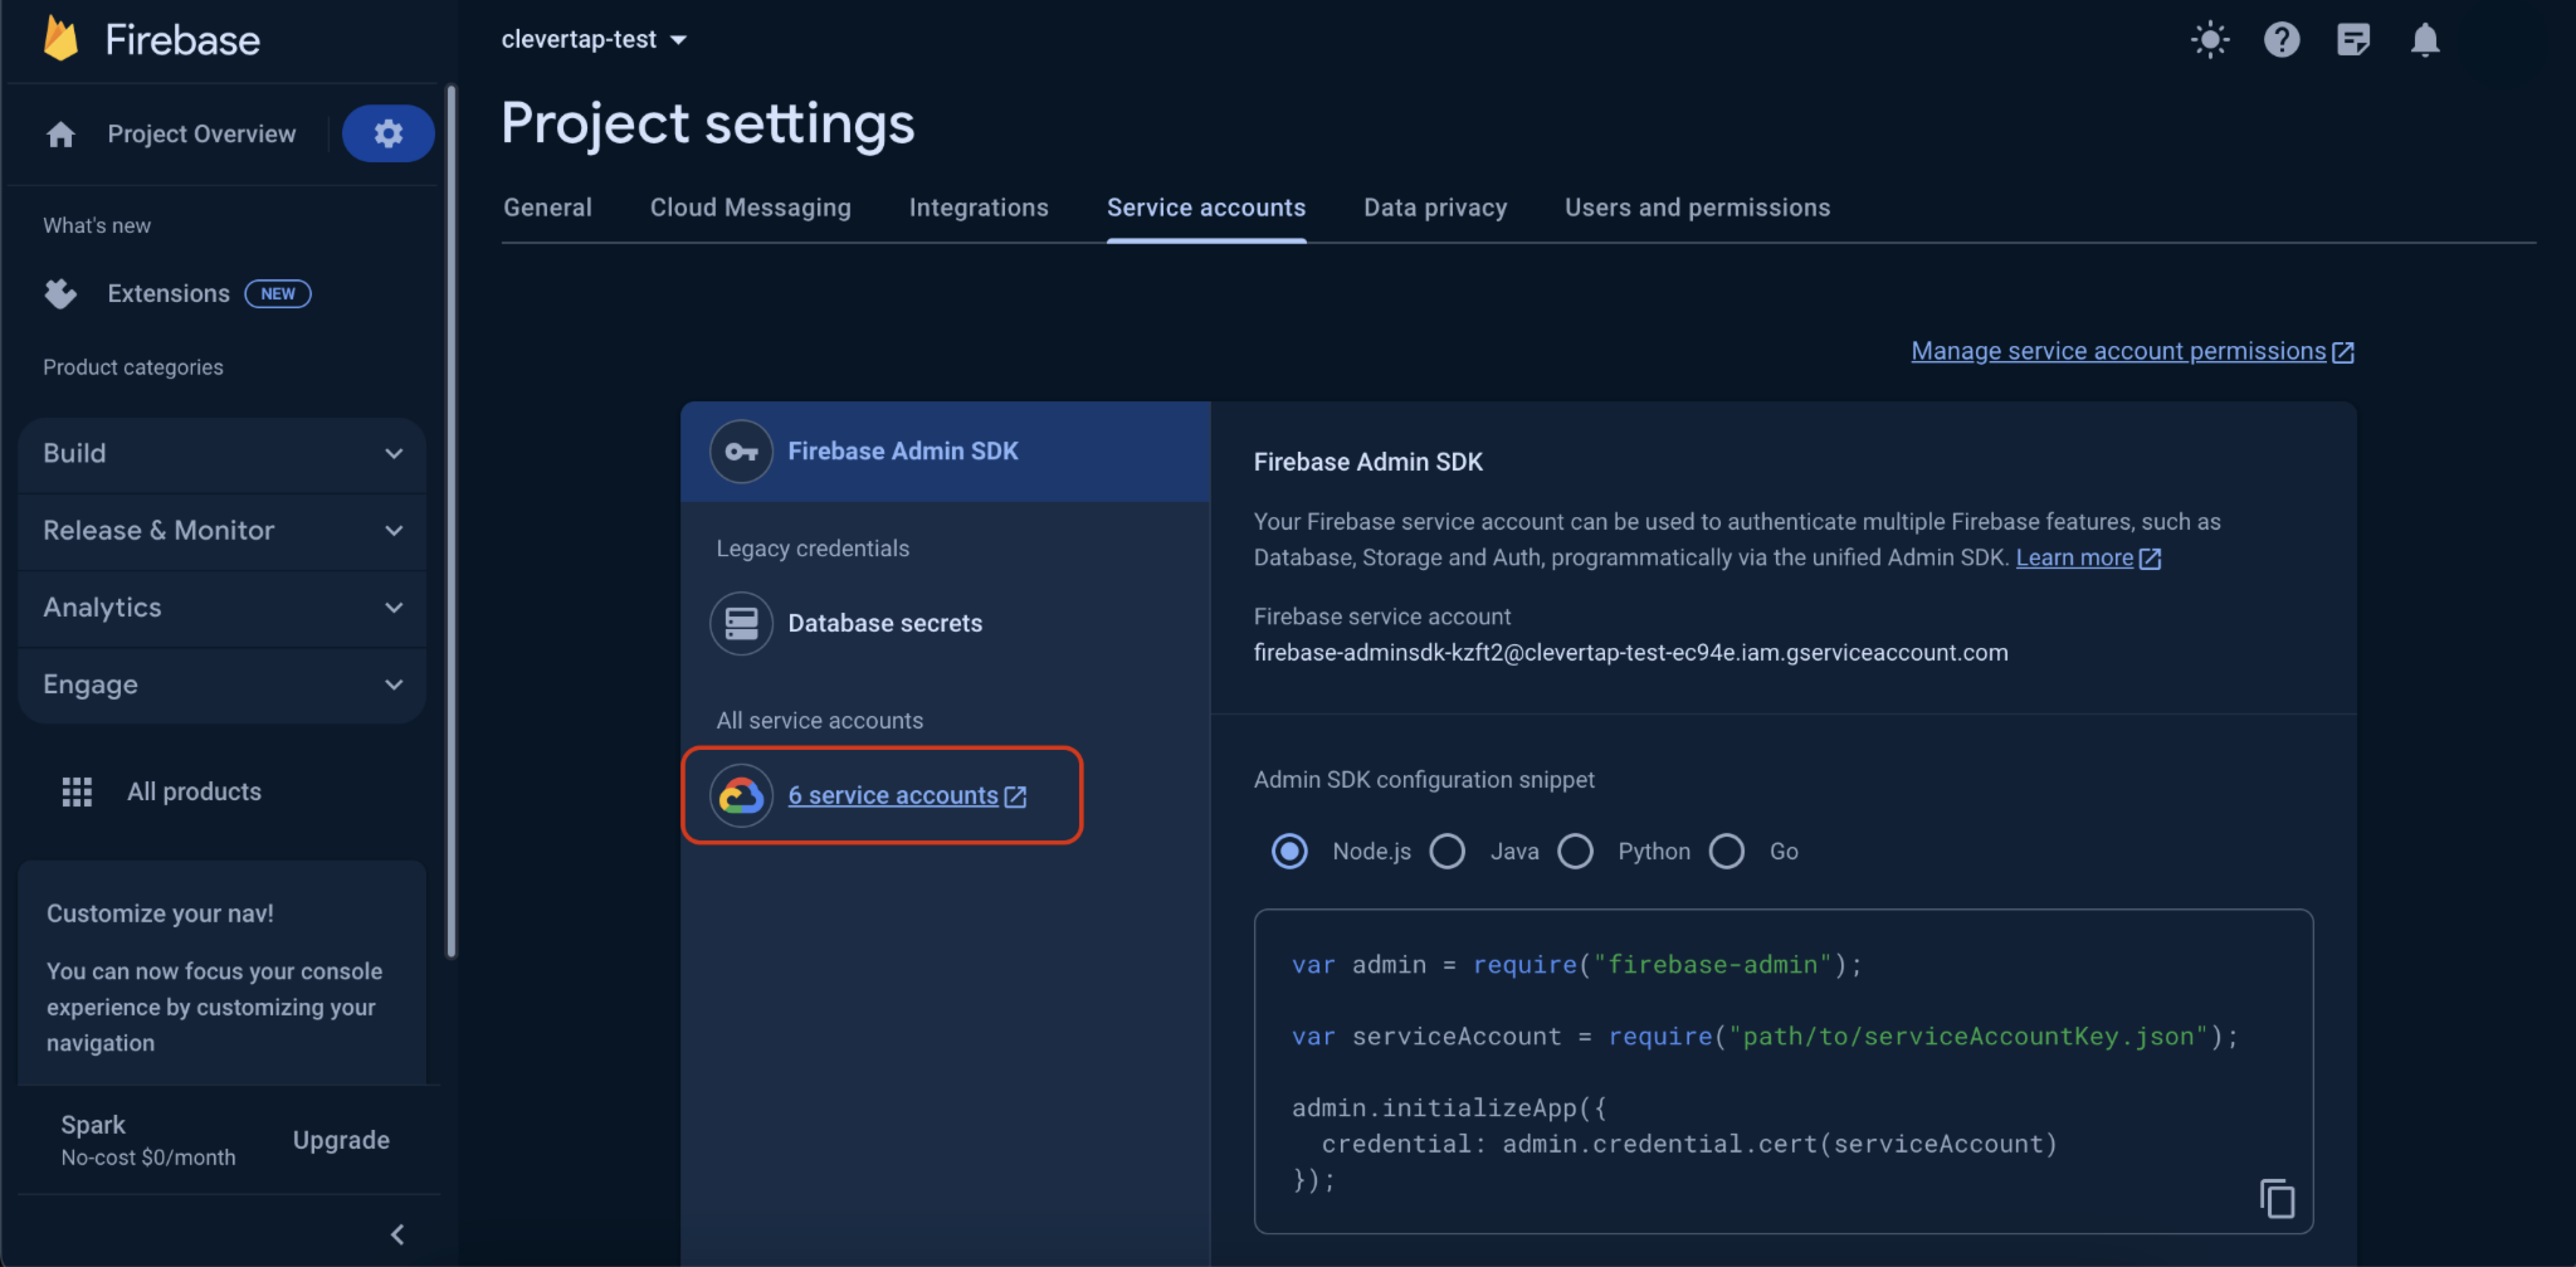
- Log in to the Firebase Developer Console and go to Open Settings > Service Accounts.
- To obtain the FCM Credential File, click Generate new private key.
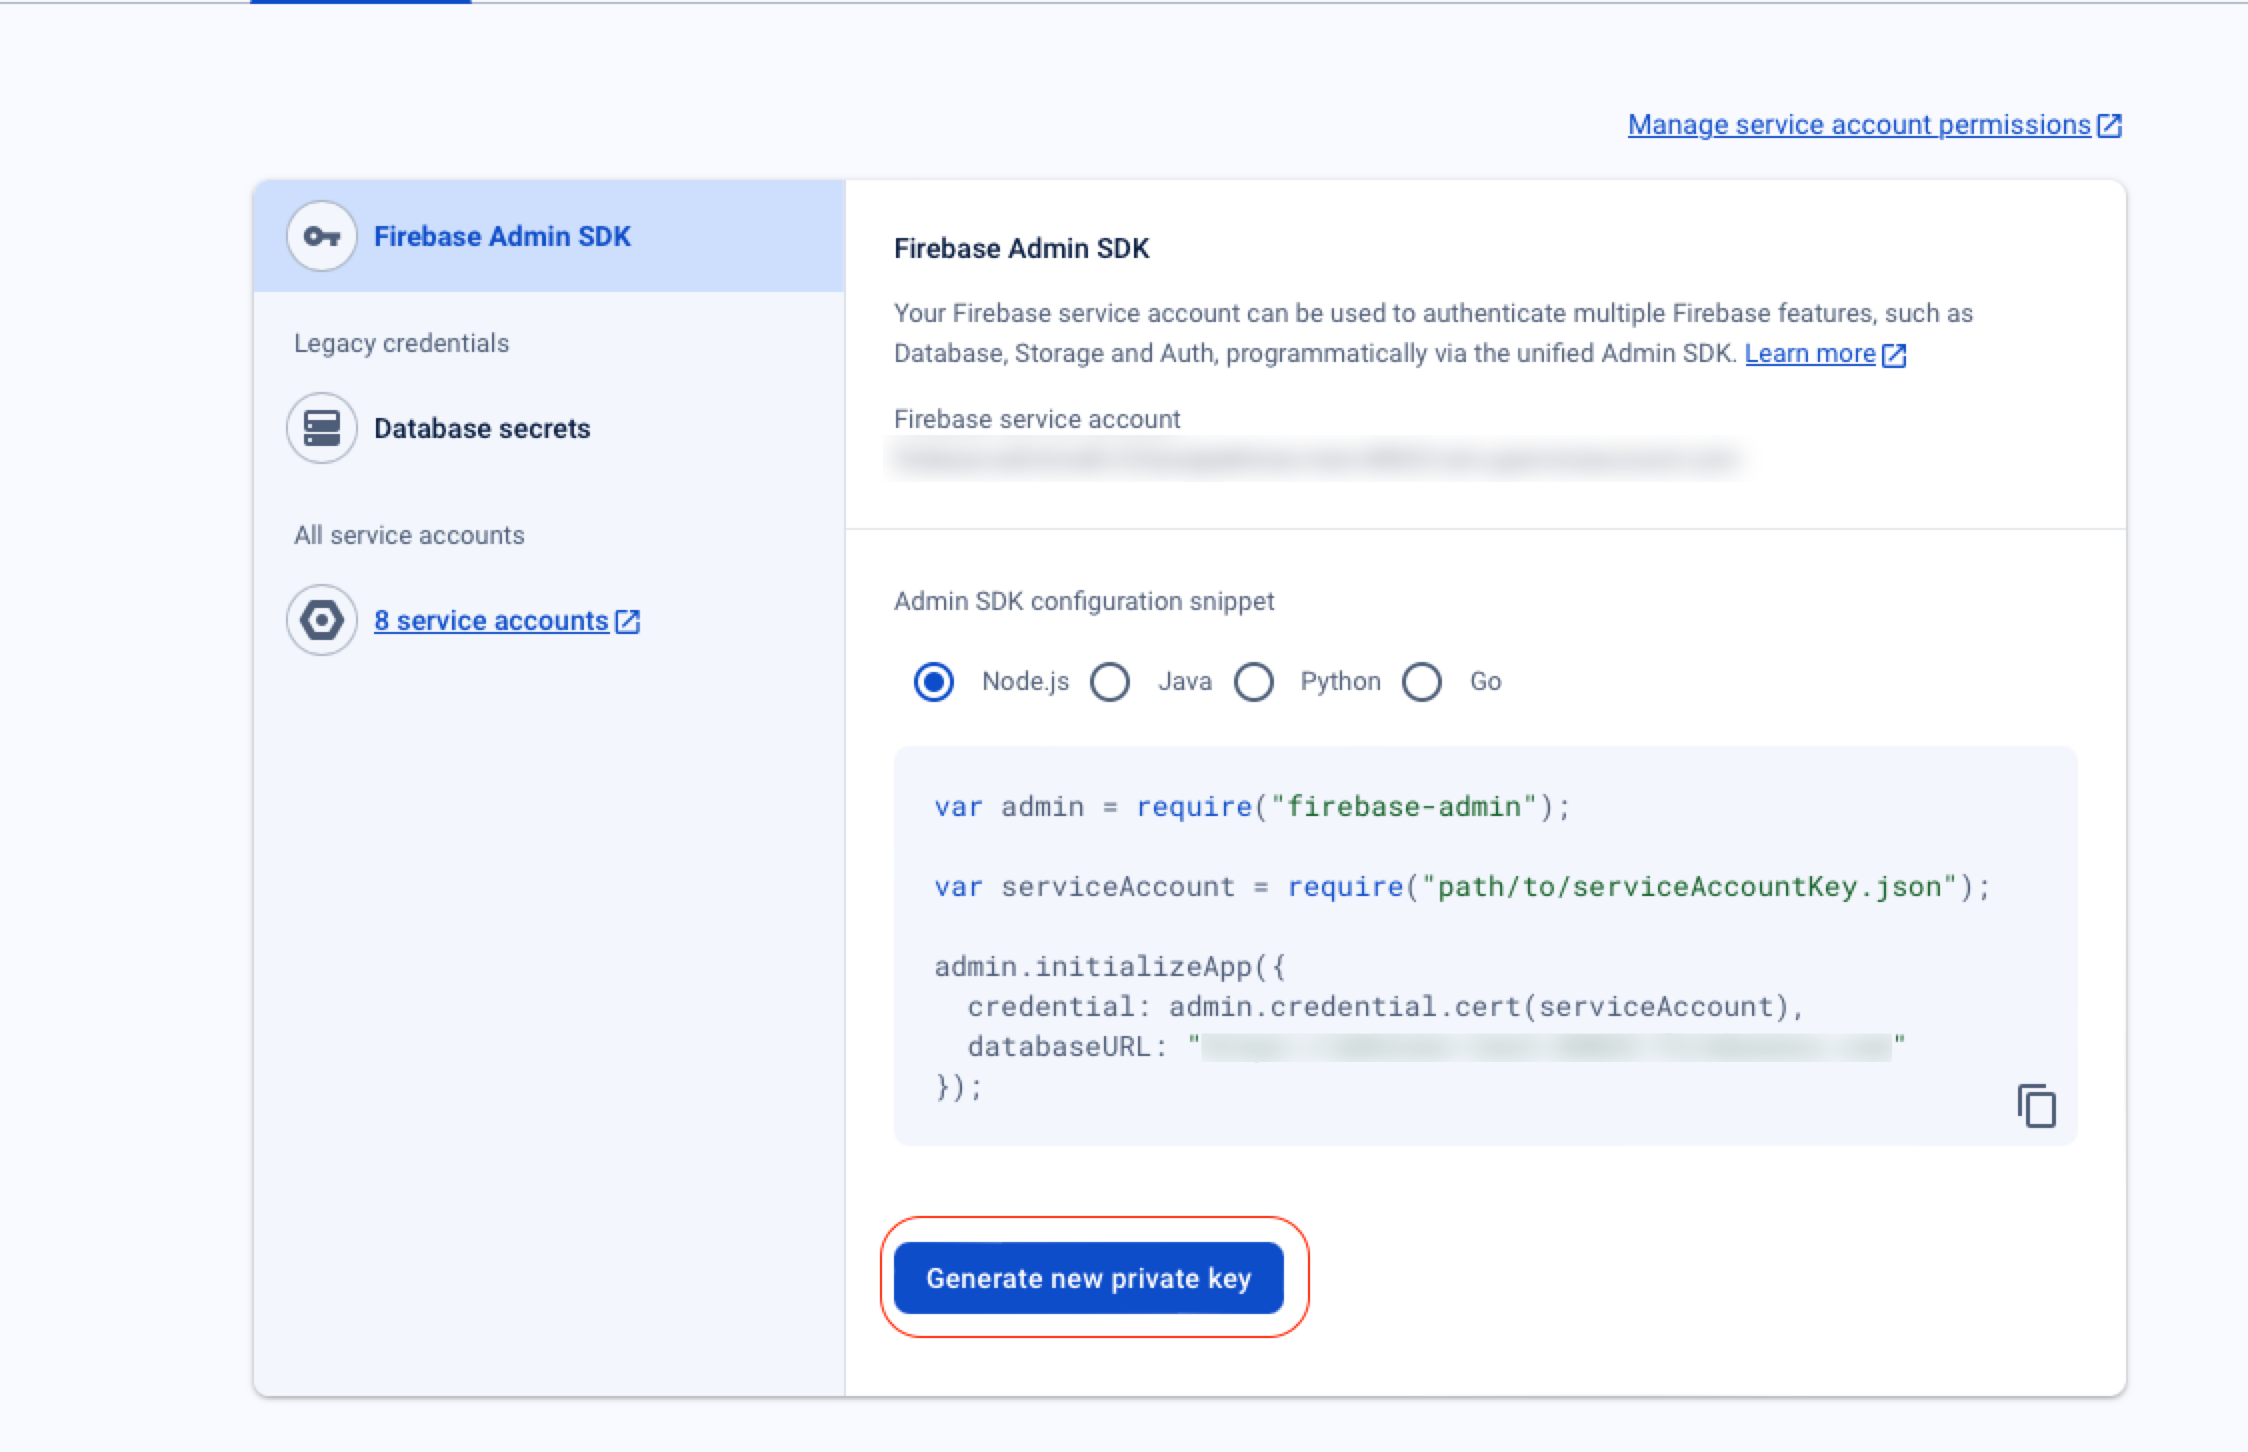
Generate New Private Key
- Confirm your action by clicking Generate Key.
Set Up FCM Credentials on CleverTap
To ensure your campaigns are delivered, you must set up FCM Credentials on the CleverTap dashboard:
- Log in to the CleverTap dashboard and go to Settings > Channels > Mobile Push.
- Click the FCM credentials section and click Upload FCM Credential File, as shown in the following image:
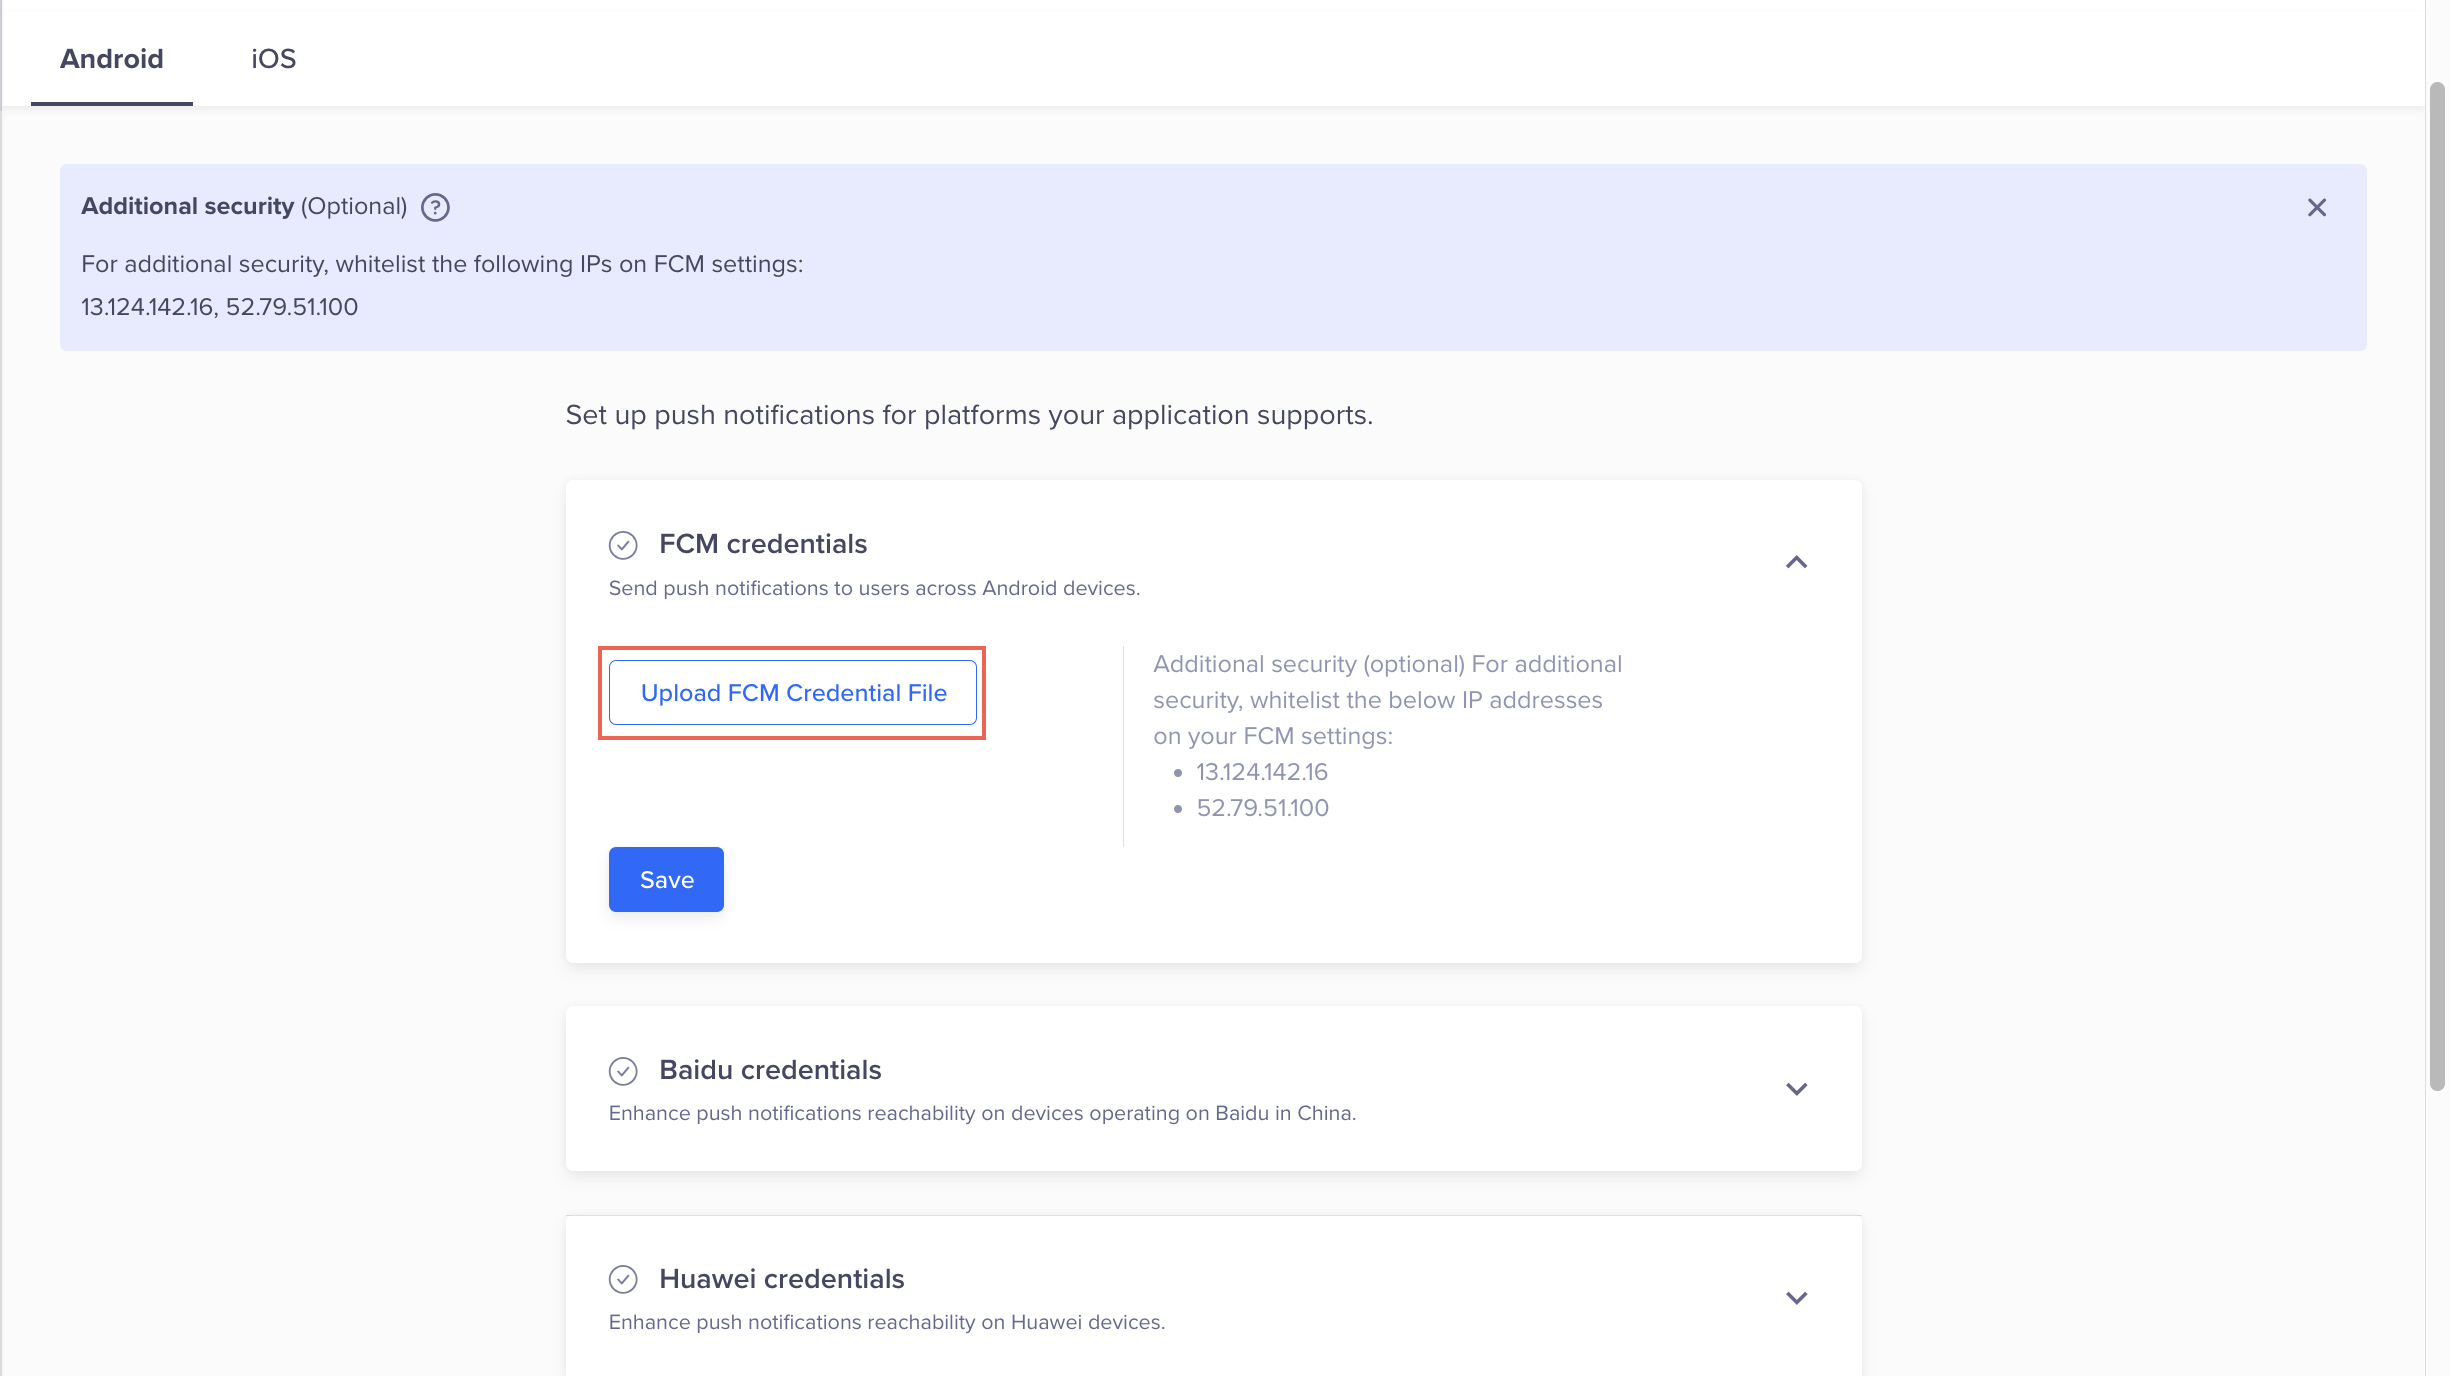
Upload FCM Credential File
- Click Save.
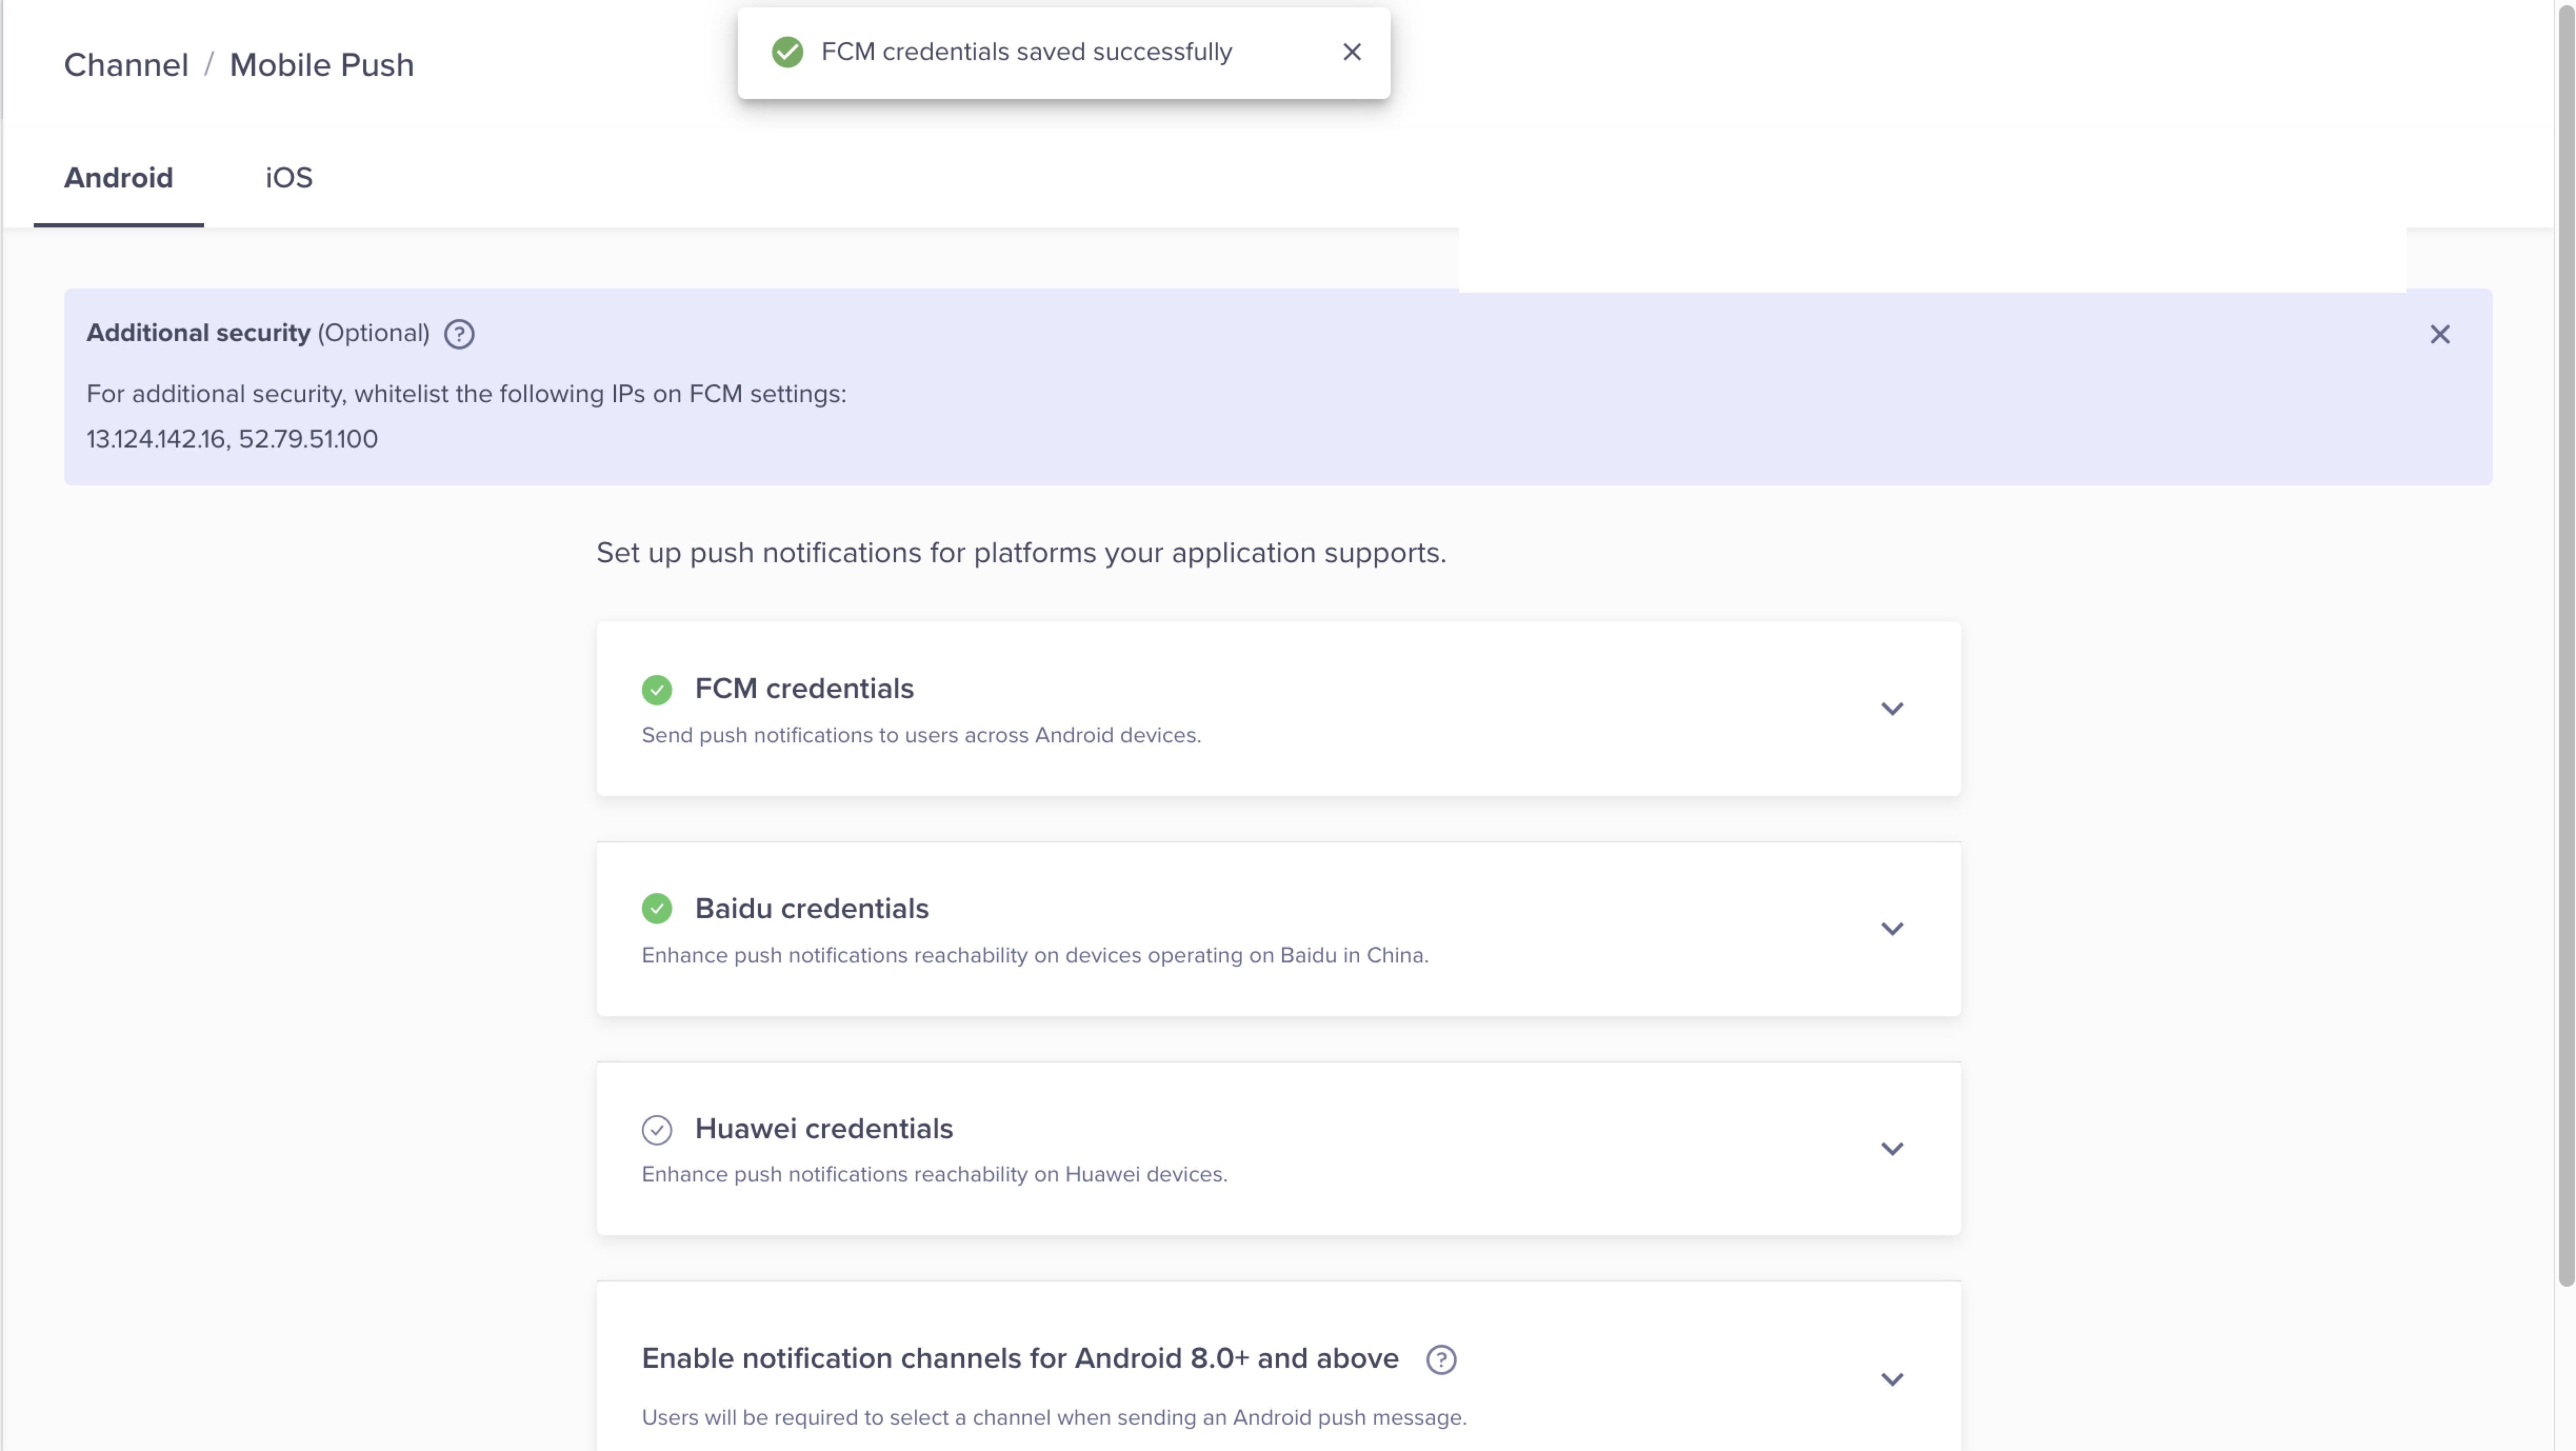
FCM Credentials Saved to CleverTap Dashboard
- Send a personalized Push campaign to internal users to verify if the configuration is successful.
Safeguard Admin Credentials
If your privacy policy requires safeguarding your admin credentials shared in the JSON file with CleverTap, follow the steps listed below:
- Open your Firebase project and go to the Service accounts tab.
- Click the service accounts list, as shown in the following figure:
Click Service Accounts List
- Select your project from the Service Accounts page and click + CREATE SERVICE ACCOUNT.

Create Service Account
- Add the Service account name and Grant Firebase Cloud Messaging API Admin role to the service account and click Done, as shown in the following figure:
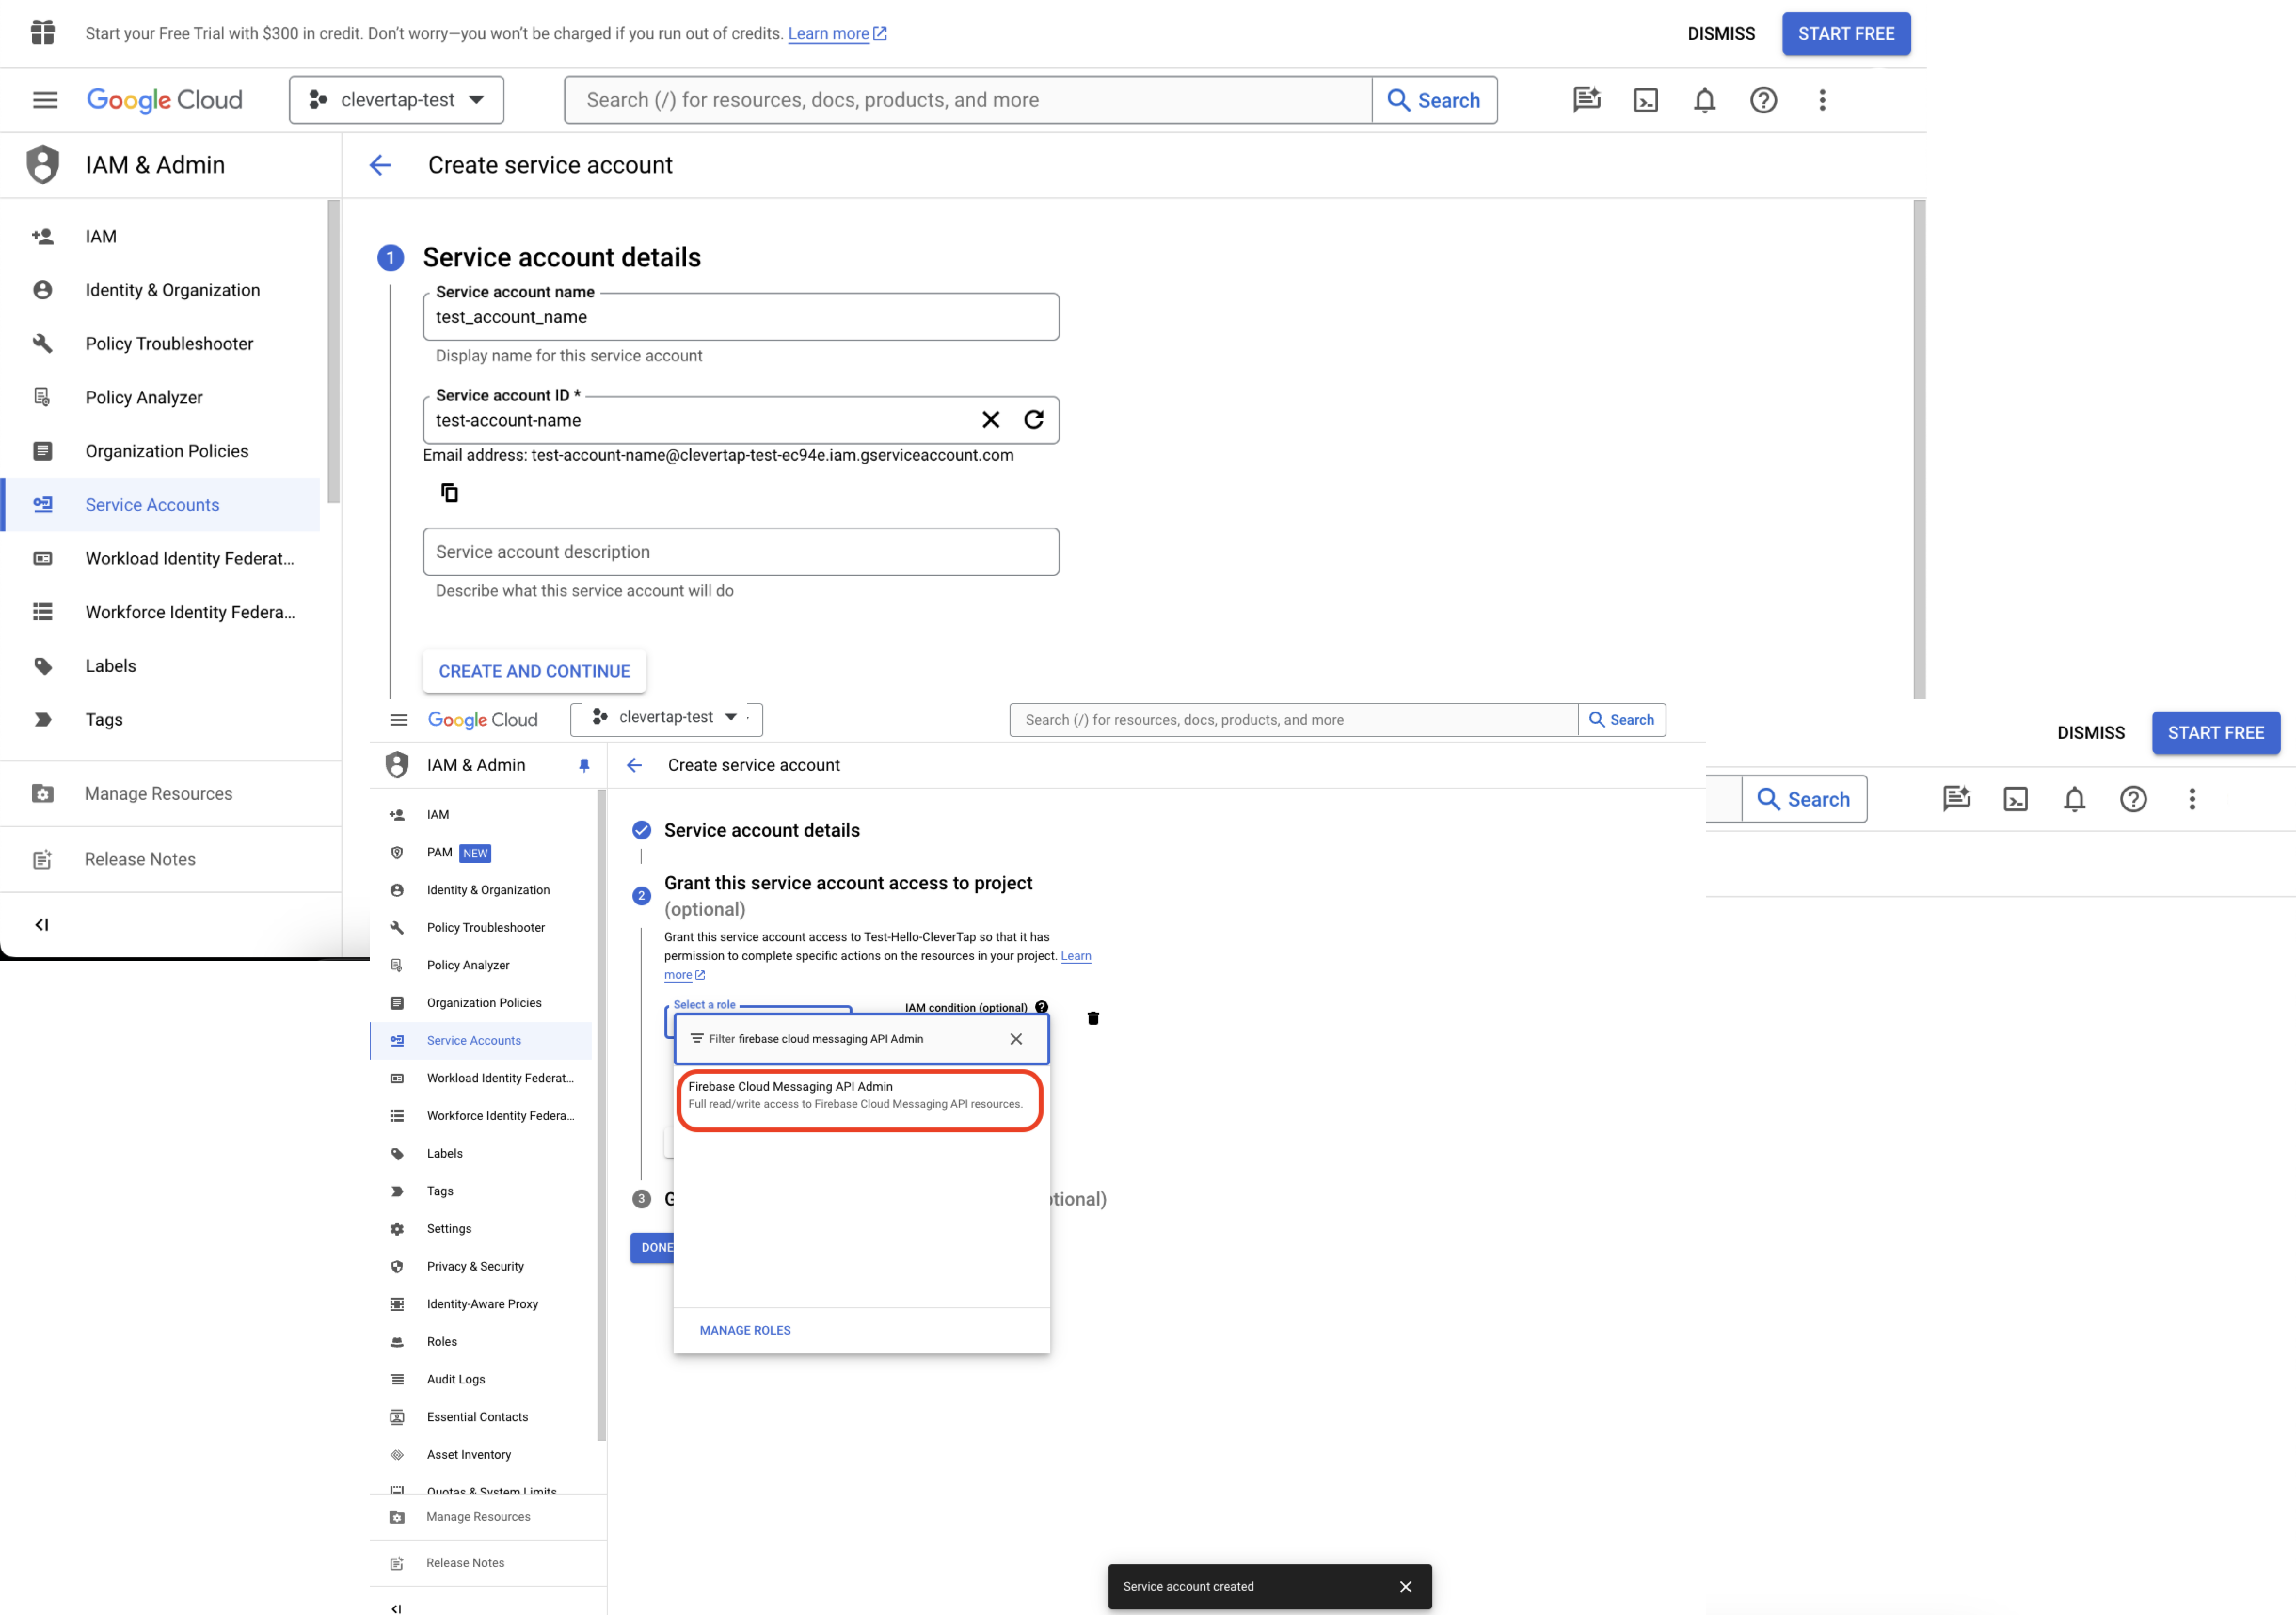
Assign Role to Service Account
- Download your Credentials File:
- Navigate to the Keys tab from your service account and click ADD KEY.
- Select the Key type as JSON and click Create. The credentials file is downloaded.
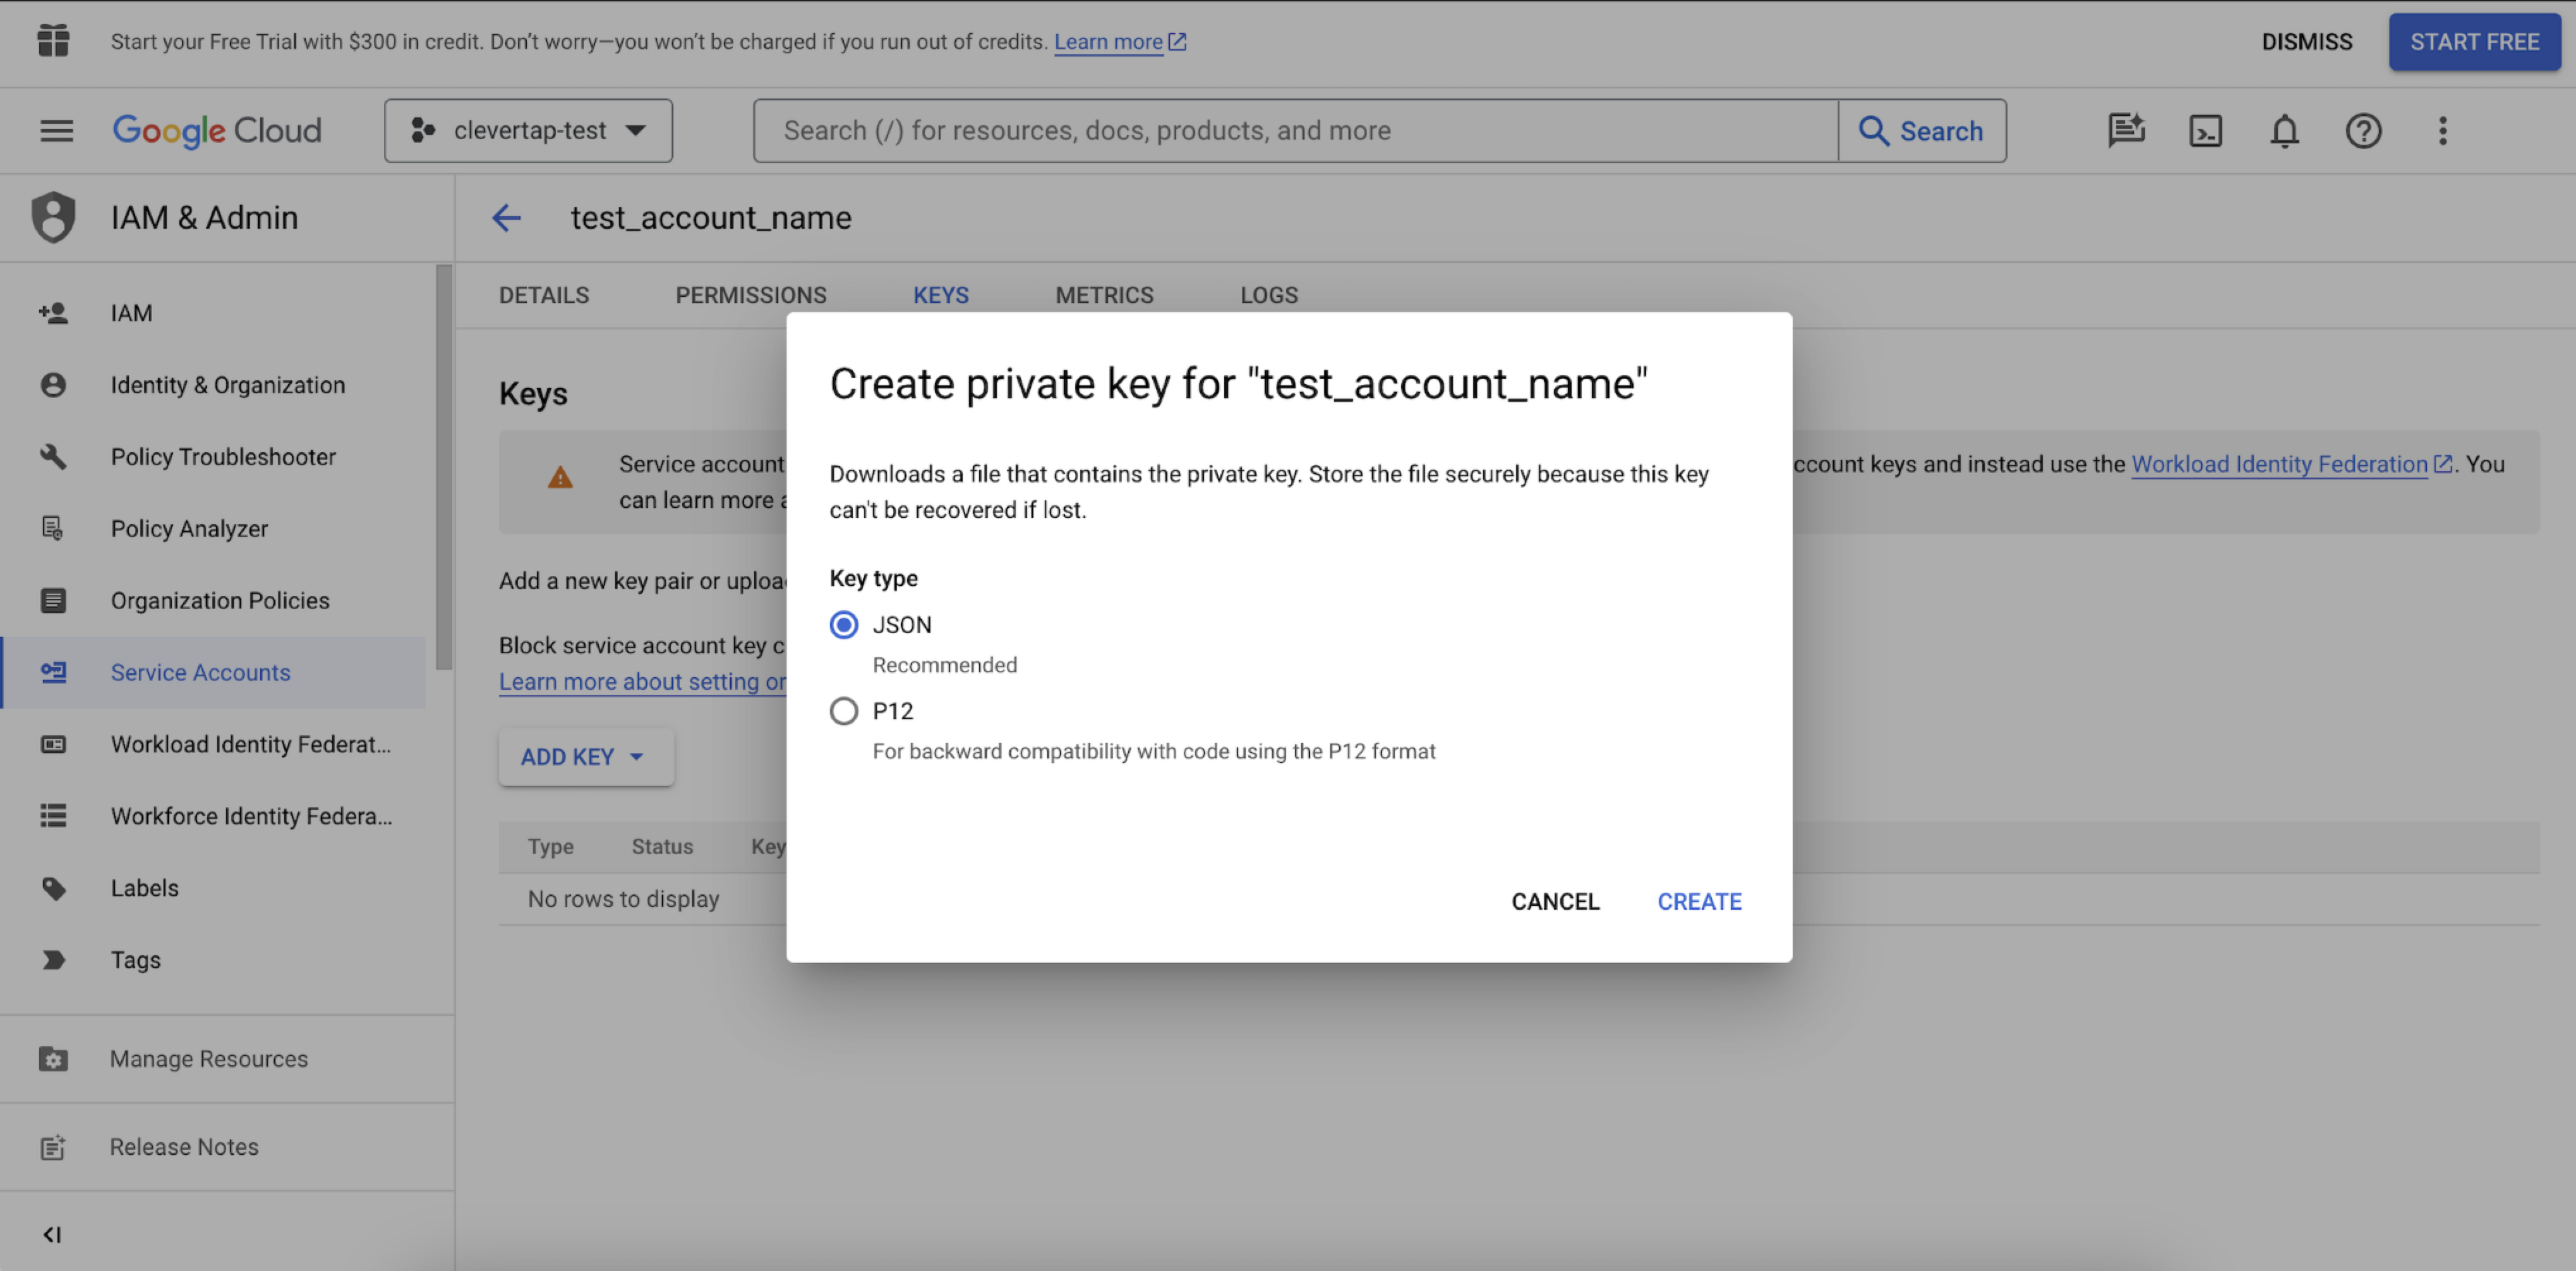
Download Credential File
- Use these credentials on a test account. Once you have validated it, you can use the same process for live account key generation and upload it to the CleverTap dashboard.
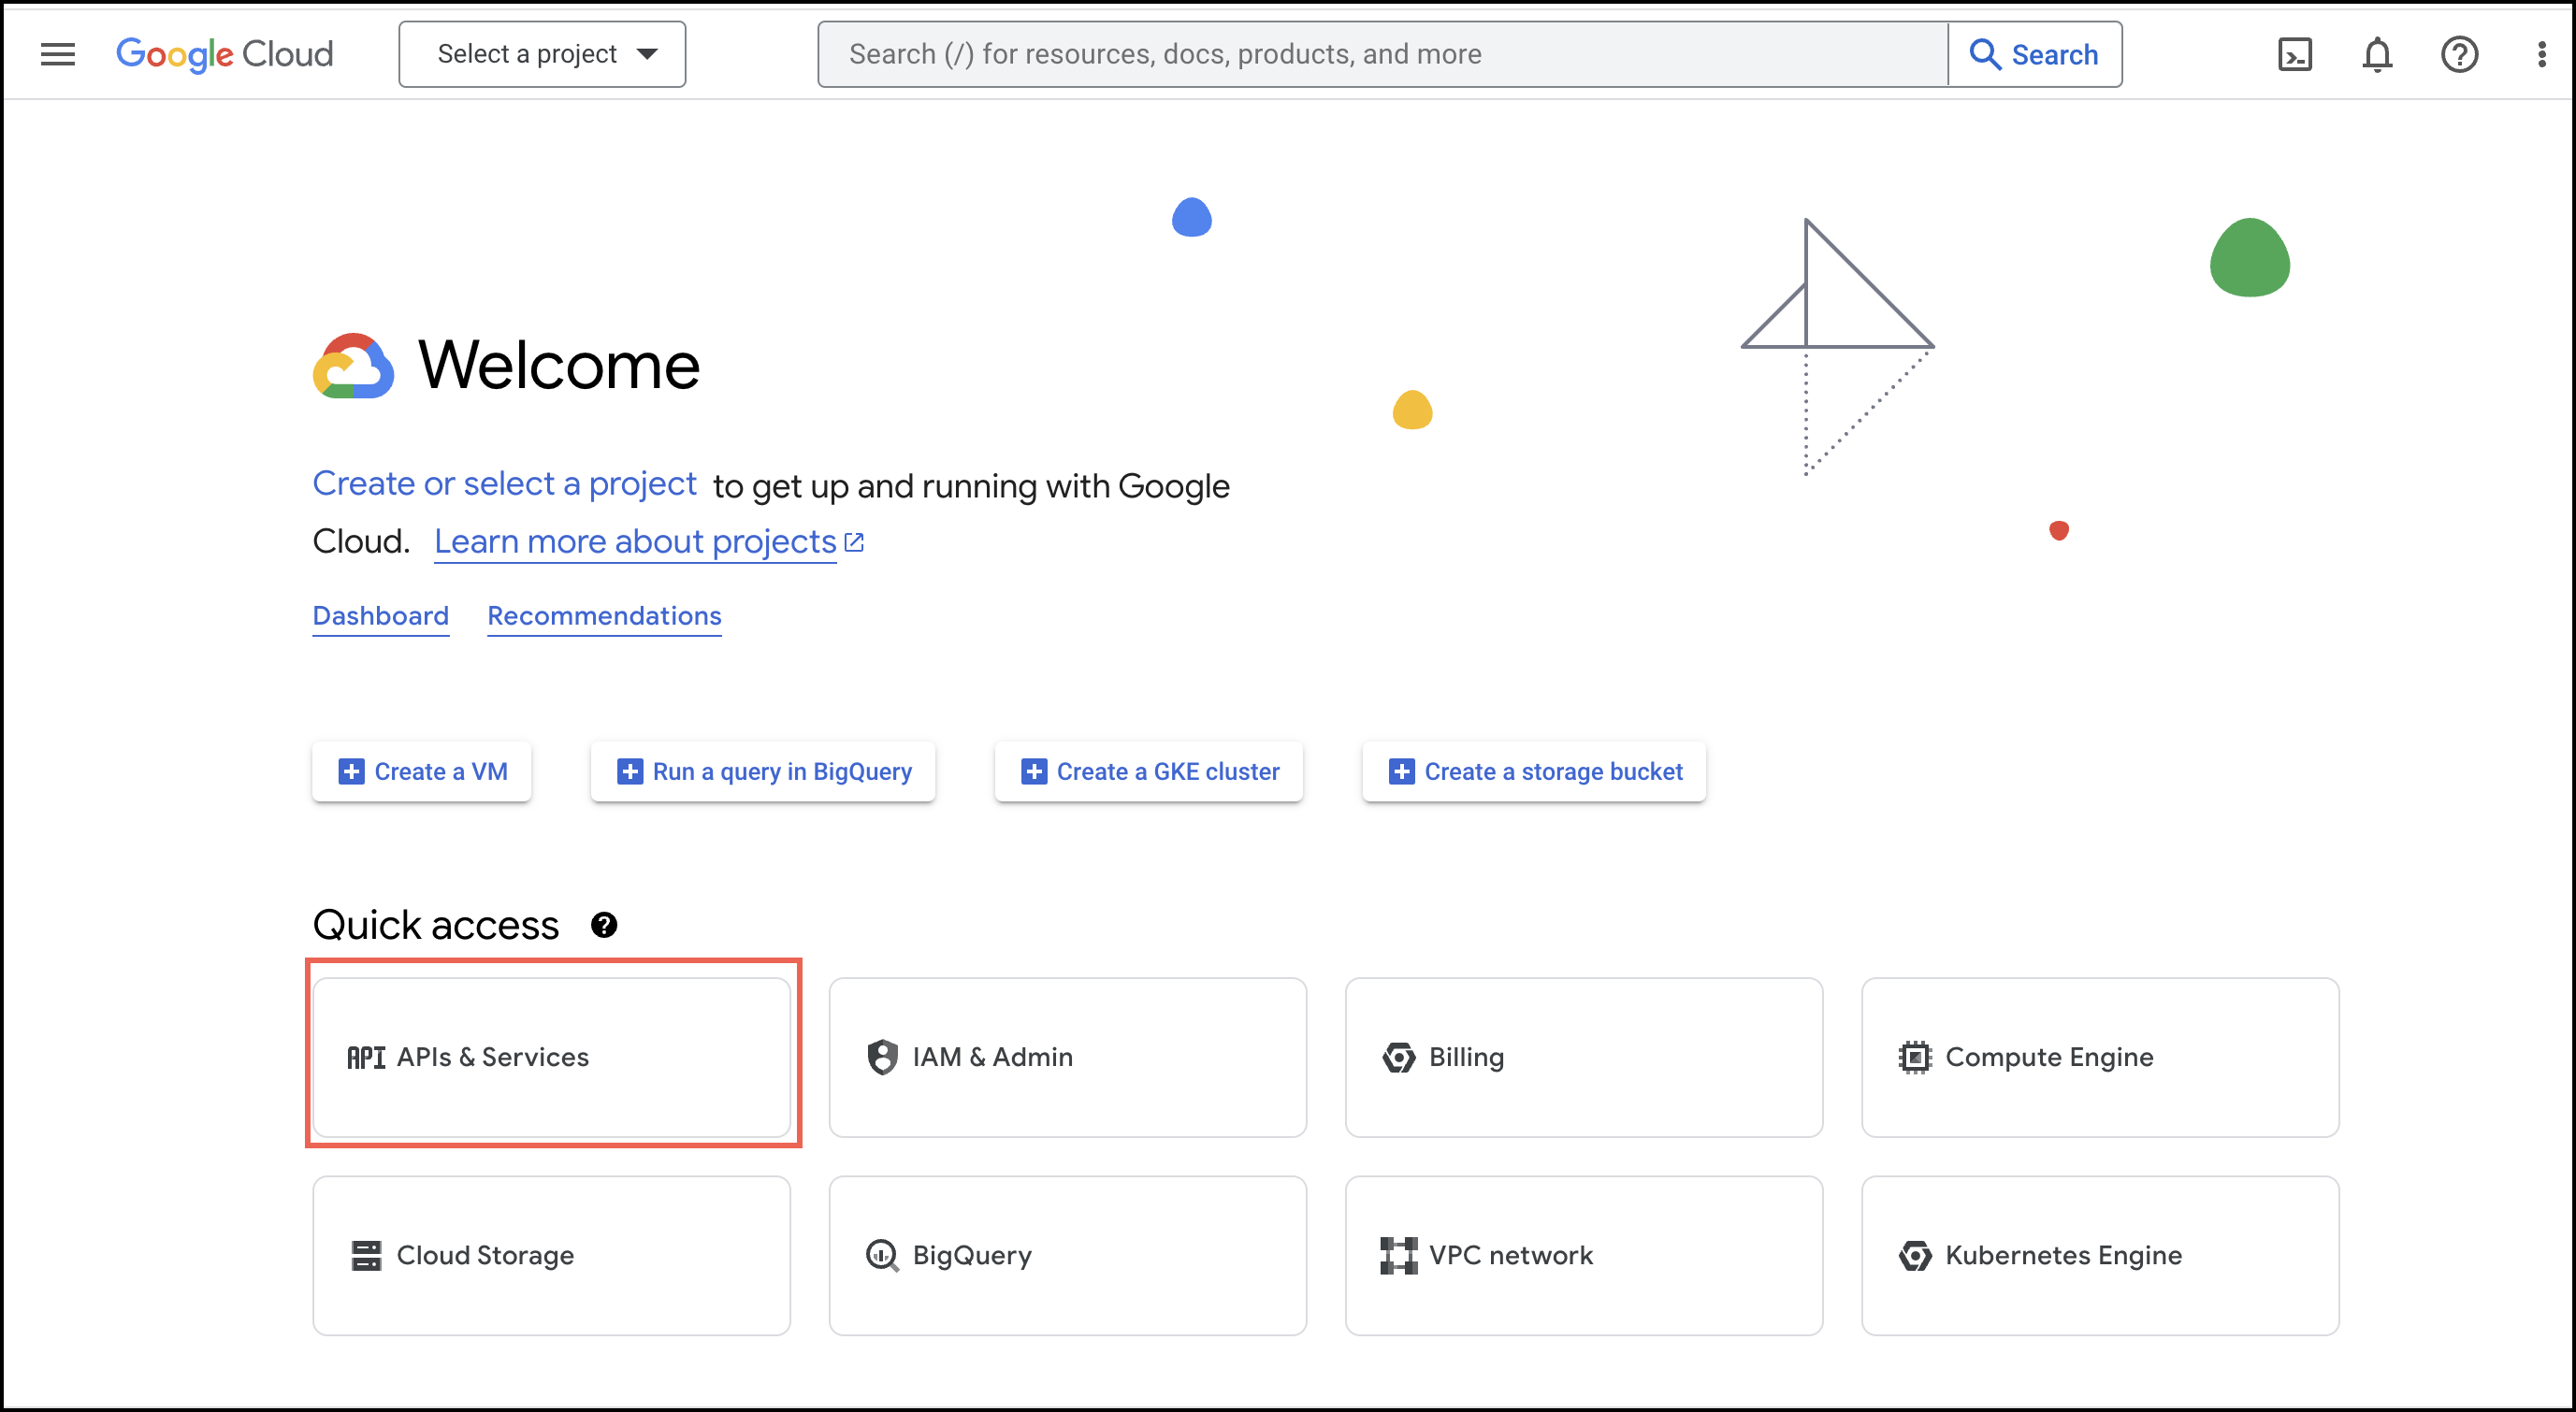
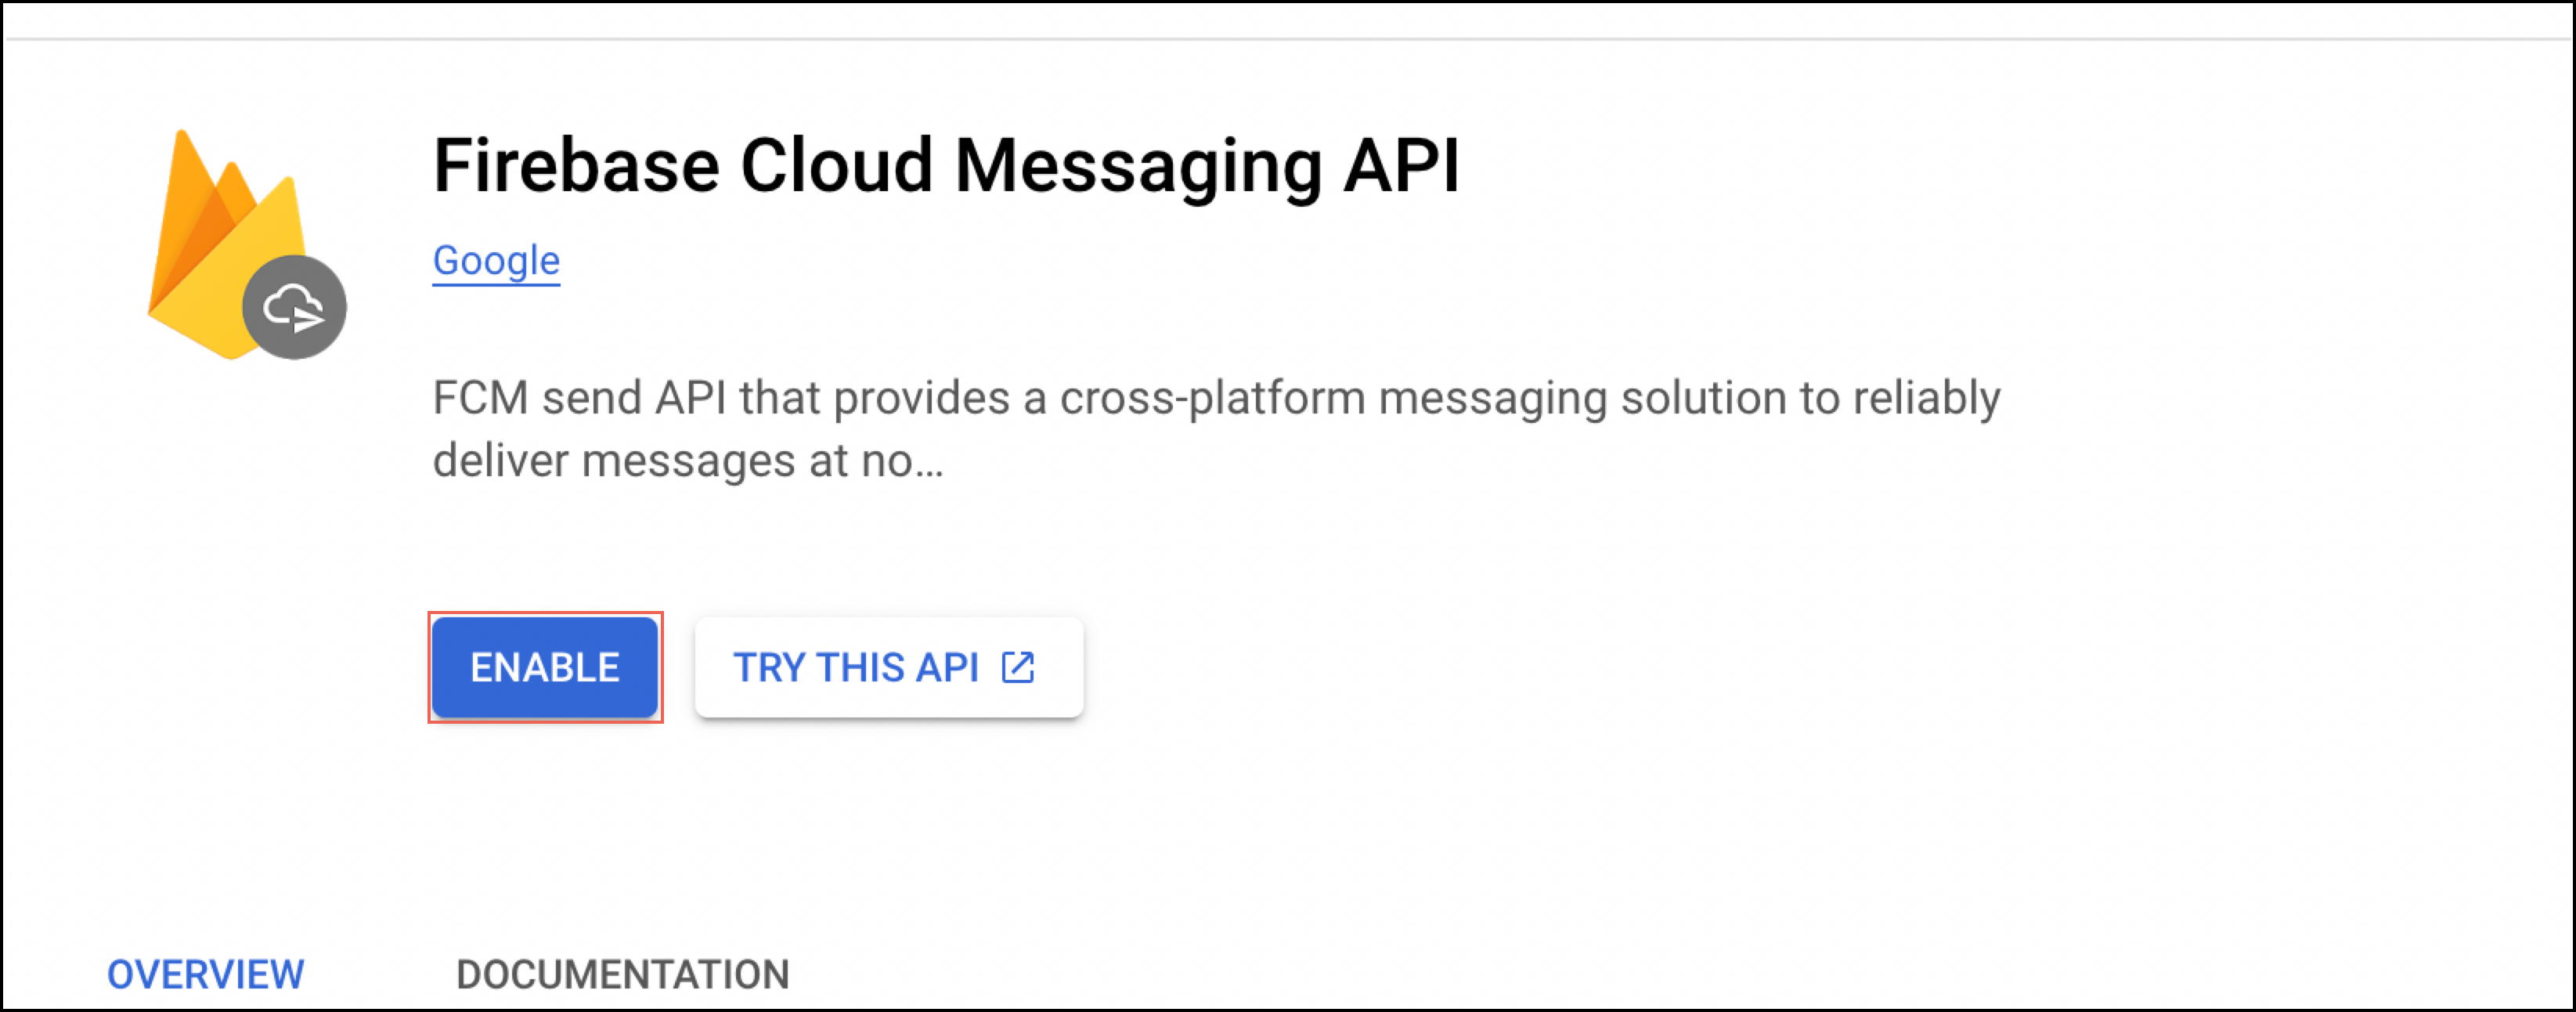
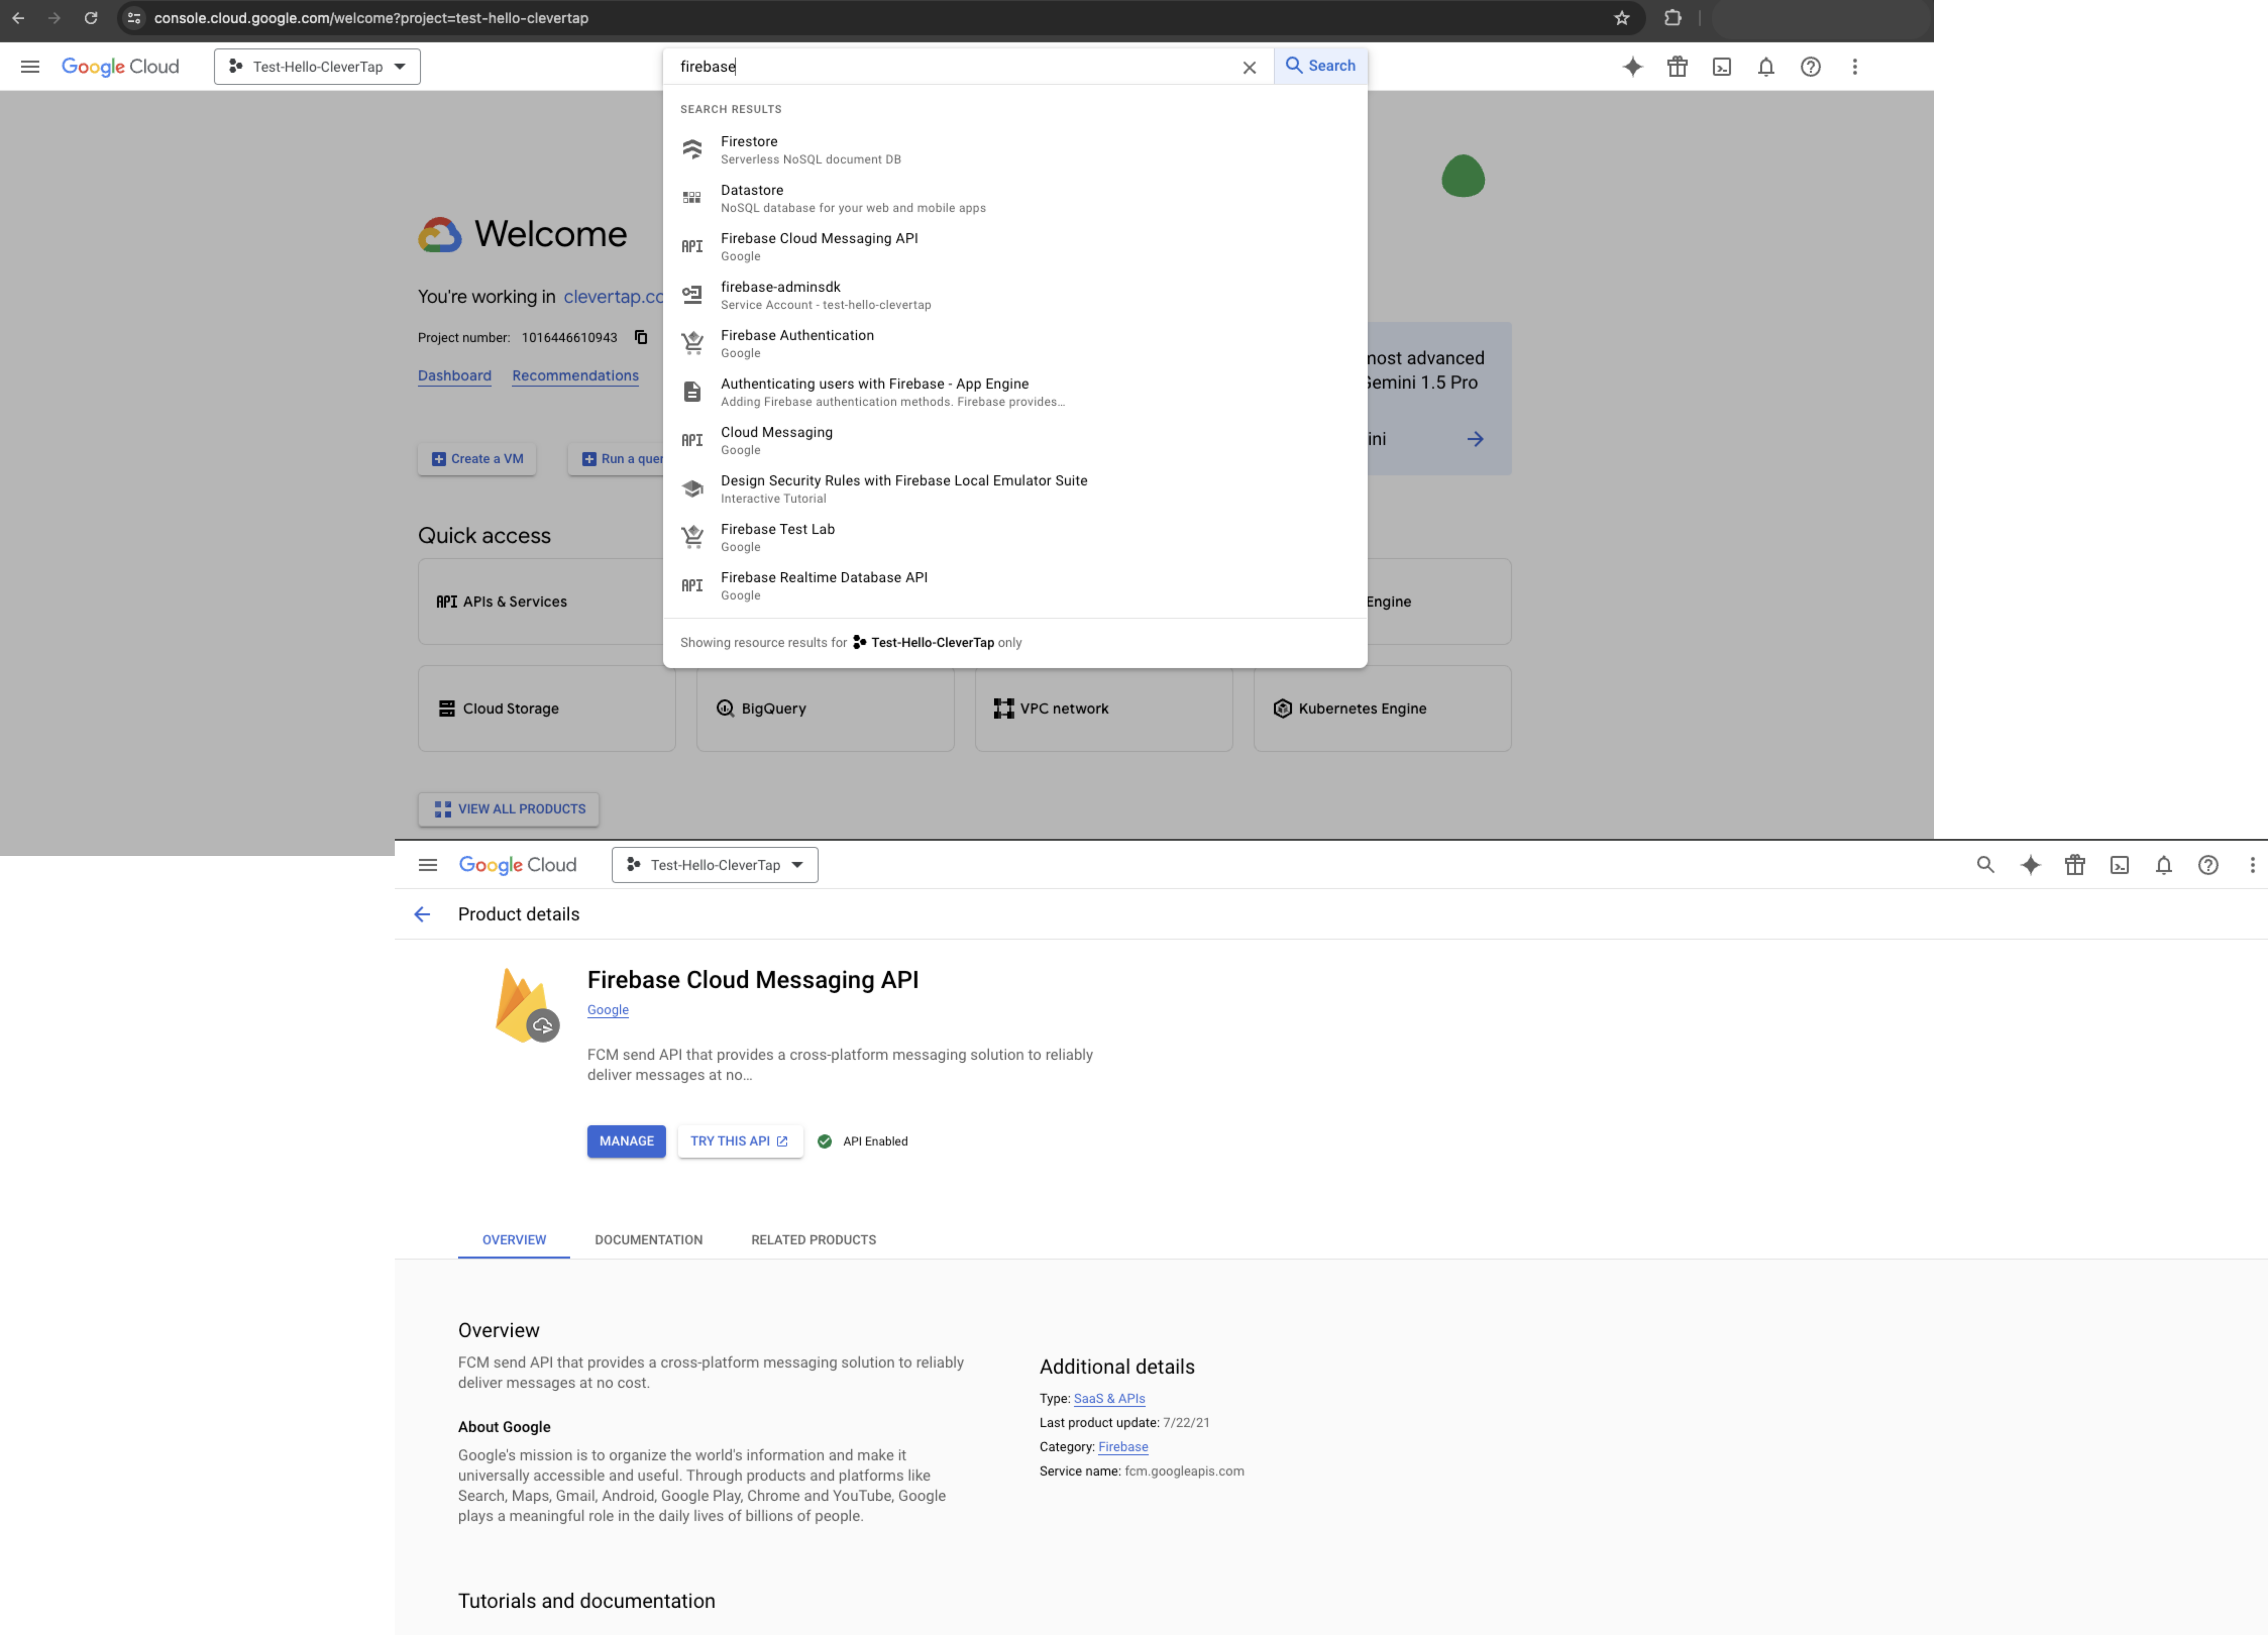
PrerequisiteTo enable Firebase Cloud Messaging API, do the following:
- Go to console.cloud.google.com and click API & Services.
- Click Cloud Messaging API link from the left menu.
- Click ENABLE if it is not already enabled.
HTTP v1 API Rate Limits
With the new HTTP v1 API, the rate at which FCM sends requests per minute has changed. Each project now has a strictly enforced threshold for the number of requests allowed. The HTTP v1 API allocates 600,000 tokens per 1-minute token bucket, which replenishes completely at the end of each 1-minute interval.
Verify API Rate Limits
To verify the API Limits for your account:
-
Navigate to the Firebase Cloud Messaging API Management menu:
- Go to console.cloud.google.com and select your project from the dropdown if not already selected.
- Search and select Firebase Cloud Messaging API.
- Click Manage.
Navigate to Firebase Cloud Messaging API Management Menu
-
Find your Send Requests per Minute Quota:
- Navigate to the Quotas and System Limits tab.
- Check your Send Requests per Minute Quota, as shown in the following image:
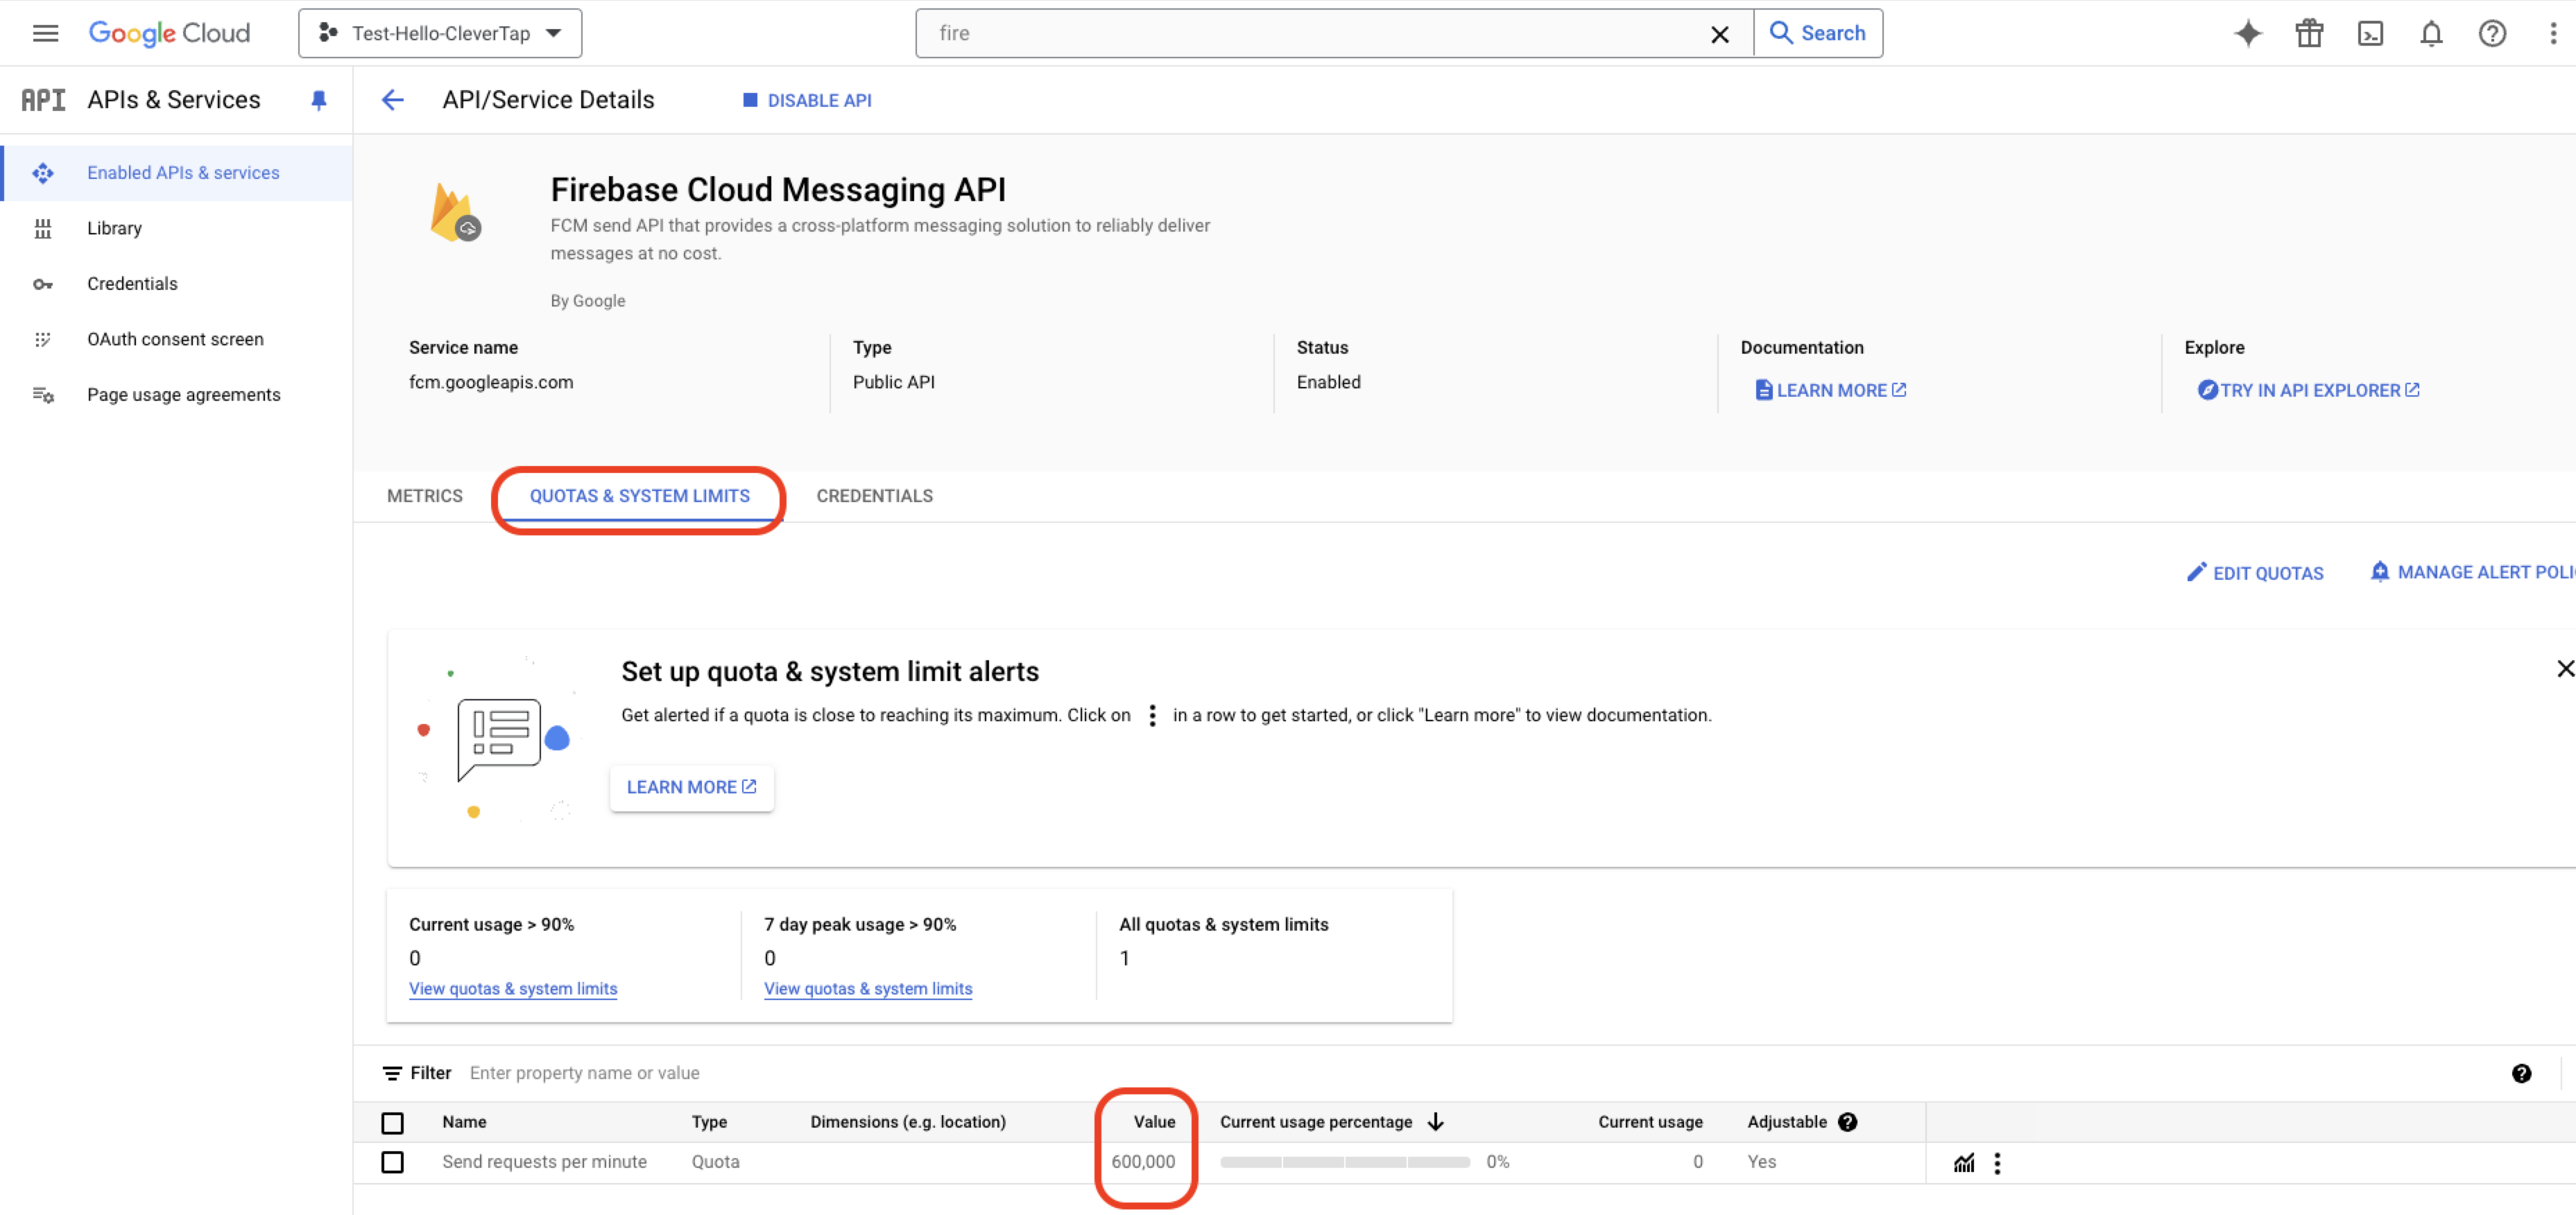
Find Send Requests per Minute Quota For Your Account
API Rate Limit Exceeded
Consider an example where your account is granted a quota of 1000 requests per minute, and your target segment consists of 5000 users. FCM expects the throttle rate to adhere strictly to this limit. Failure to comply with this throttle rate may result in push notifications not being delivered to users and instead resulting in errors. It also triggers a non-compliance email from the FCM support team. However, CleverTap attempts to resend the request up to three times before marking it as a failed delivery and raises the FCM Rate limit exceeded error.
To optimize this, you can use CleverTap's throttle feature under the Campaign Limits section to help you stay within your allocated quota. This limit is set globally and can be configured by navigating to Settings > Setup > Campaign Limits and modifying the throttle limit.
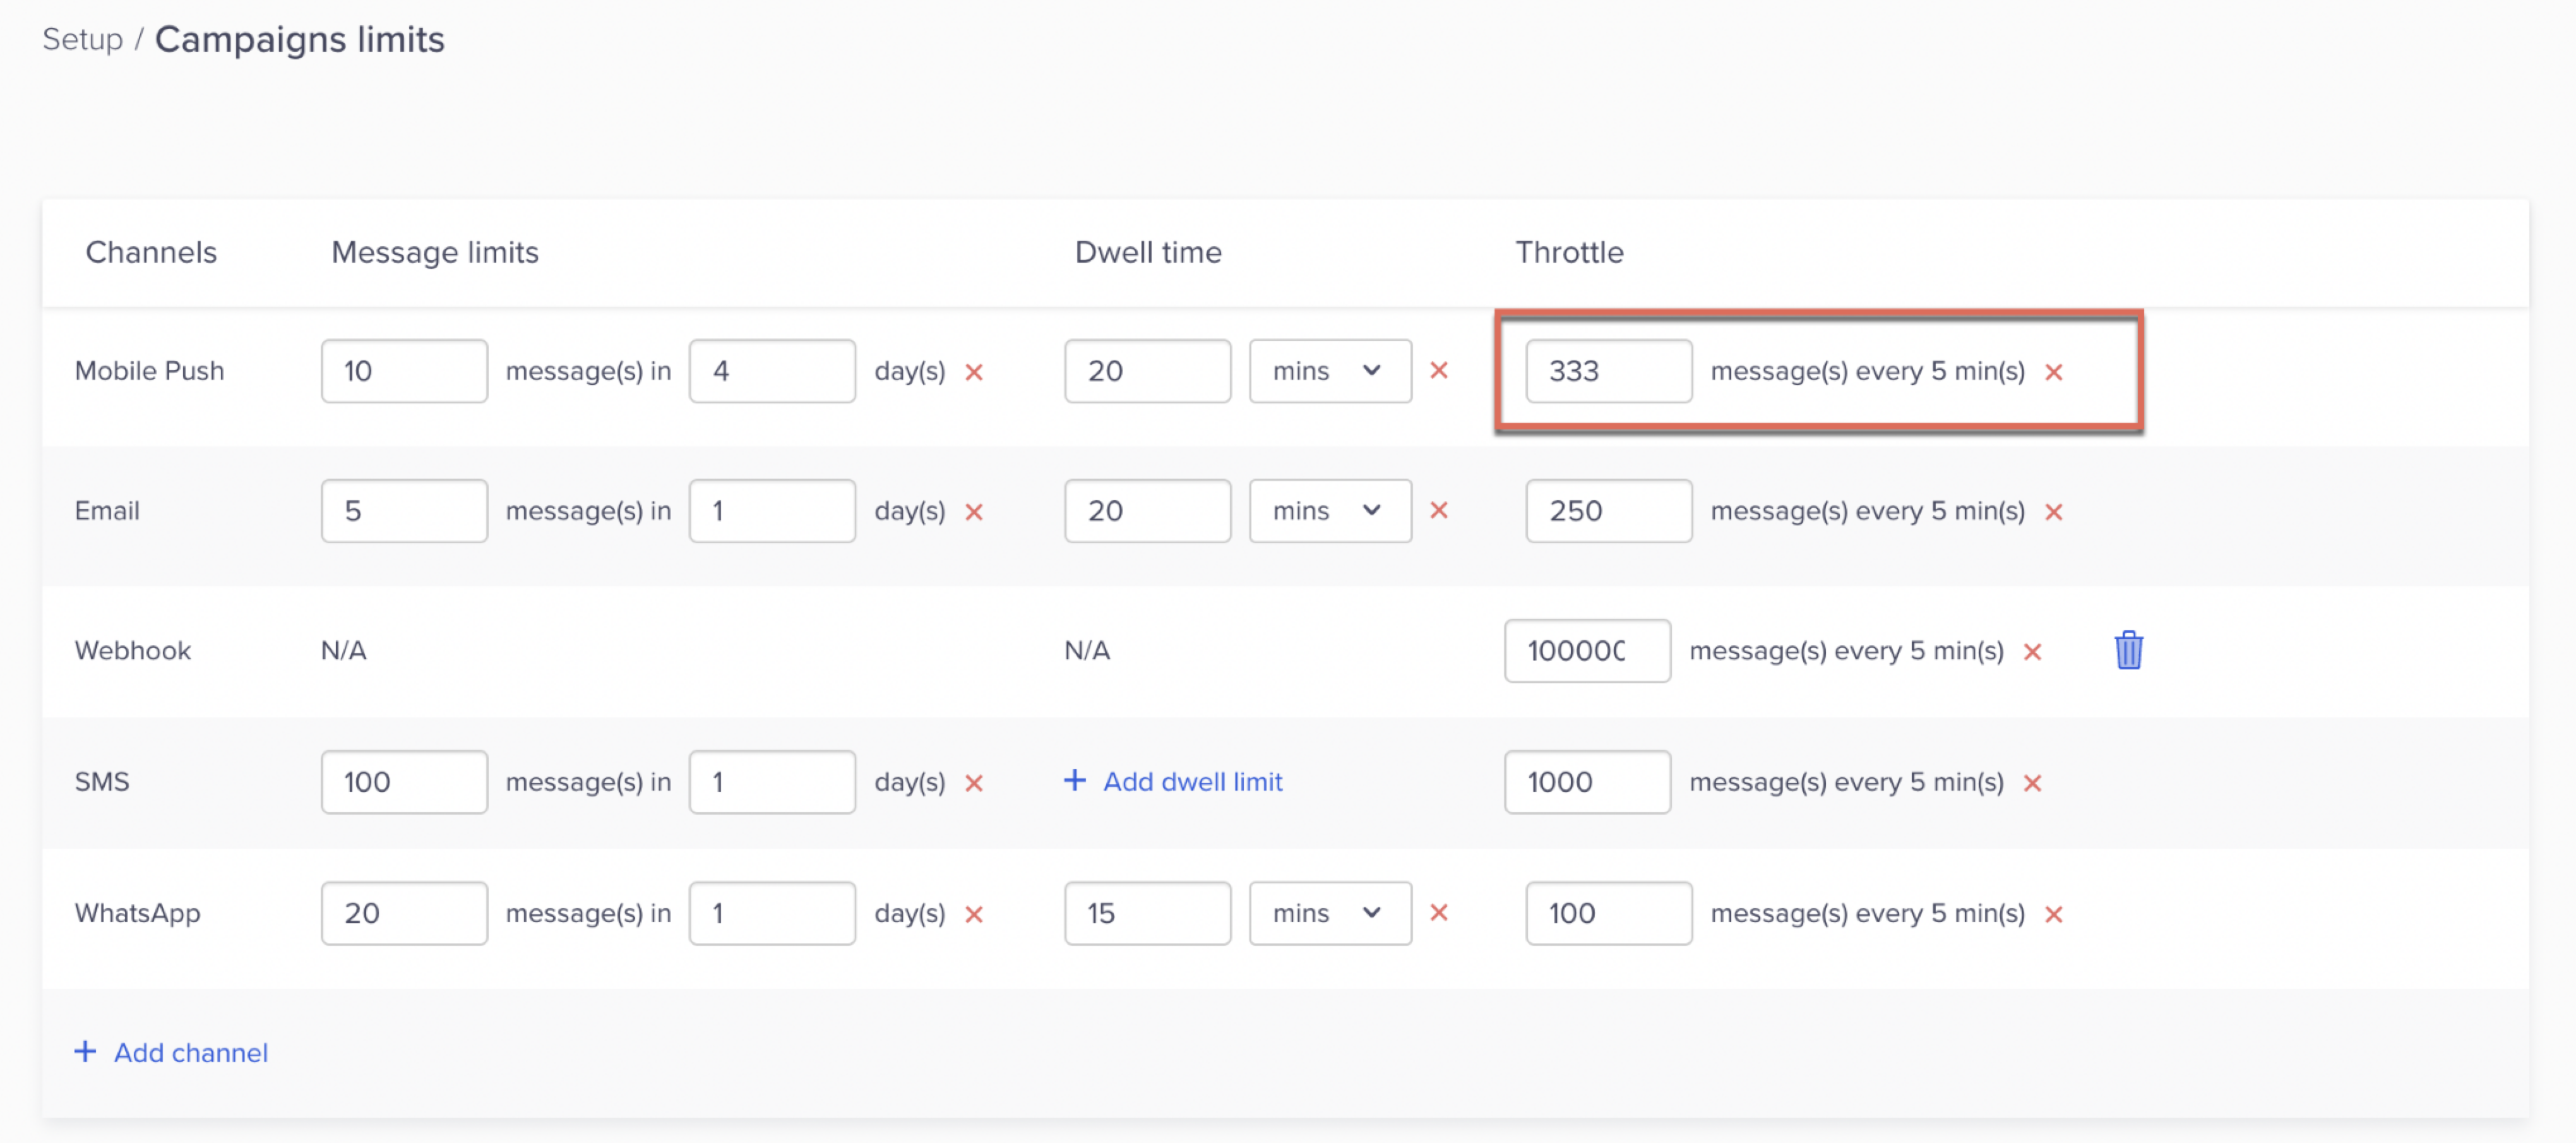
Set Up Throttle Limit
If you encounter any issues, refer to the frequently asked questions section.
Campaign Throttle LimitThe FCM quota limit applies only to Android push notifications. However, CleverTap's campaign throttle limit applies at the campaign level. If there are multiple campaigns or if you want to deliver notifications to both Android and iOS devices, or use other FCM services, the campaign throttle limit must be set below the FCM quota limit to ensure efficient delivery.
Add CleverTap's FcmMessageListenerService
Inside the
<service
    android:name="com.clevertap.android.sdk.pushnotification.fcm.FcmMessageListenerService"
android:exported="true">
    <intent-filter>
        <action android:name="com.google.firebase.MESSAGING_EVENT"/>
    </intent-filter>
</service>
Opening a notification using CleverTap’s implementation launches your app. If you send a deeplink, the link will be opened.
Custom Android Push Notification Handling
Step 1. Using Your Custom Implementation
If you have your custom implementation for managing Android push notifications, you can inform CleverTap about the user’s FCM registration ID.
Follow the instructions below if you are using FCM.
String fcmRegId = FirebaseInstanceId.getInstance().getToken();
clevertapDefaultInstance.pushFcmRegistrationId(fcmRegId,true);
val fcmRegId = FirebaseInstanceId.getInstance().token
clevertapDefaultInstance?.pushFcmRegistrationId(fcmRegId, true)Step 2: Using Multiple Android Push Notification Providers
CleverTap plays well with other Android push notification providers. You can configure your app to work with multiple push notification providers.
If you are using FCM, please follow these instructions:
- Subclass
FirebaseMessagingServiceas shown below:
public class MyFcmMessageListenerService extends FirebaseMessagingService {

    @Override
    public void onMessageReceived(RemoteMessage message){
        try {
            if (message.getData().size() > 0) {
                Bundle extras = new Bundle();
                for (Map.Entry<String, String> entry : message.getData().entrySet()) {
                    extras.putString(entry.getKey(), entry.getValue());
                }

                NotificationInfo info = CleverTapAPI.getNotificationInfo(extras);

                if (info.fromCleverTap) {
                    CleverTapAPI.createNotification(getApplicationContext(), extras);
                } else {
                    // not from CleverTap handle yourself or pass to another provider
                }
            }
        } catch (Throwable t) {
           Log.d("MYFCMLIST", "Error parsing FCM message", t);
        }
    }
}
class MyFcmMessageListenerService : FirebaseMessagingService() {
override fun onMessageReceived(message: RemoteMessage) {
message.data.apply {
try {
if (size > 0) {
val extras = Bundle()
for ((key, value) in this) {
extras.putString(key, value)
}
val info = CleverTapAPI.getNotificationInfo(extras)
if (info.fromCleverTap) {
CleverTapAPI.createNotification(applicationContext, extras)
} else {
// not from CleverTap handle yourself or pass to another provider
}
}
} catch (t: Throwable) {
Log.d("MYFCMLIST", "Error parsing FCM message", t)
}
}
}
}If you are using CleverTap Android SDK v4.4.0 and above, you can add the following code instead of the above code:
public class MyFcmMessageListenerService extends FirebaseMessagingService {

    @Override
    public void onMessageReceived(RemoteMessage message){
        CTFcmMessageHandler()
                .createNotification(getApplicationContext(), message);
    }
}
class MyFcmMessageListenerService : FirebaseMessagingService() {
@Override
public void onMessageReceived(RemoteMessage message){
CTFcmMessageHandler()
.createNotification(applicationContext, message)
}
}
NoteFrom CleverTap Android SDK v5.1.0 onwards, the following API now runs on the caller's thread. Ensure to call it in
onMessageReceive()of messaging service:
CTFcmMessageHandler().createNotification(getApplicationContext(), message)CleverTapAPI.createNotification(getApplicationContext(),extras);
- Add your service to the
AndroidManifest.xmlin place of the CleverTapFcmMessageListenerService.
<service
    android:name="com.your.package.MyFcmMessageListenerService"
    android:exported="true">
    <intent-filter>
        <action android:name="com.google.firebase.MESSAGING_EVENT"/>
    </intent-filter>
</service>-
Replace
com.your.packagewith the correct package name which contains the newly created class,MyFcmMessageListenerService. -
To track the push notification events and deeplinks add the following receiver in your
AndroidManifest.xml:
<receiver
    android:name="com.clevertap.android.sdk.pushnotification.CTPushNotificationReceiver"
    android:exported="false"
    android:enabled="true">
</receiver>
Step 3: Structure of CleverTap FCM Payload
Here is the structure of the payload with a CleverTap FCM push notification.
| Key | Type | Description |
|---|---|---|
| wzrk_pn | N/A | If present, this notification is sent from CleverTap. |
| wzrk_id | string | Open rate tracking ID (can be empty or it might not be present). |
| wzrk_bp | string | If present, the value will be the URL of an image that needs to be displayed in the notification. |
| wzrk_sound | boolean or string | If present, it signifies that the default or custom Android notification sound must be played. |
| nt | string | Notification Title, if absent or empty, falls back to the app name. |
| nm | string | Notification Body, if absent or empty, ignore this notification. |
| wzrk_dl | string | If present, this is a deeplink that must be followed at the time of notification open. |
| wzrk_d | N/A | If present, ignore this notification. |
| ico | string | If present and not empty, it contains the URL of an image that must be used as the small notification icon. |
| wzrk_pivot | string | If present and not empty, it signifies the type of variant in A/B campaigns. |
| wzrk_rnv | string | If present and not empty, it will raise the Push Impressions event. |
| wzrk_nms | string | If present and not empty, it contains the summary text to be displayed along with the image. |
| wzrk_st | string | If present and not empty, it contains the subtitle text, which is displayed next to the App name. |
| wzrk_clr | string | If present and not empty, it contains the Hex value of the color to be applied on the small icon (and app name for Android versions below Pie) |
| wzrk_bpds | string | If present and not empty, indicate the image rendering status in the push notification. Its values indicate the following statuses: - NO_IMAGE: The push payload does not include an image.- SUCCESS: The push payload contains an image that was downloaded successfully.- NO_NETWORK: The push payload includes an image, but the user's device does not have network connectivity.- DOWNLOAD_FAILED: The push payload contains an image that could not be downloaded due to an external error. |
| wzrk_bpdsr | string | If wzrk_bpds is DOWNLOAD_FAILED, the companion key wzrk_bpdsr contains a detailed reason string describing why the big picture image download failed (for example, network errors, decode failures, timeout). This helps with debugging push notification rendering issues. This is available starting from v8.0.0. |
If the field nm is empty, ignore the notification. CleverTap sends out a dummy notification with the nm field empty to test for app uninstalls. In addition to the above, attach all keys starting with wzrk to your notification extras (For example, wzrk_id is used to track notification opens).
Set the Small Notification Icon
The small icon is a notification bar icon displayed in the push notifications, as shown in the image below:
Set the Small Notification Icon
With the release of Android 5 (Lollipop), the notification icons are rendered differently in the notification bar at the top. By default, our SDK uses the app's icon for both the notification icon and the notification bar icon; however, since Android 5, all non-alpha channels are ignored while drawing the main notification icon. For more information, refer to Android Notification Guide in the Android documentation.
The small icon must be an alpha only image, which means it must have only one color and be transparent for the rest. The alpha only icon image combines the colored and transparent regions.
In general, the logo displayed on the icon has a single color, and the background is transparent. The alpha channel provides the ability to embed transparency within an image. This can be accomplished with tools such as Adobe Photoshop, Illustrator, and so on. You can also change the colored region of the small icon from the CleverTap dashboard.
The CleverTap SDK fills the transparent section of the small icon with the selected color:
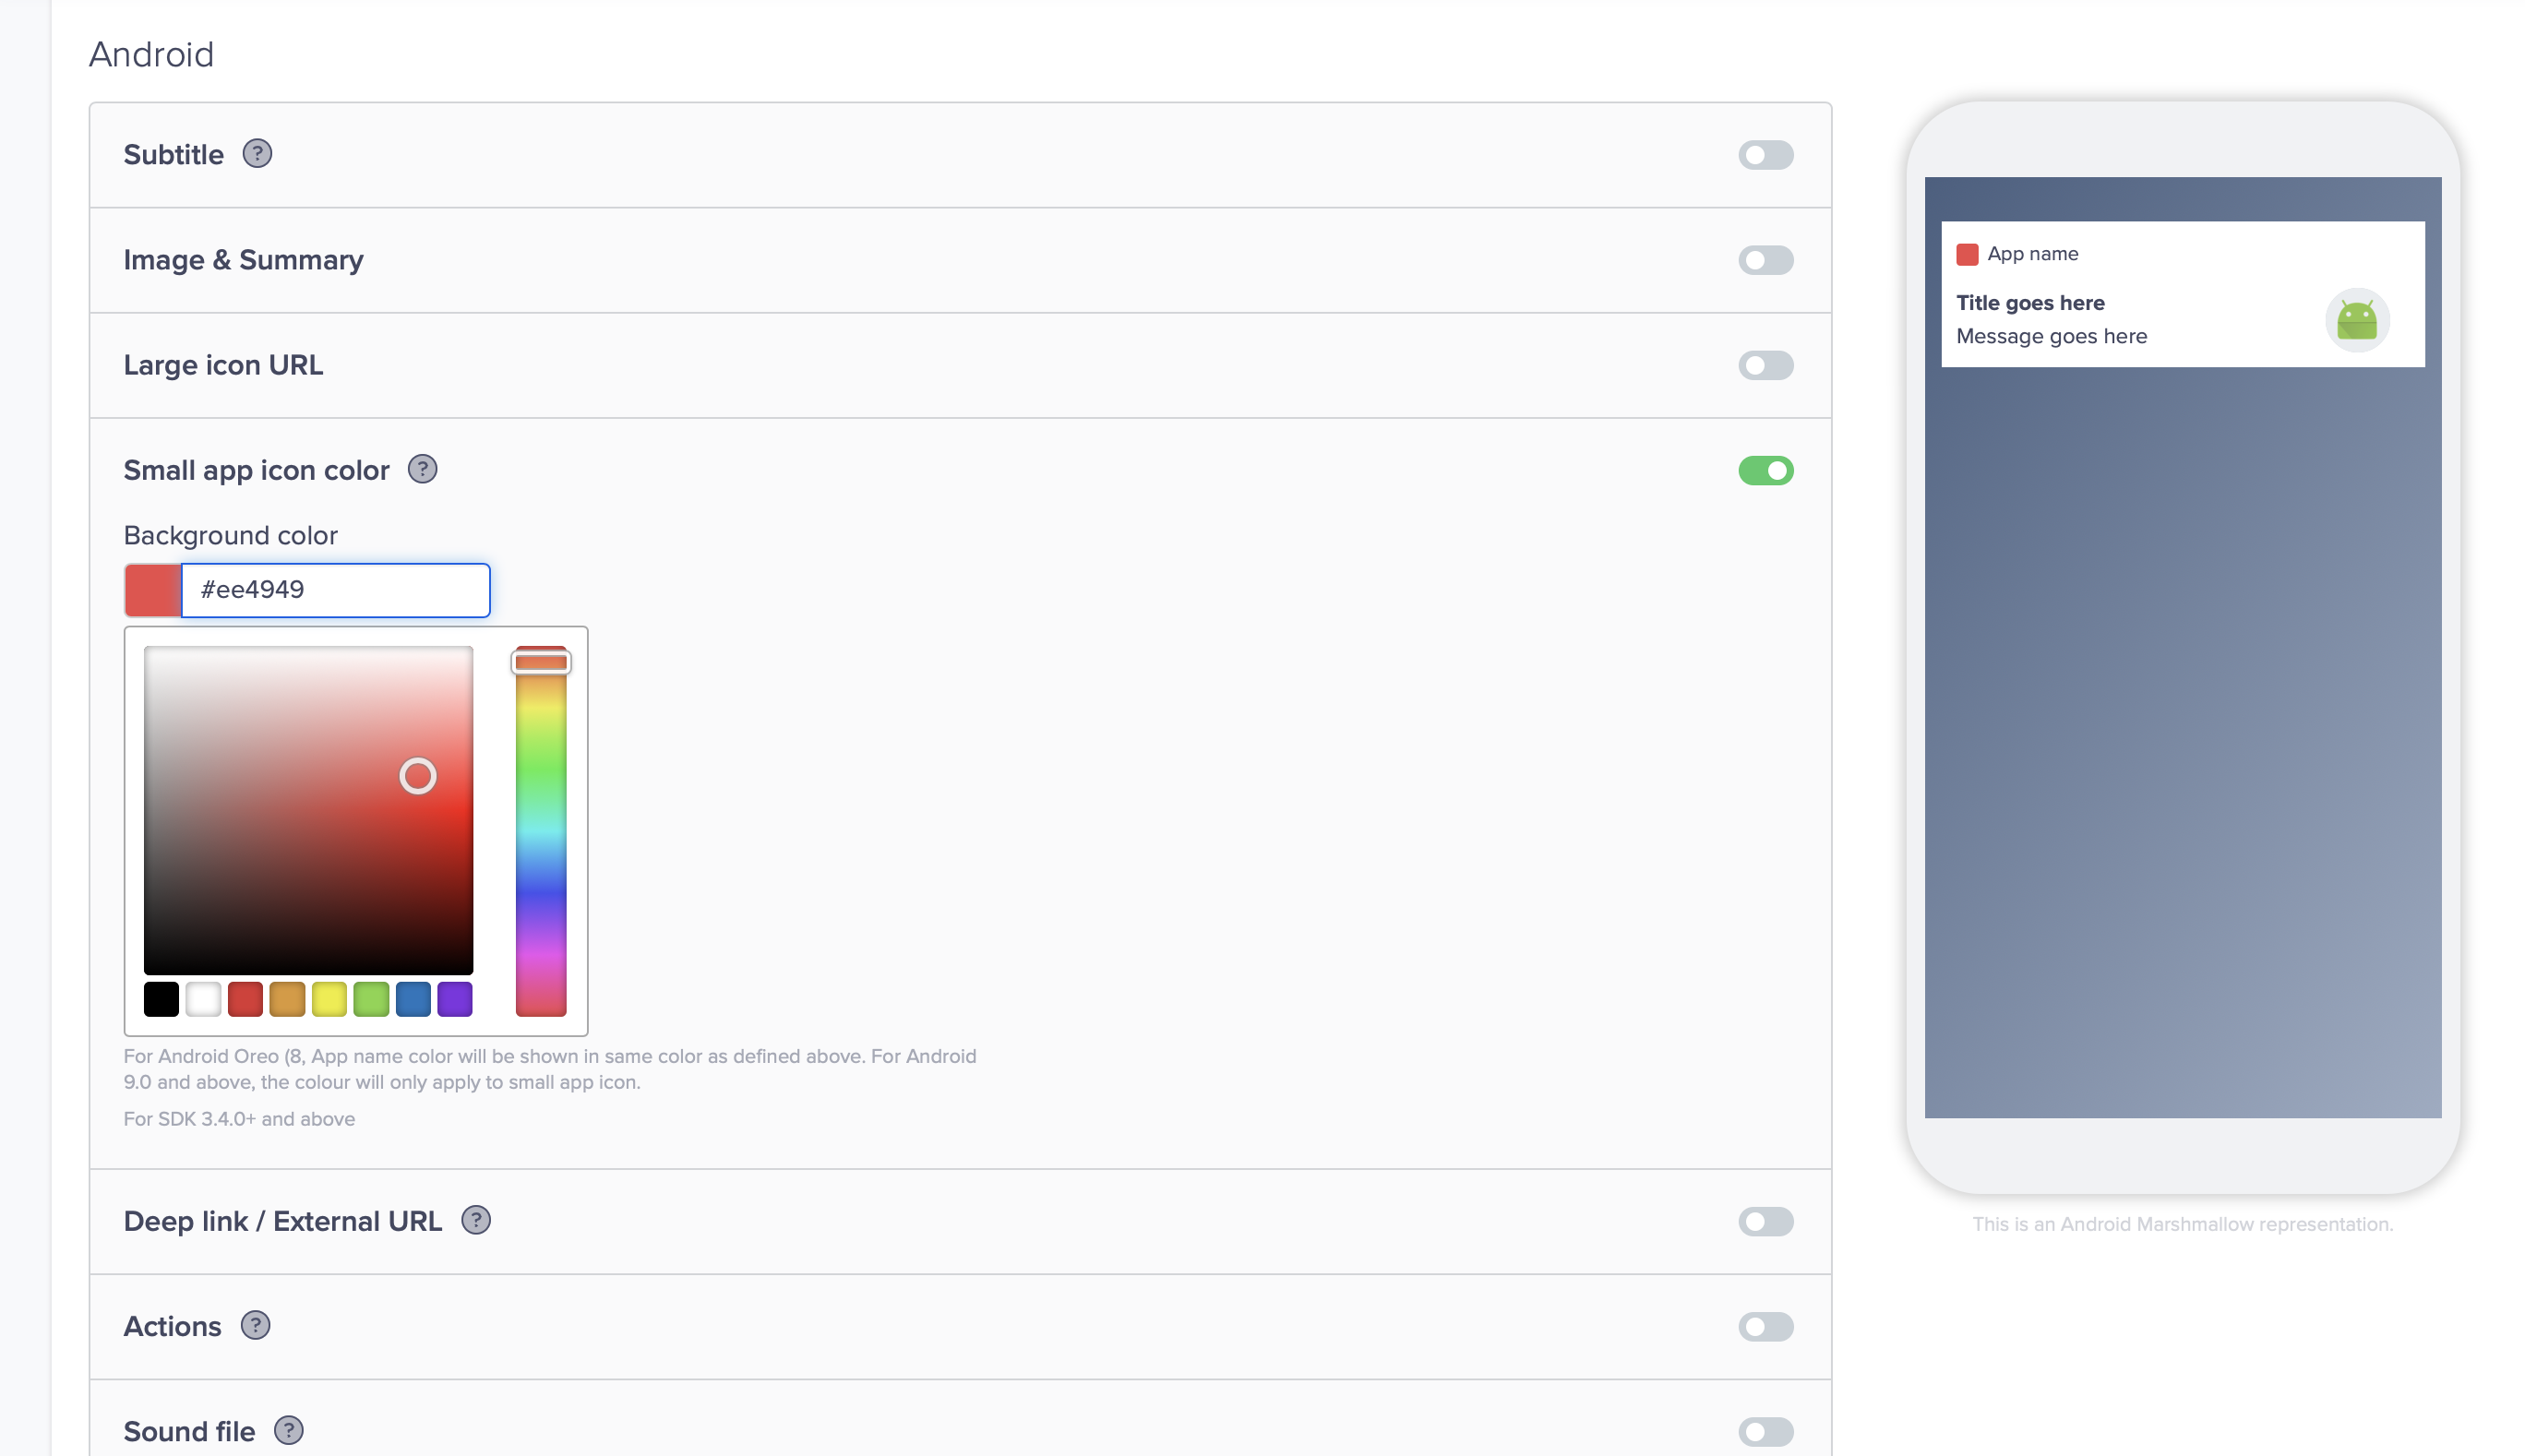
Set Small App Icon Color
Following is a small icon sample:
Example of a Small Icon
After creating an icon with the alpha channel, you can use it for your project in Android Studio. Save the icon file in the Drawable folder of your project.
To set a custom notification icon (only for the small icon), add the following metadata entry in your AndroidManifest.xml.
<meta-data
    android:name="CLEVERTAP_NOTIFICATION_ICON"
    android:value="ic_stat_red_star"/> <!-- name of your file in the drawable directory without the file extension. -->
Device and Android LimitationPush notification icons may be displayed in black and white on OnePlus, Oppo, and Realme devices due to support limitations of these device manufacturers for Android 12 and 13 versions.
Push Notification Callback
The CleverTap Android SDK v3.8.1 and above gives you a callback when a Push Notification is clicked along with the entire payload. Implement the CTPushNotificationListener in your Application class or Main Activity to receive this payload.
To set the listener, use the following code -
CleverTapAPI cleverTapAPI = CleverTapAPI.getDefaultInstance(getApplicationContext());
cleverTapAPI.setCTPushNotificationListener(this);
CleverTapAPI.getDefaultInstance(applicationContext)?.apply {
ctPushNotificationListener = this@YourAndroidActivity
}Implement the following override method to receive the payload as a Map on the click of a notification -
@Override
public void onNotificationClickedPayloadReceived(HashMap<String, Object> payload) {
   //Use your custom logic for  the payload
}
override fun onNotificationClickedPayloadReceived(payload: HashMap<String, Any>?) {
//Use your custom logic for the payload
}Push Impressions
You can raise and record push notifications delivered to your users’ Android devices.
- Navigate to Settings > Schema > Events.
- Search for Push Impressions, then click on the vertical ellipsis.

Push Impressions
- Click on Setup push impressions. A new window displays.
- Click on Save to enable the option.
If you are custom-handling push notifications, add the following code after you render the push notifications:
CleverTapAPI.getDefaultInstance(this).pushNotificationViewedEvent(extras);CleverTapAPI.getDefaultInstance(this@YourAndroidActivity)?.pushNotificationViewedEvent(extras)Pull Notification
Starting with v3.4.0, the SDK supports Pull Notification. This feature provides the capability to reach users on devices that suppress notifications via GCM/FCM.
To allow your app to use CleverTap's Pull Notification via background ping service, add the following fields in your app's AndroidManifest.xml:
<meta-data
    android:name="CLEVERTAP_BACKGROUND_SYNC"
    android:value="1"/>
Custom HandlingAdditional integration is required if the app is rendering push notifications and not the CleverTap SDK. For more information, see custom handling of pull notification.
Custom Handling of Pull Notification
- In your custom FCM Receiver class, add the following code snippet when you receive the RemoteMessage object from Firebase. This method allows you to ensure that duplicate notification is not rendered on your device via Pull Notification.
if (message.getData().size() > 0) {
                Bundle extras = new Bundle();
                Iterator var = message.getData().entrySet().iterator();

                while(var.hasNext()) {
                    Map.Entry entry = (Map.Entry)var.next();
                    extras.putString((String)entry.getKey(), (String)entry.getValue());
                }
                    CleverTapAPI.processPushNotification(getApplicationContext(),extras);
                }
            }
if (message.getData().size() > 0)
{
val extras = Bundle()
val `var` = message.getData().entrySet().iterator()
while (`var`.hasNext())
{
val entry = `var`.next() as Map.Entry
extras.putString(entry.getKey() as String, entry.getValue() as String)
}
CleverTapAPI.processPushNotification(getApplicationContext(), extras)
}- In your Application class, implement the CTPushAmpListener interface.
public class MyApplication extends Application implements CTPushAmpListener {

// your application class code
}
class MyApplication:Application(), CTPushAmpListener// your application class code- In the onCreate() method of your Application class, create an instance of CleverTapAPI and set the
CTPushAmpListeneras following:
CleverTapAPI cleverTapAPI = CleverTapAPI.getDefaultInstance(getApplicationContext());
cleverTapAPI.setCTPushAmpListener(this);
val cleverTapAPI = CleverTapAPI.getDefaultInstance(getApplicationContext())
cleverTapAPI.setCTPushAmpListener(this)- After the listener is set, whenever a notification is sent to the device via Pull Notification, the app will receive the payload in the onPushPayloadReceived method. Implement this method as follows and ensure that your rendering logic of the Push Notification is written here:
@Override
public void onPushPayloadReceived(Bundle bundle) {
  CTFcmMessageHandler()
                .createNotification(getApplicationContext(), message);
  //OR
  //write push notification rendering logic here
}
fun onPushPayloadReceived(bundle:Bundle) {
CTFcmMessageHandler()
.createNotification(getApplicationContext(), message)
//OR
//write push notification rendering logic here
}FAQs
Why do I see a CHANNEL_UNSUBSCRIBEDEvent in a Multi-Process Android App using FCM?
CHANNEL_UNSUBSCRIBEDEvent in a Multi-Process Android App using FCM?You may encounter the CHANNEL_UNSUBSCRIBED event in multi-process Android applications where Firebase is initialized in multiple processes. Although Firebase Cloud Messaging (FCM) supports multi-process apps, it does not automatically handle cross-process initialization.
If Firebase is not explicitly initialized in each process where it is accessed, it may lead to inconsistent behavior, including unexpectedly triggering the CHANNEL_UNSUBSCRIBED event. Therefore, Firebase initialization must be handled manually and carefully in multi-process apps.
For more information, refer to the following resources:
What are the steps to migrate from the Legacy API to the FCM v1 APIs?
For detailed steps, refer to Configure Push Notifications. You can also check our video, which gives a quick walkthrough of the steps for migrating to the new FCM APIs.
What is the new API rate limit? How does it impact push notification deliverability?
Each Firebase project using the HTTP v1 APIs is strictly limited to a specific number of requests per minute. For more information, refer to HTTP v1 API Rate Limits.
How do I resolve the "Wrong FCM API Key" error?
Ensure that you create a new Service Account from the correct Firebase project on the Firebase Console and assign it the Firebase Cloud Messaging API Admin role, not the Firebase Cloud Messaging Admin role. For more information, refer to Safeguard Admin Credentials.

Firebase Cloud Messaging API Admin
Do we need to update the CleverTap SDK to migrate to HTTP v1 API?
No. You do not need to update the CleverTap SDK. You just need to upload the FCM Credentials on the CleverTap Dashboard.
I have already uploaded the credentials. Is there anything else I need to do to migrate to the HTTP v1 API?
No further steps are required. Once credentials are added, CleverTap automatically transitions from legacy APIs to v1 APIs. Ensure that you always add throttle for Push Notification to keep the rate limit in check.
What happens if I fail to migrate to new v1 APIs before June 2024?
You will not be able to send Push Notifications via legacy credentials; instead, it results in an error.
How can I increase the rate limit for my account?
To request an increase in the rate limit, contact Firebase Support.
Why does FCM fail when using a custom FirebaseOptions.Builder, and how do I fix it?
FirebaseOptions.Builder, and how do I fix it?When Firebase is initialized using a custom FirebaseOptions.Builder, Firebase Cloud Messaging (FCM) requires the GCM/FCM Sender ID to be explicitly set. If setGcmSenderId() is missing, FCM cannot register correctly, which causes push notification issues.
To fix this, add the Sender ID (from the Firebase console) to your builder:
builder.setGcmSenderId(YOUR_FCM_SENDER_ID);This resolves FCM issues when using the CleverTap Android SDK with custom Firebase initialization.
Updated 15 days ago