iOS Push Notifications
Push Notifications
CleverTap allows you to send push notifications to your applications from our dashboard. Please follow the steps to send your first push notification to your application. Please note to test remote push notifications you need to connect your actual iOS device. The remote push notifications don't work on simulator.
Step 1: Configure Push Notifications
To send push notifications on your iOS Application using CleverTap dashboard, you first need to upload key or certificate from Apple developer account. There are 2 ways to configure push notifications.
Uploading .p8 file (recommended)
- Go to Apple developer account and go to Certificates, Identifiers & Profiles
- Go to
Keyssection and click on a new key usingAdd button(+).
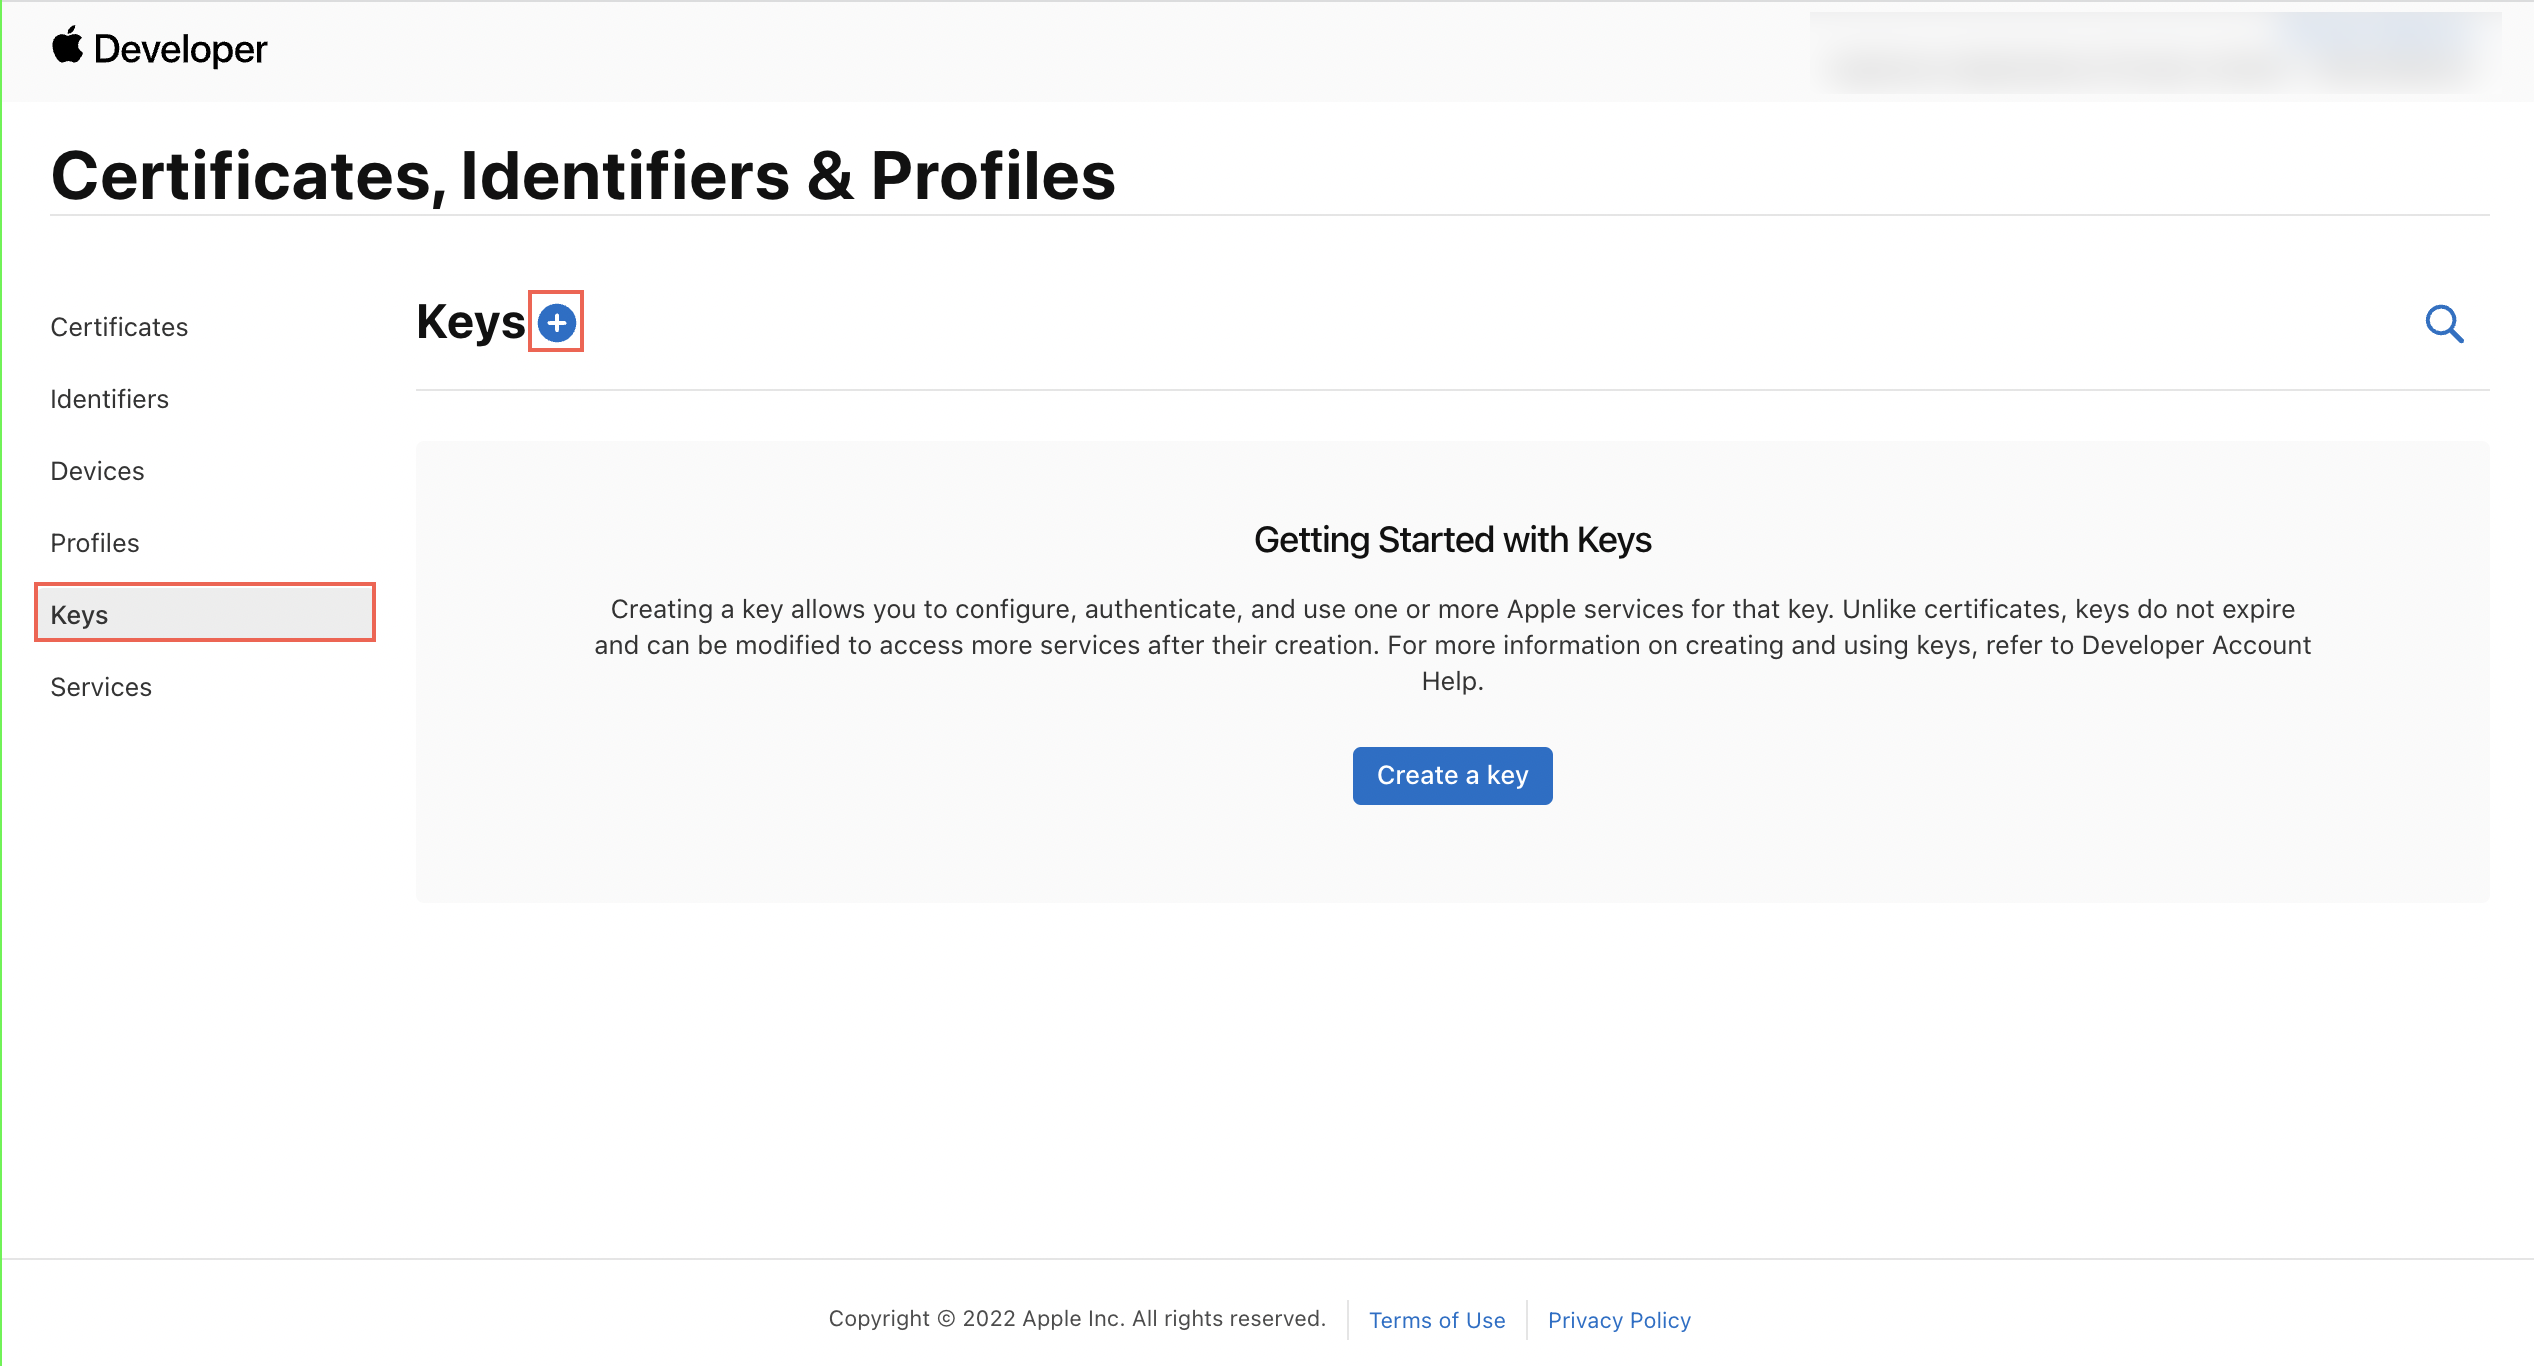
Apple Certificates, Identifiers & Profiles
- Choose a unique name for key and select Apple Push Notification service(APNs) checkbox. Click continue and then confirm.
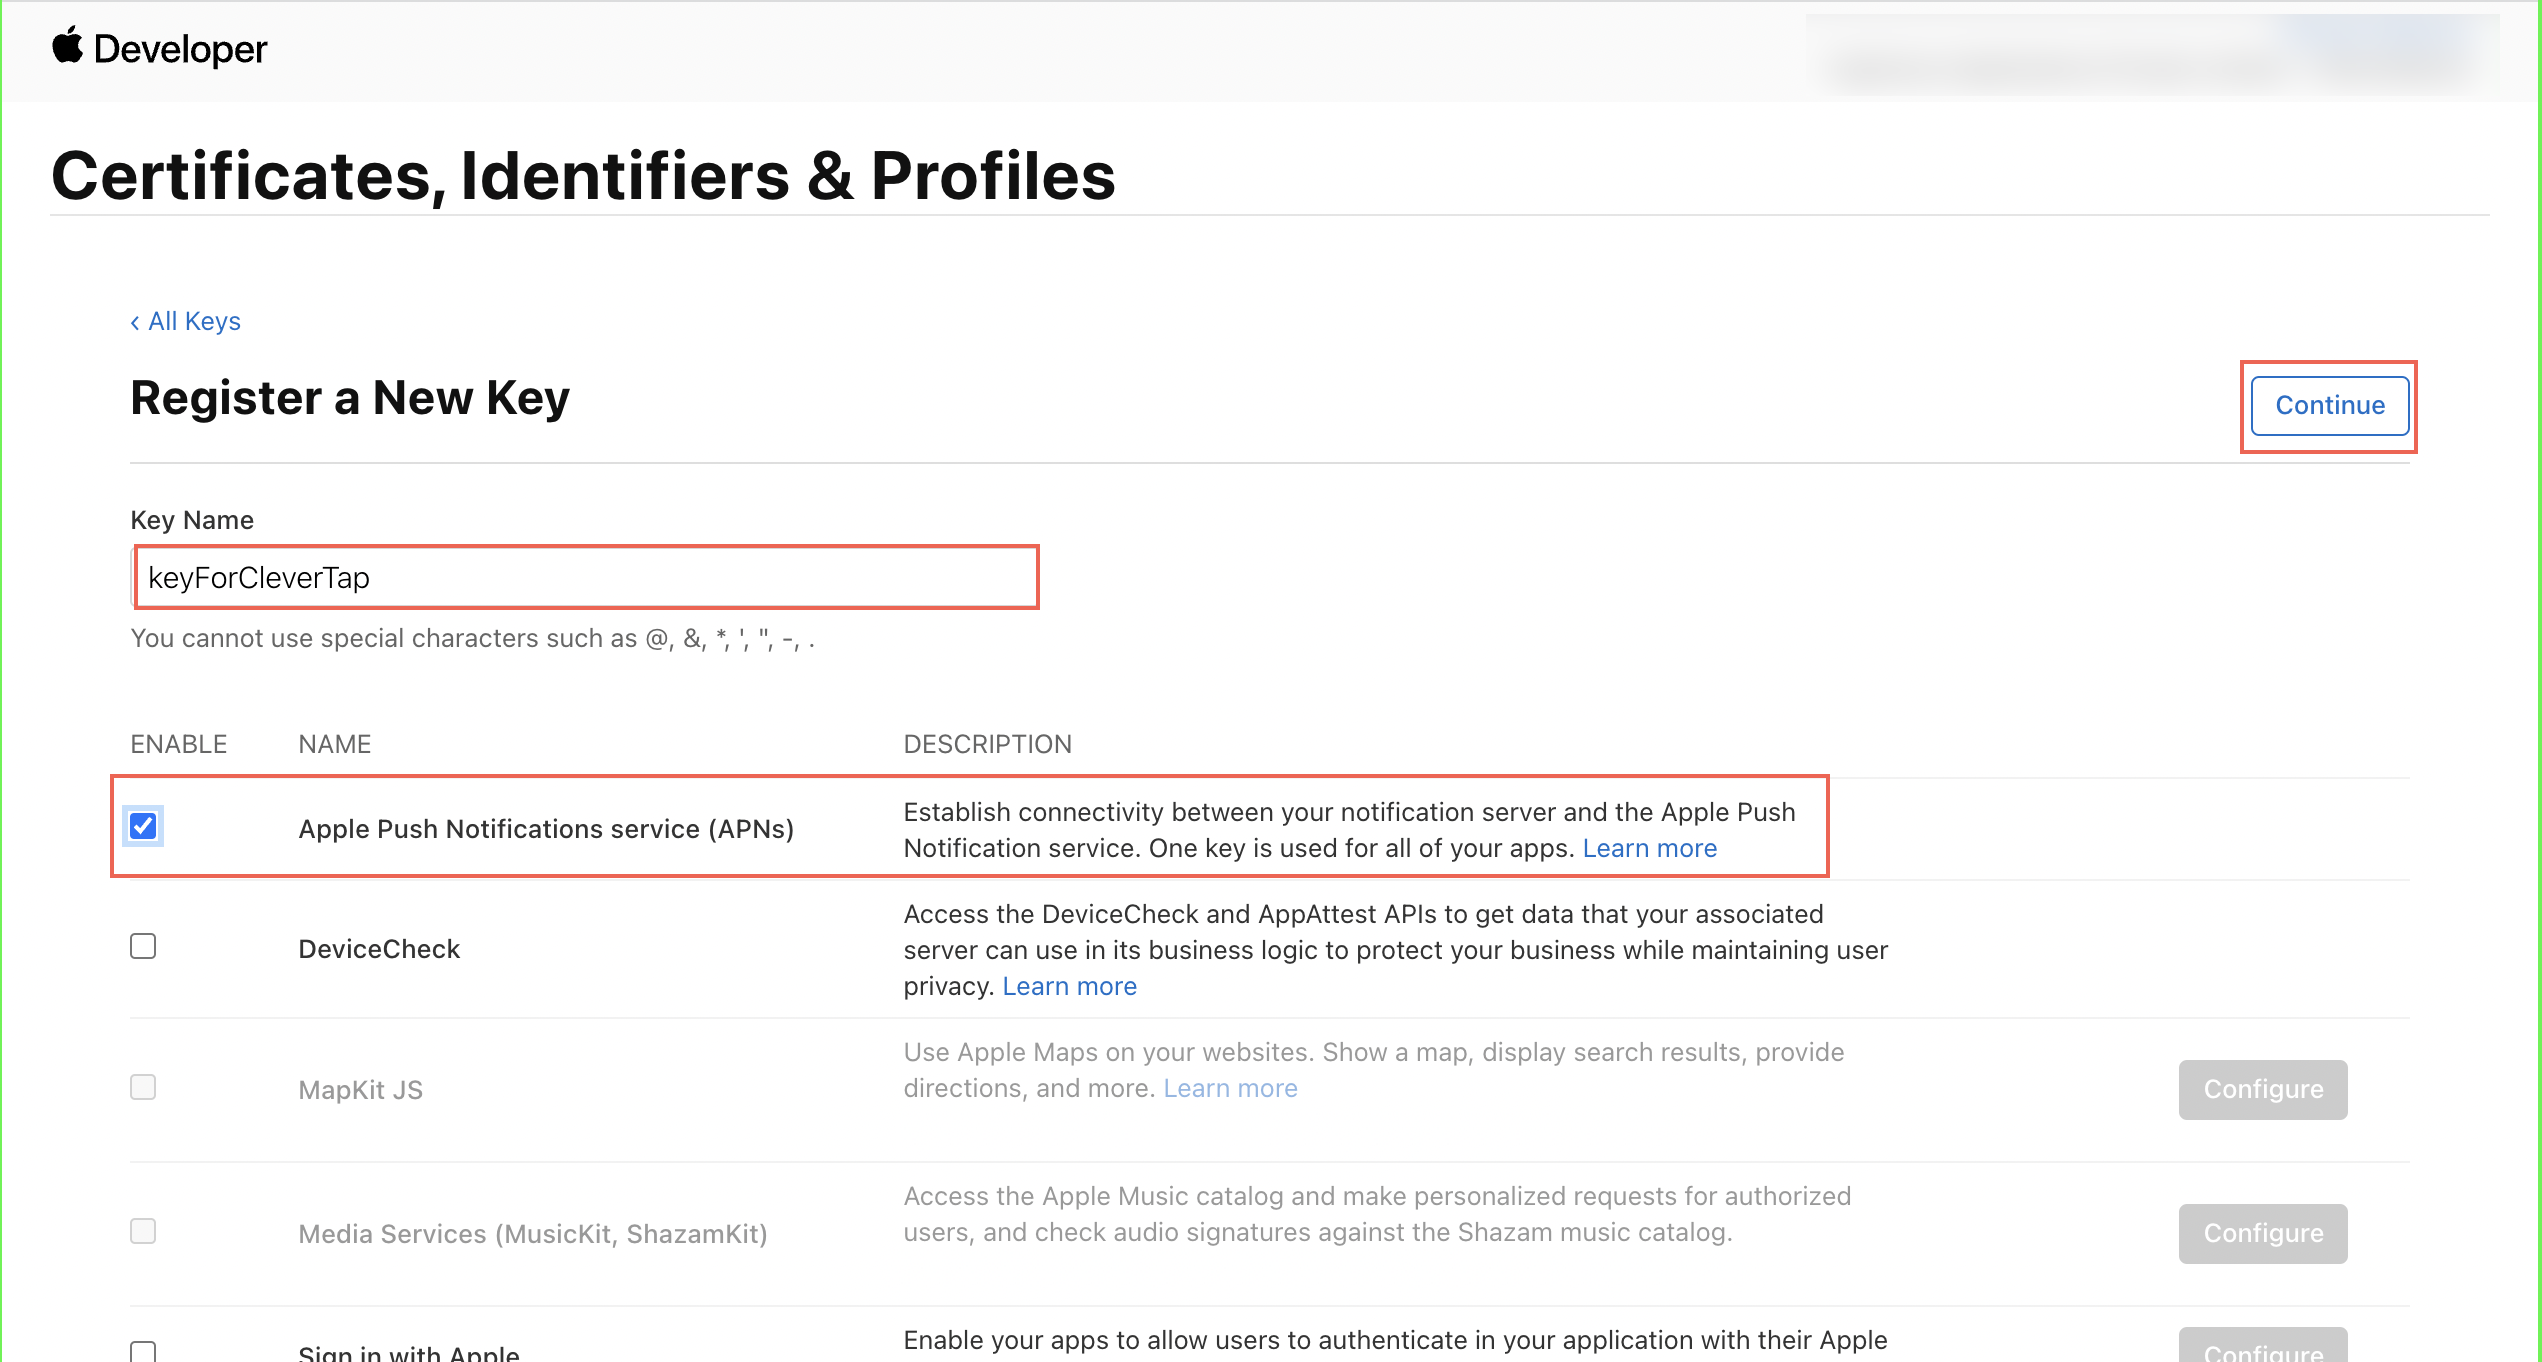
Register a New Key
- Note and save the key ID. Click
Downloadto generate and save the key.
Please note you have to save the key in a secured place because you can't download key more than once. Do not rename Auth key file, and upload it as it is to the CleverTap dashboard, as shown in steps 6.
- Now go to CleverTap dashboard and go to Settings > Channels > Mobile Push. Choose iOS tab and choose Provider authentication token(Auth key) under Authentication Type as given in following picture.
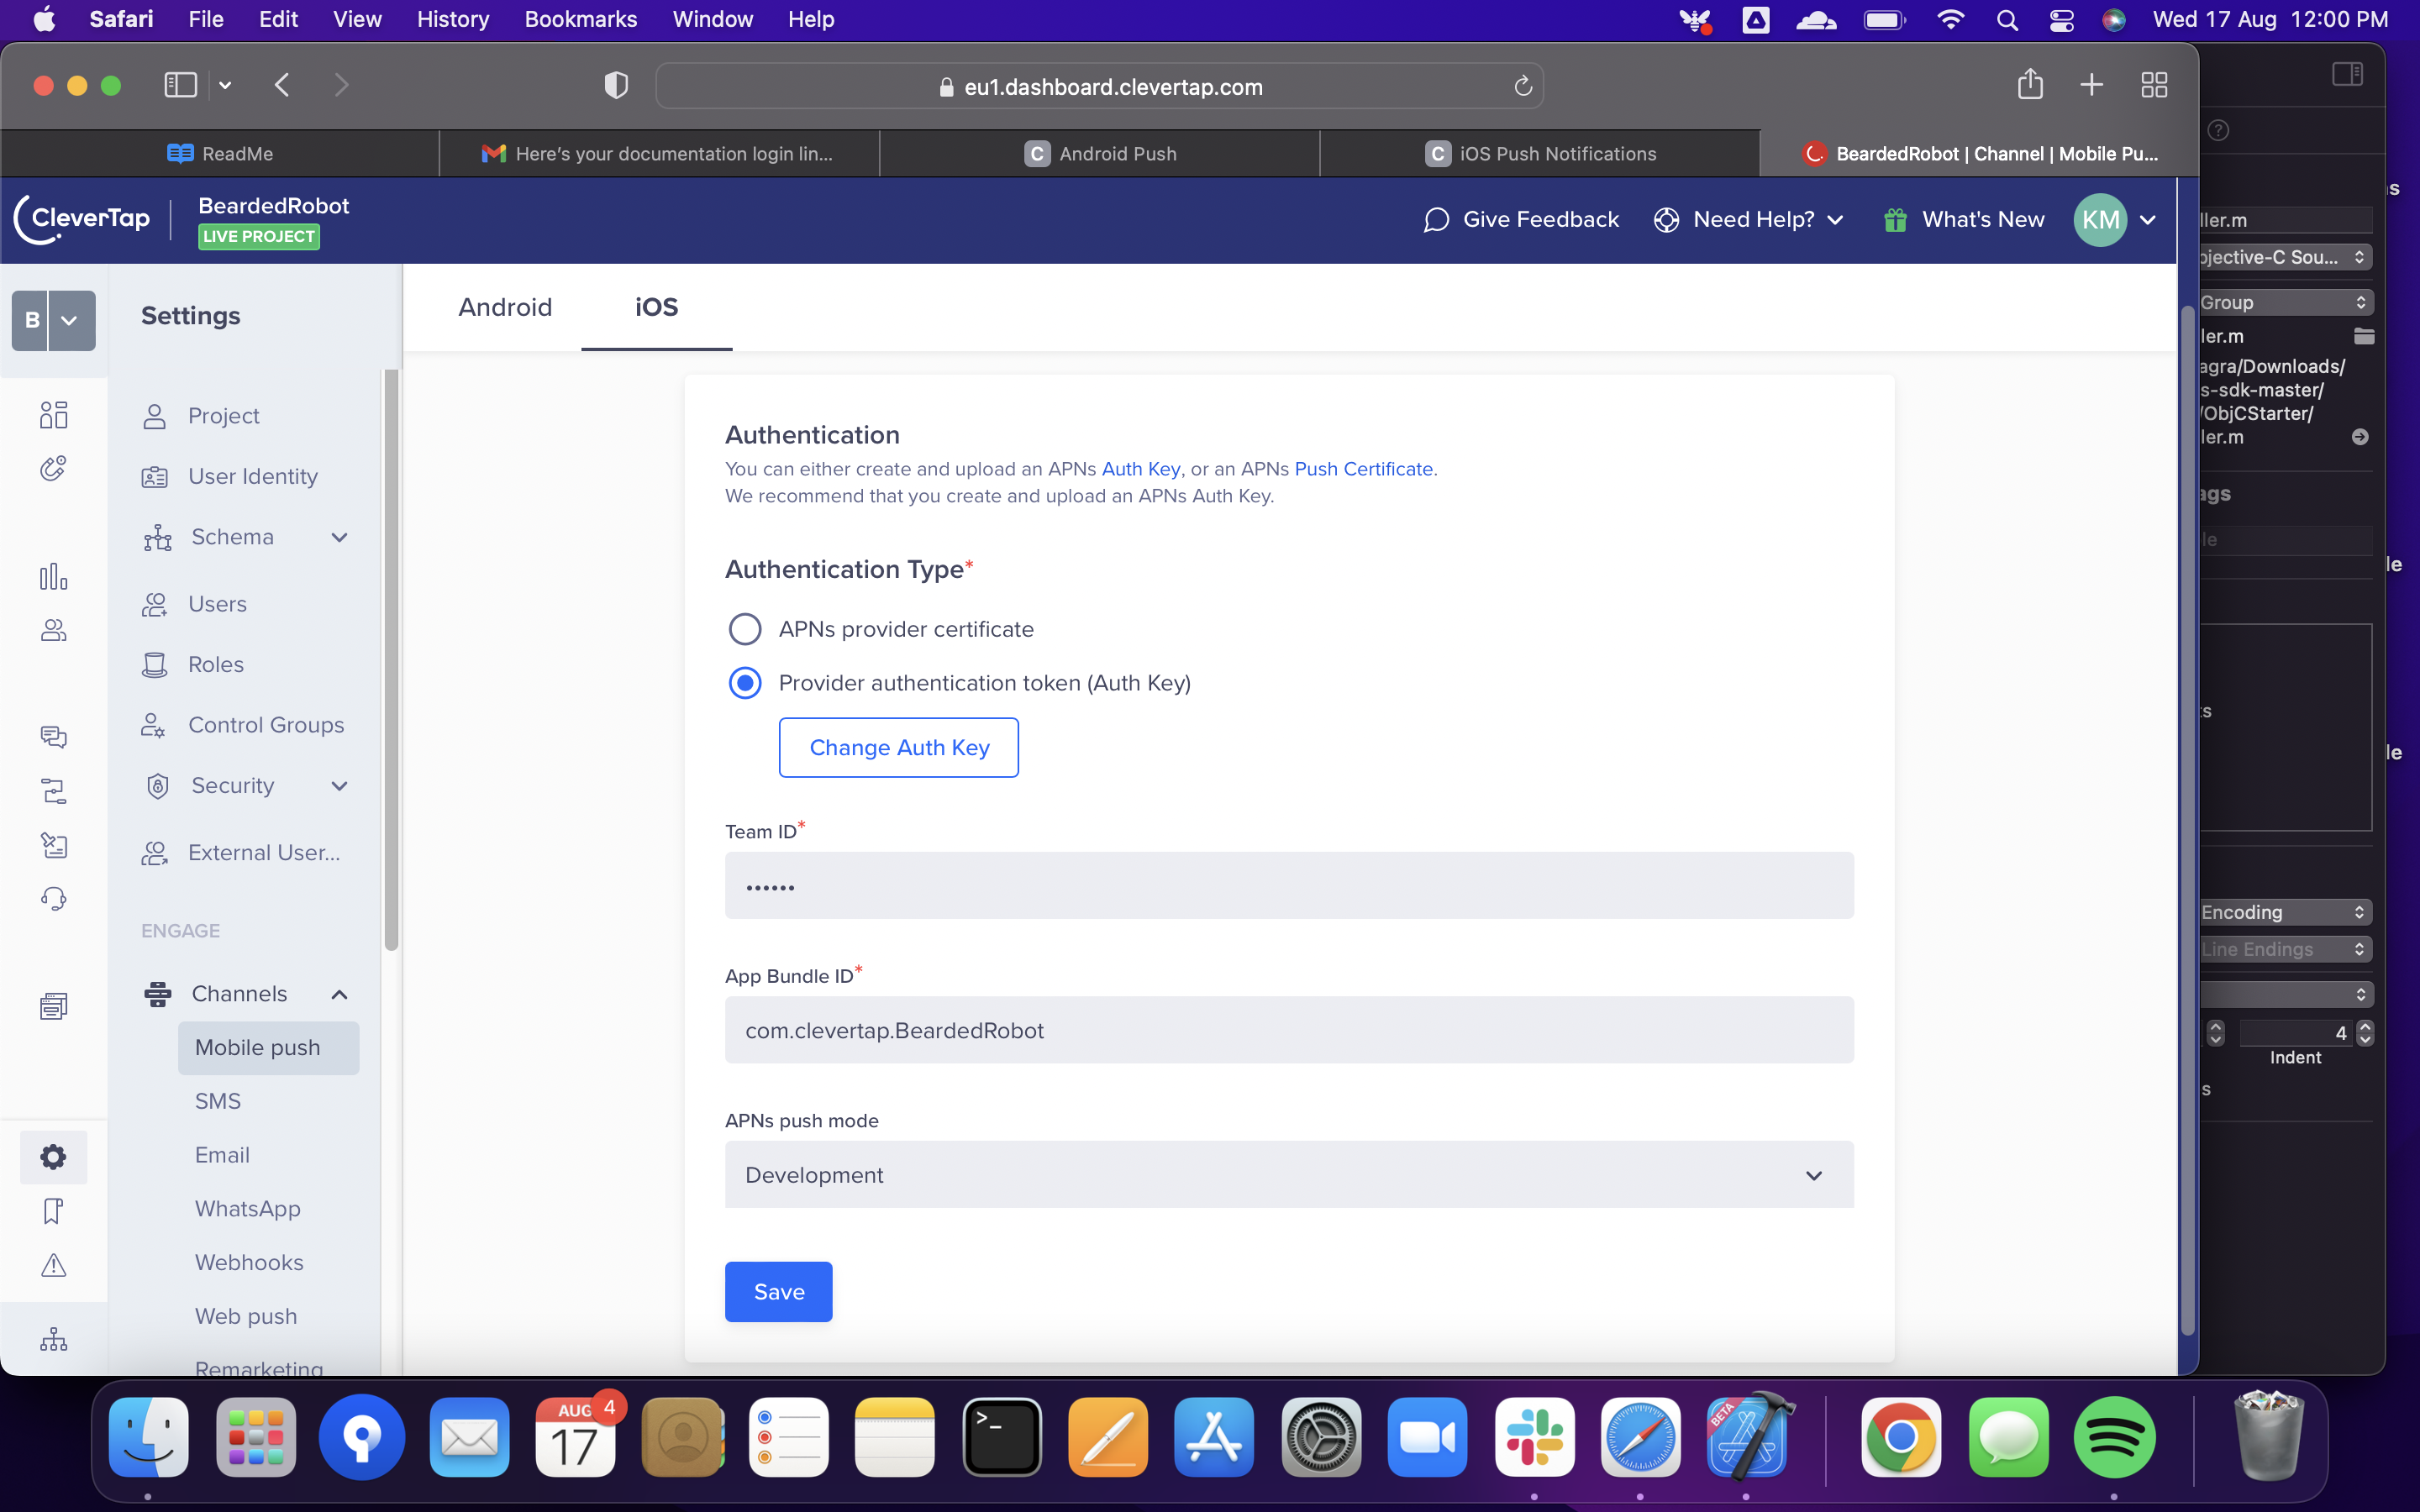
iOS Authentication in Mobile Push
- You will get an option to
Upload Auth Key. Upload your .p8 key from Apple developer account and Enter Team ID, App Bundle Id and choose APN Push mode. - You will get your Team ID from Apple Developer Account. Go to Membership tab and get your Team ID. Your app's bundle ID can be found in Xcode. Select the appropriate mode for sending push notifications, i.e., either Production or Development and click Save.
You have successfully configured the push notifications for your project. You can visit developer documentation.
We recommend that you create and upload an APNs Auth Key rather than uploading .p12 certificate for the following reasons:
No need to re-generate the push certificate every year
One auth key can be used for all your apps – this avoids the complication of maintaining different certificates
Uploading .p12 certificate
If you have configured .p8 file successfully, you can skip this and directly go to Step 2.
Alternatively, you may utilize Apple’s older authentication scheme (.p12 SSL certificates). These certificates automatically expire every year and will require you to regenerate and re-upload them.
- Log in to Apple Developer account, and navigate to the Program Resources tab and select Certificates, Identifiers & Profiles.
- Select Certificates tab and add a new certificate using the '+' sign.
- Select Apple Push Notification service SSL (Sandbox) under Services and click Continue.
- Choose App ID of your project from the dropdown.
- Now Apple will ask to upload a Certificate signing request. On your MAC open Keychain Access and navigate to Certificate Assistant. Select Request a Certificate From a Certificate Authority.
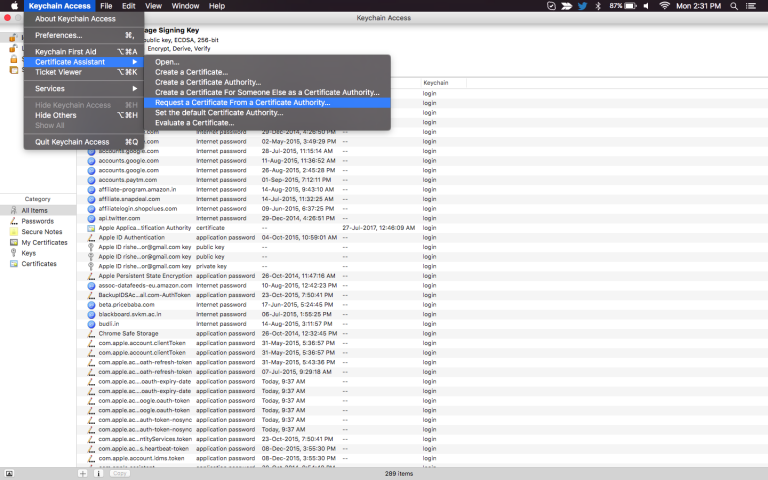
Select Request a Certificate From a Certificate Authority
Selecting this option directs you to the Certificate Assistant. Select Request is > Saved to Disk and leave the email address blank. Click Continue.
- Now Upload the certificate on Apple developer account as requested in Step 5.
- Download the certificates generated and open it with the Keychain Access application.
- In Keychain Access, click on My Certificates and locate your push certificate.
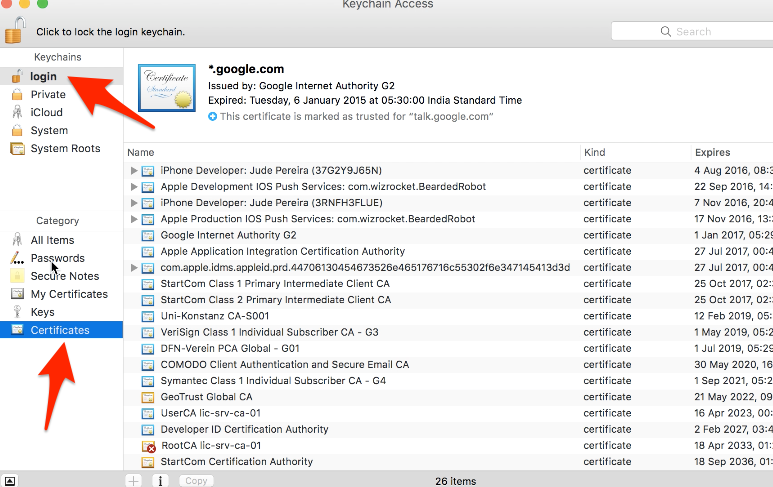
Add the Push Certificate to Keychains
- Select it, right-click it and export it as a .p12 file and use a temporary password. It will be required when uploading your certificate to CleverTap dashboard).
- Navigate to Manage Settings > Settings in the dashboard and upload your development/production certificate under Apple Push Certificate. The passphrase is your temporary password.
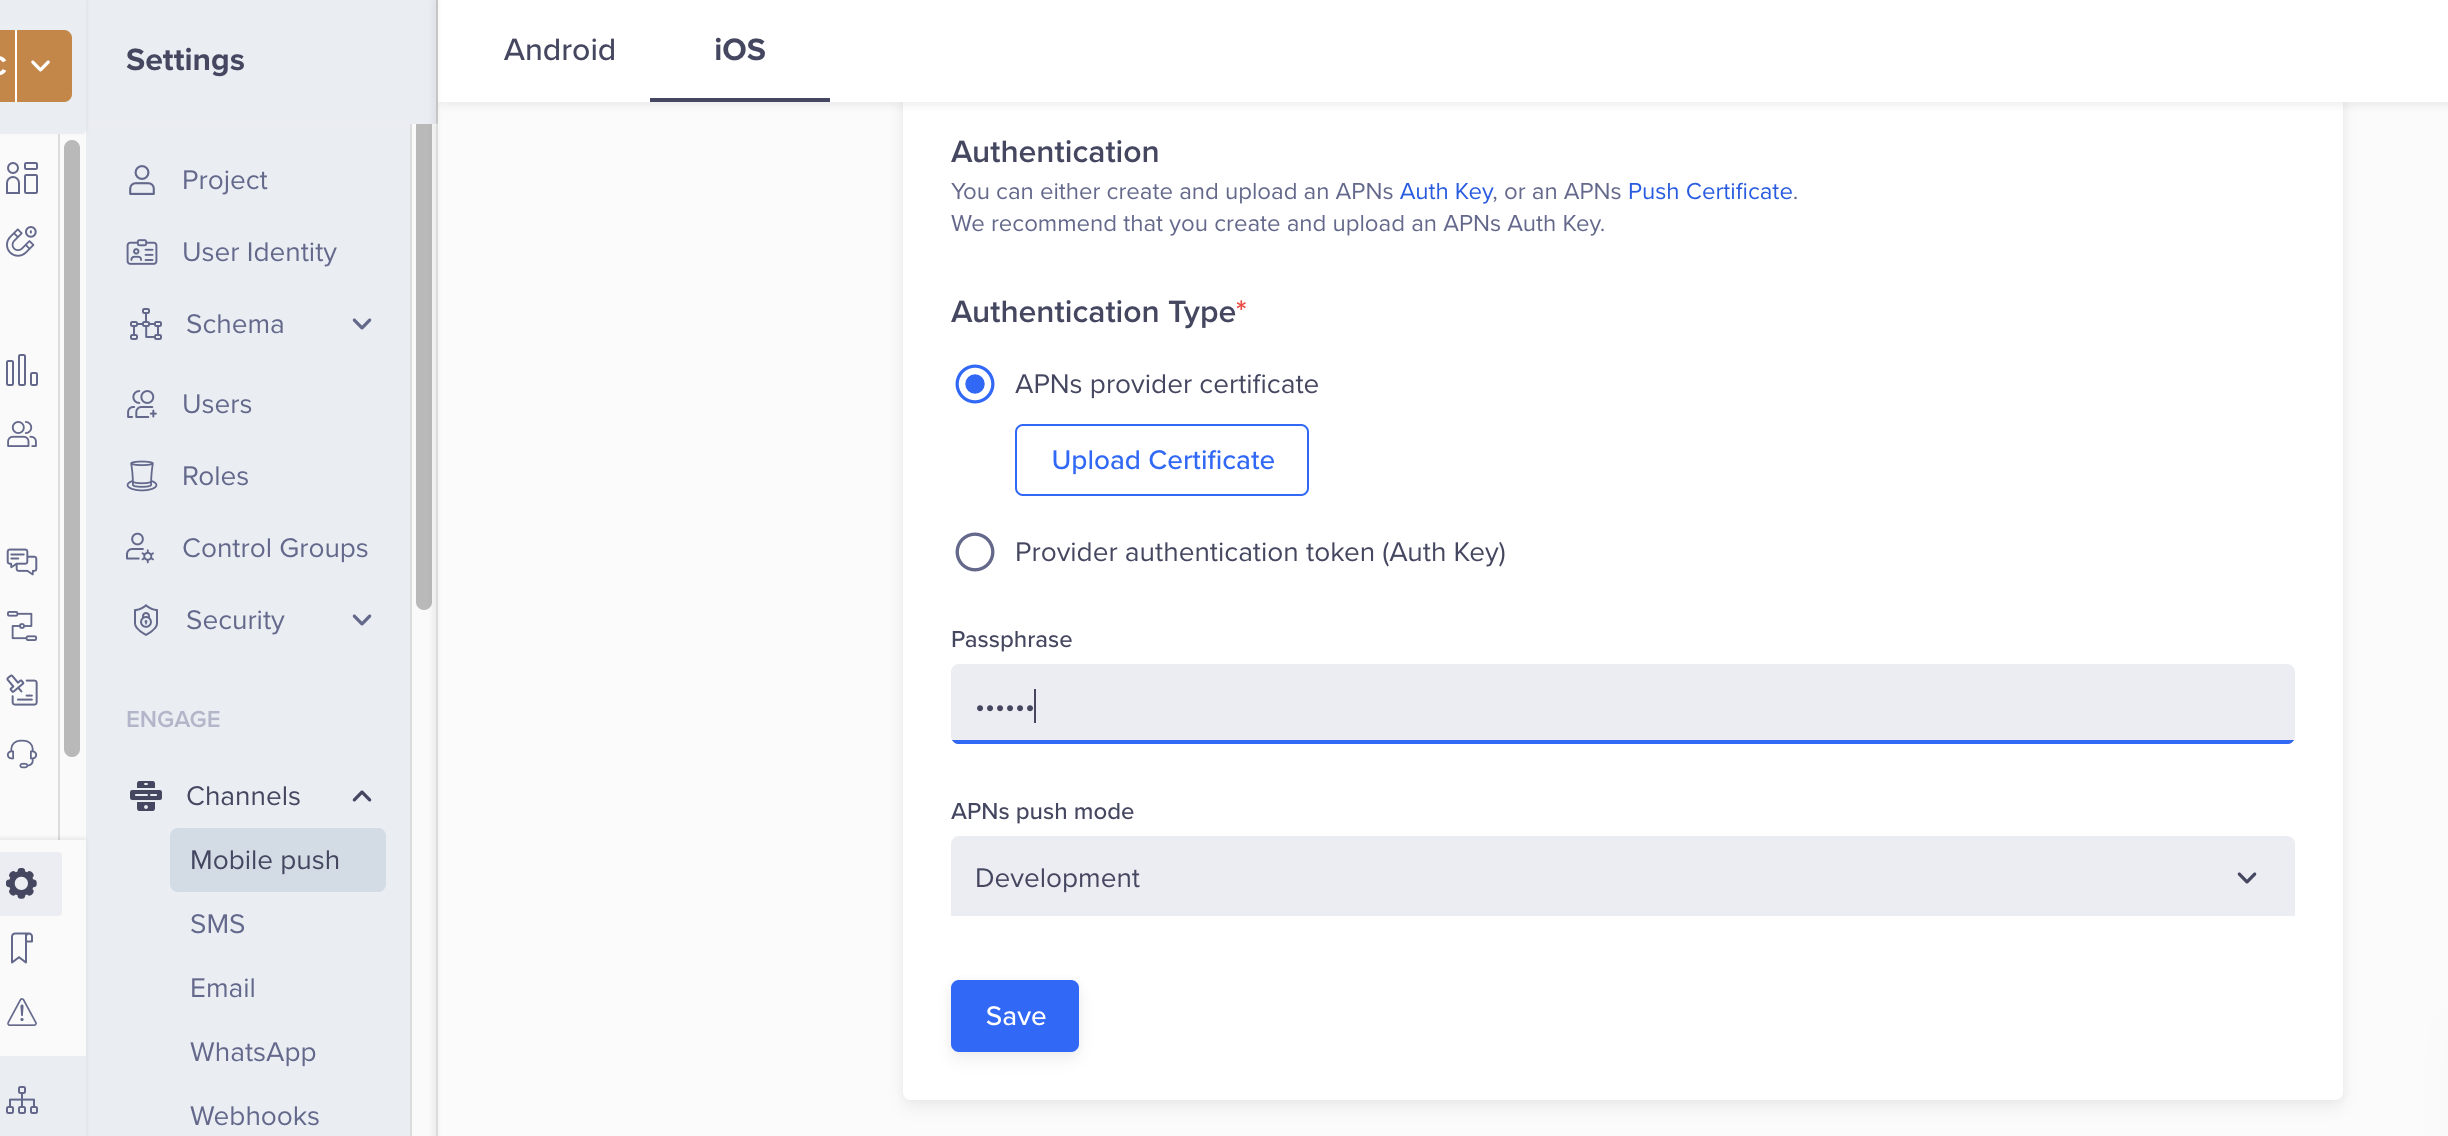
Upload Development/Production Certificate Under Apple Push Certificate
You can upload either your development or production push certificates to the dashboard for your distribution provisioning profile apps, but you can only have one active push certificate at a time.
If you wish to test push notifications in a production environment once your app goes live in the App Store, we recommend setting up a separate app group or app for your development environment.
Step 2: Enable the Push Notifications Capability
In your Xcode project settings, with the Target selected, click the Signing & Capabilities tab and then click the + Capability button to add. Type “push” in the filter field and select Push Notifications. This will enable the Push Notifications Capability in your project.
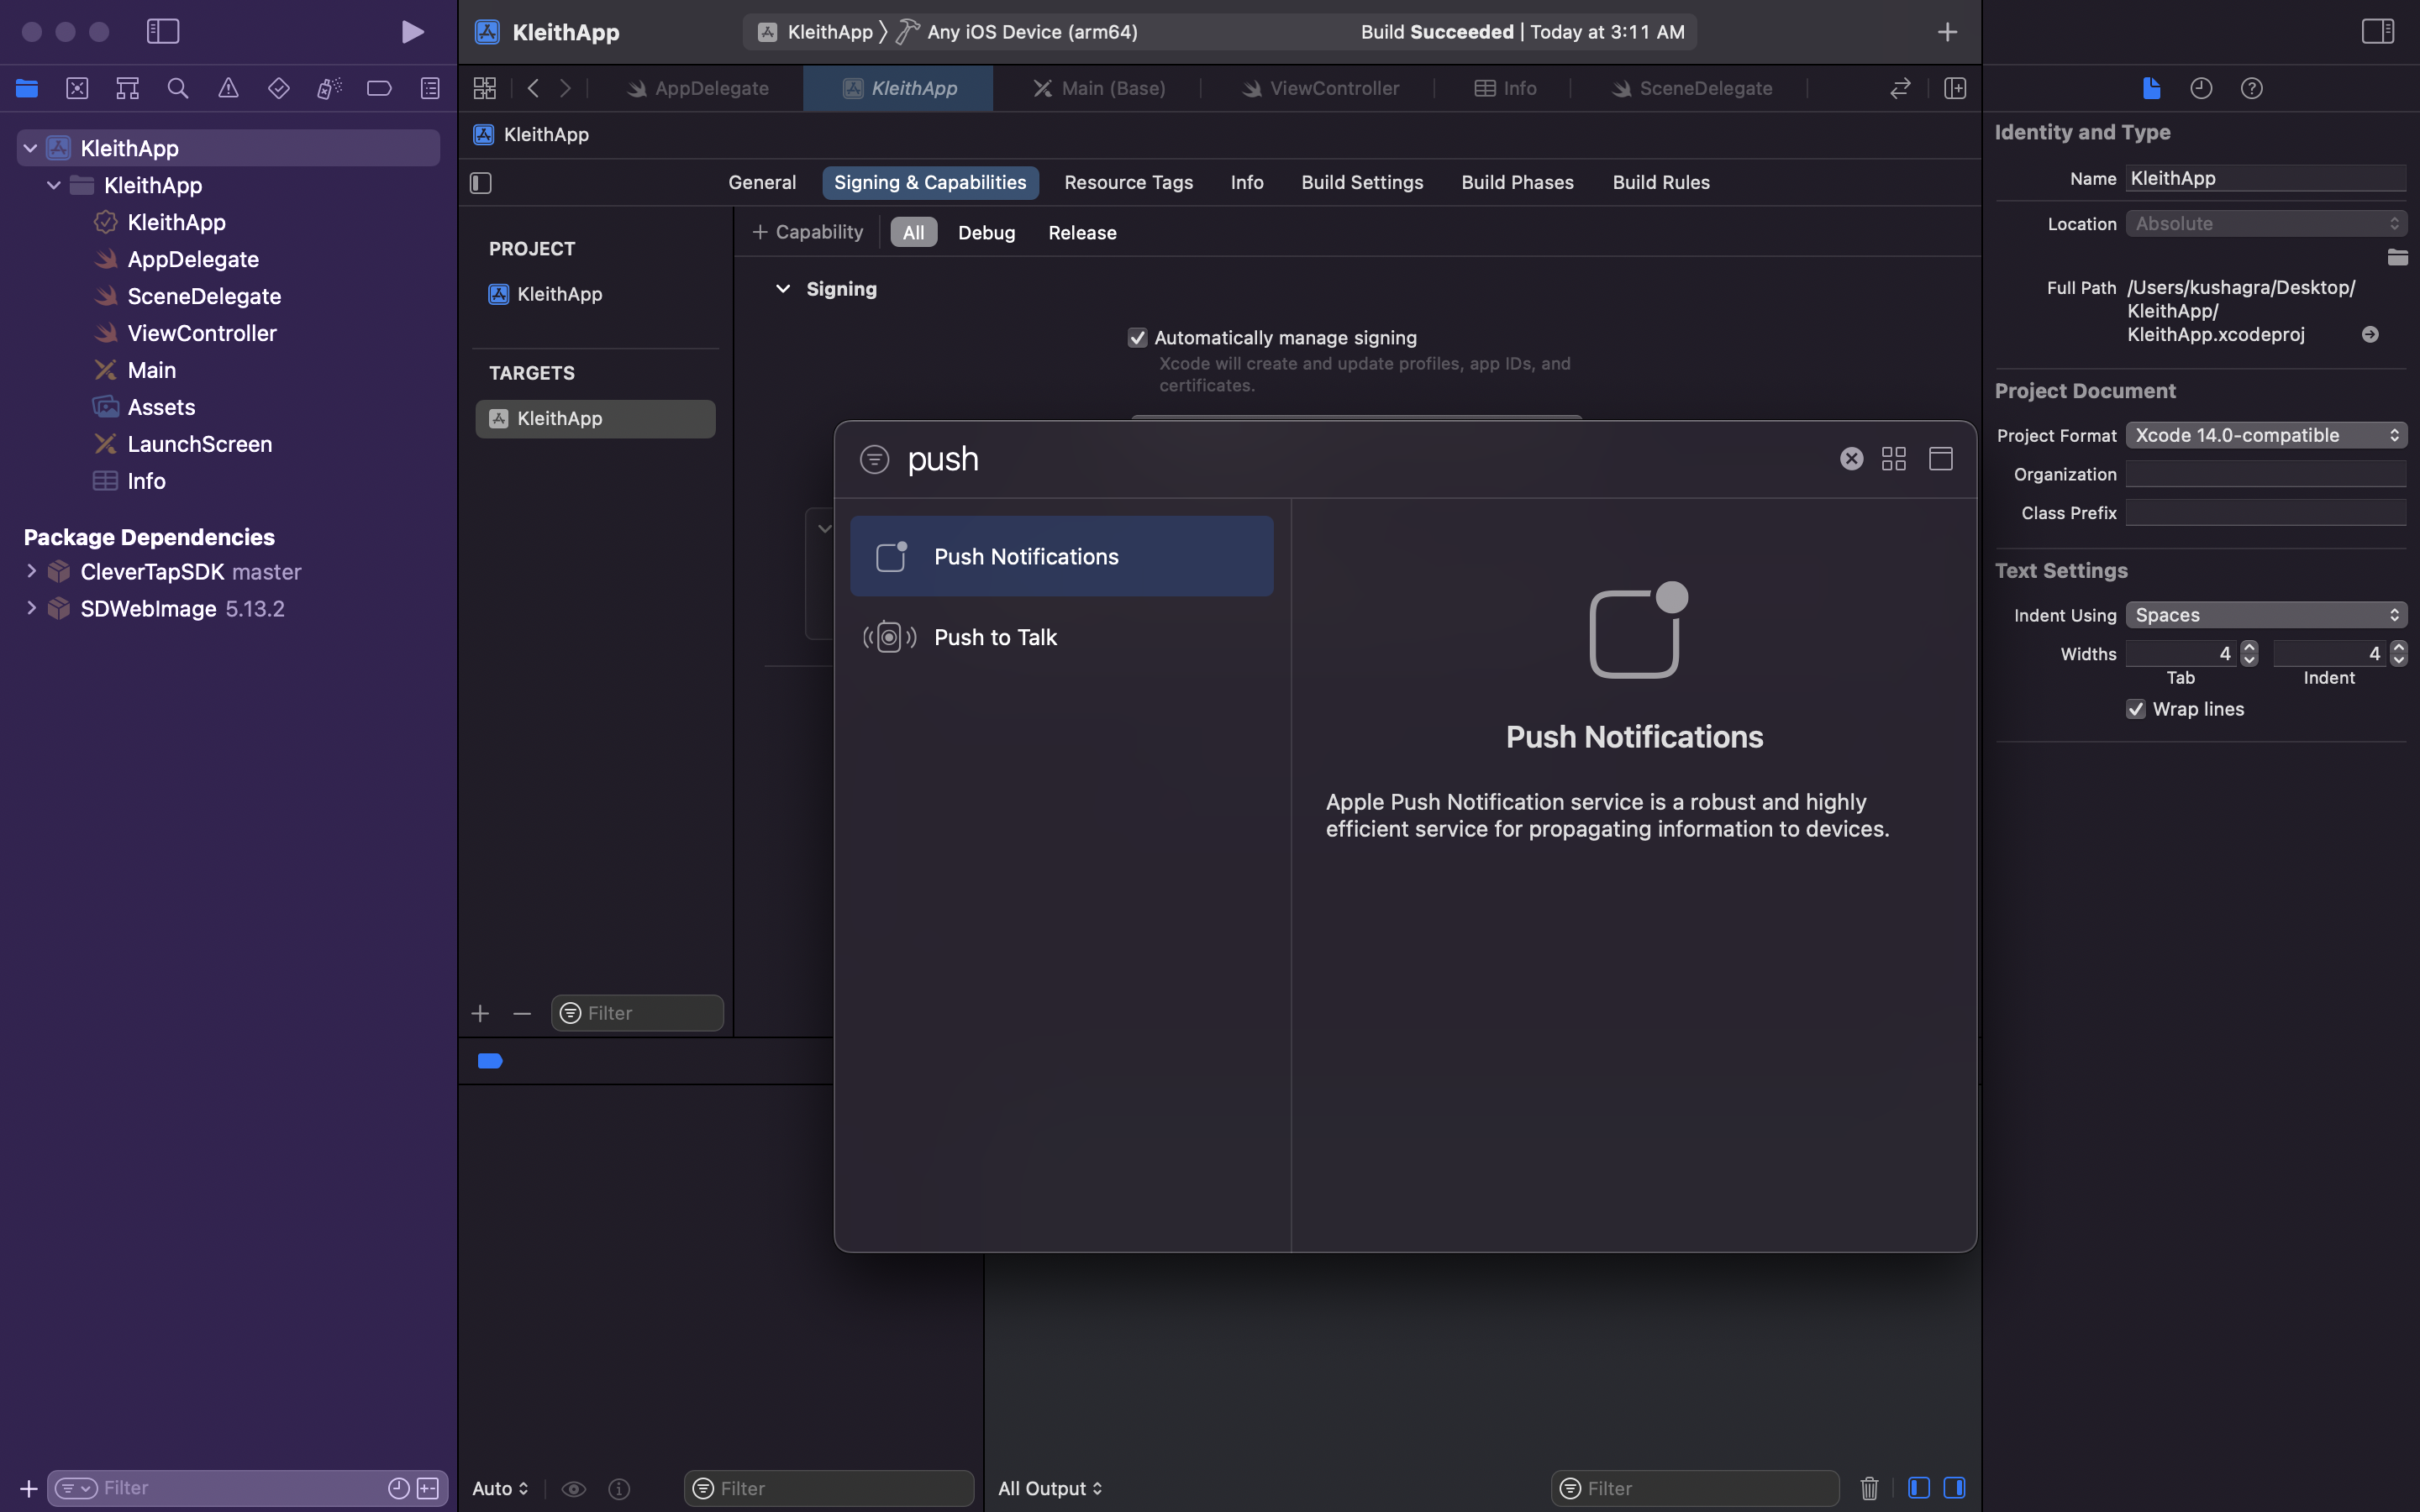
Enable the Push Notifications Capability
Step 3: Registering for push notifications
First import User Notifications in your App Delegate. The push integration code has to be written in App delegate file and should be written on main thread. To configure the CleverTap SDK to send you push notifications, you should have followed all steps till Autointegrate in iOS quick start guide document. To setup push notifications in the application, implement the UNUserNotificationCenterDelegate in your AppDelegate.
To register the device with the APN, add the following code to the application:didFinishLaunchingWithOptions: delegate method of your app delegate:
func application(_ application: UIApplication, didFinishLaunchingWithOptions launchOptions: [UIApplication.LaunchOptionsKey: Any]?) -> Bool {
        // Override point for customization after application launch.
        CleverTap.autoIntegrate()
        registerForPush()
        return true
    }

    func registerForPush() {
        // Register for Push notifications
        UNUserNotificationCenter.current().delegate = self
        // request Permissions
        UNUserNotificationCenter.current().requestAuthorization(options: [.sound, .badge, .alert], completionHandler: {granted, error in
            if granted {
                DispatchQueue.main.async {
                    UIApplication.shared.registerForRemoteNotifications()
                }
            }
        })
- (BOOL)application:(UIApplication *)application didFinishLaunchingWithOptions:(NSDictionary *)launchOptions {
[self registerPush];
[CleverTap autoIntegrate];
}
- (void)registerPush {
UNUserNotificationCenter *center = [UNUserNotificationCenter currentNotificationCenter];
[center requestAuthorizationWithOptions:(UNAuthorizationOptionSound | UNAuthorizationOptionAlert | UNAuthorizationOptionBadge) completionHandler:^(BOOL granted, NSError * _Nullable error){
if( !error ){
dispatch_async(dispatch_get_main_queue(), ^(void) {
[[UIApplication sharedApplication] registerForRemoteNotifications];
});
}
}];
}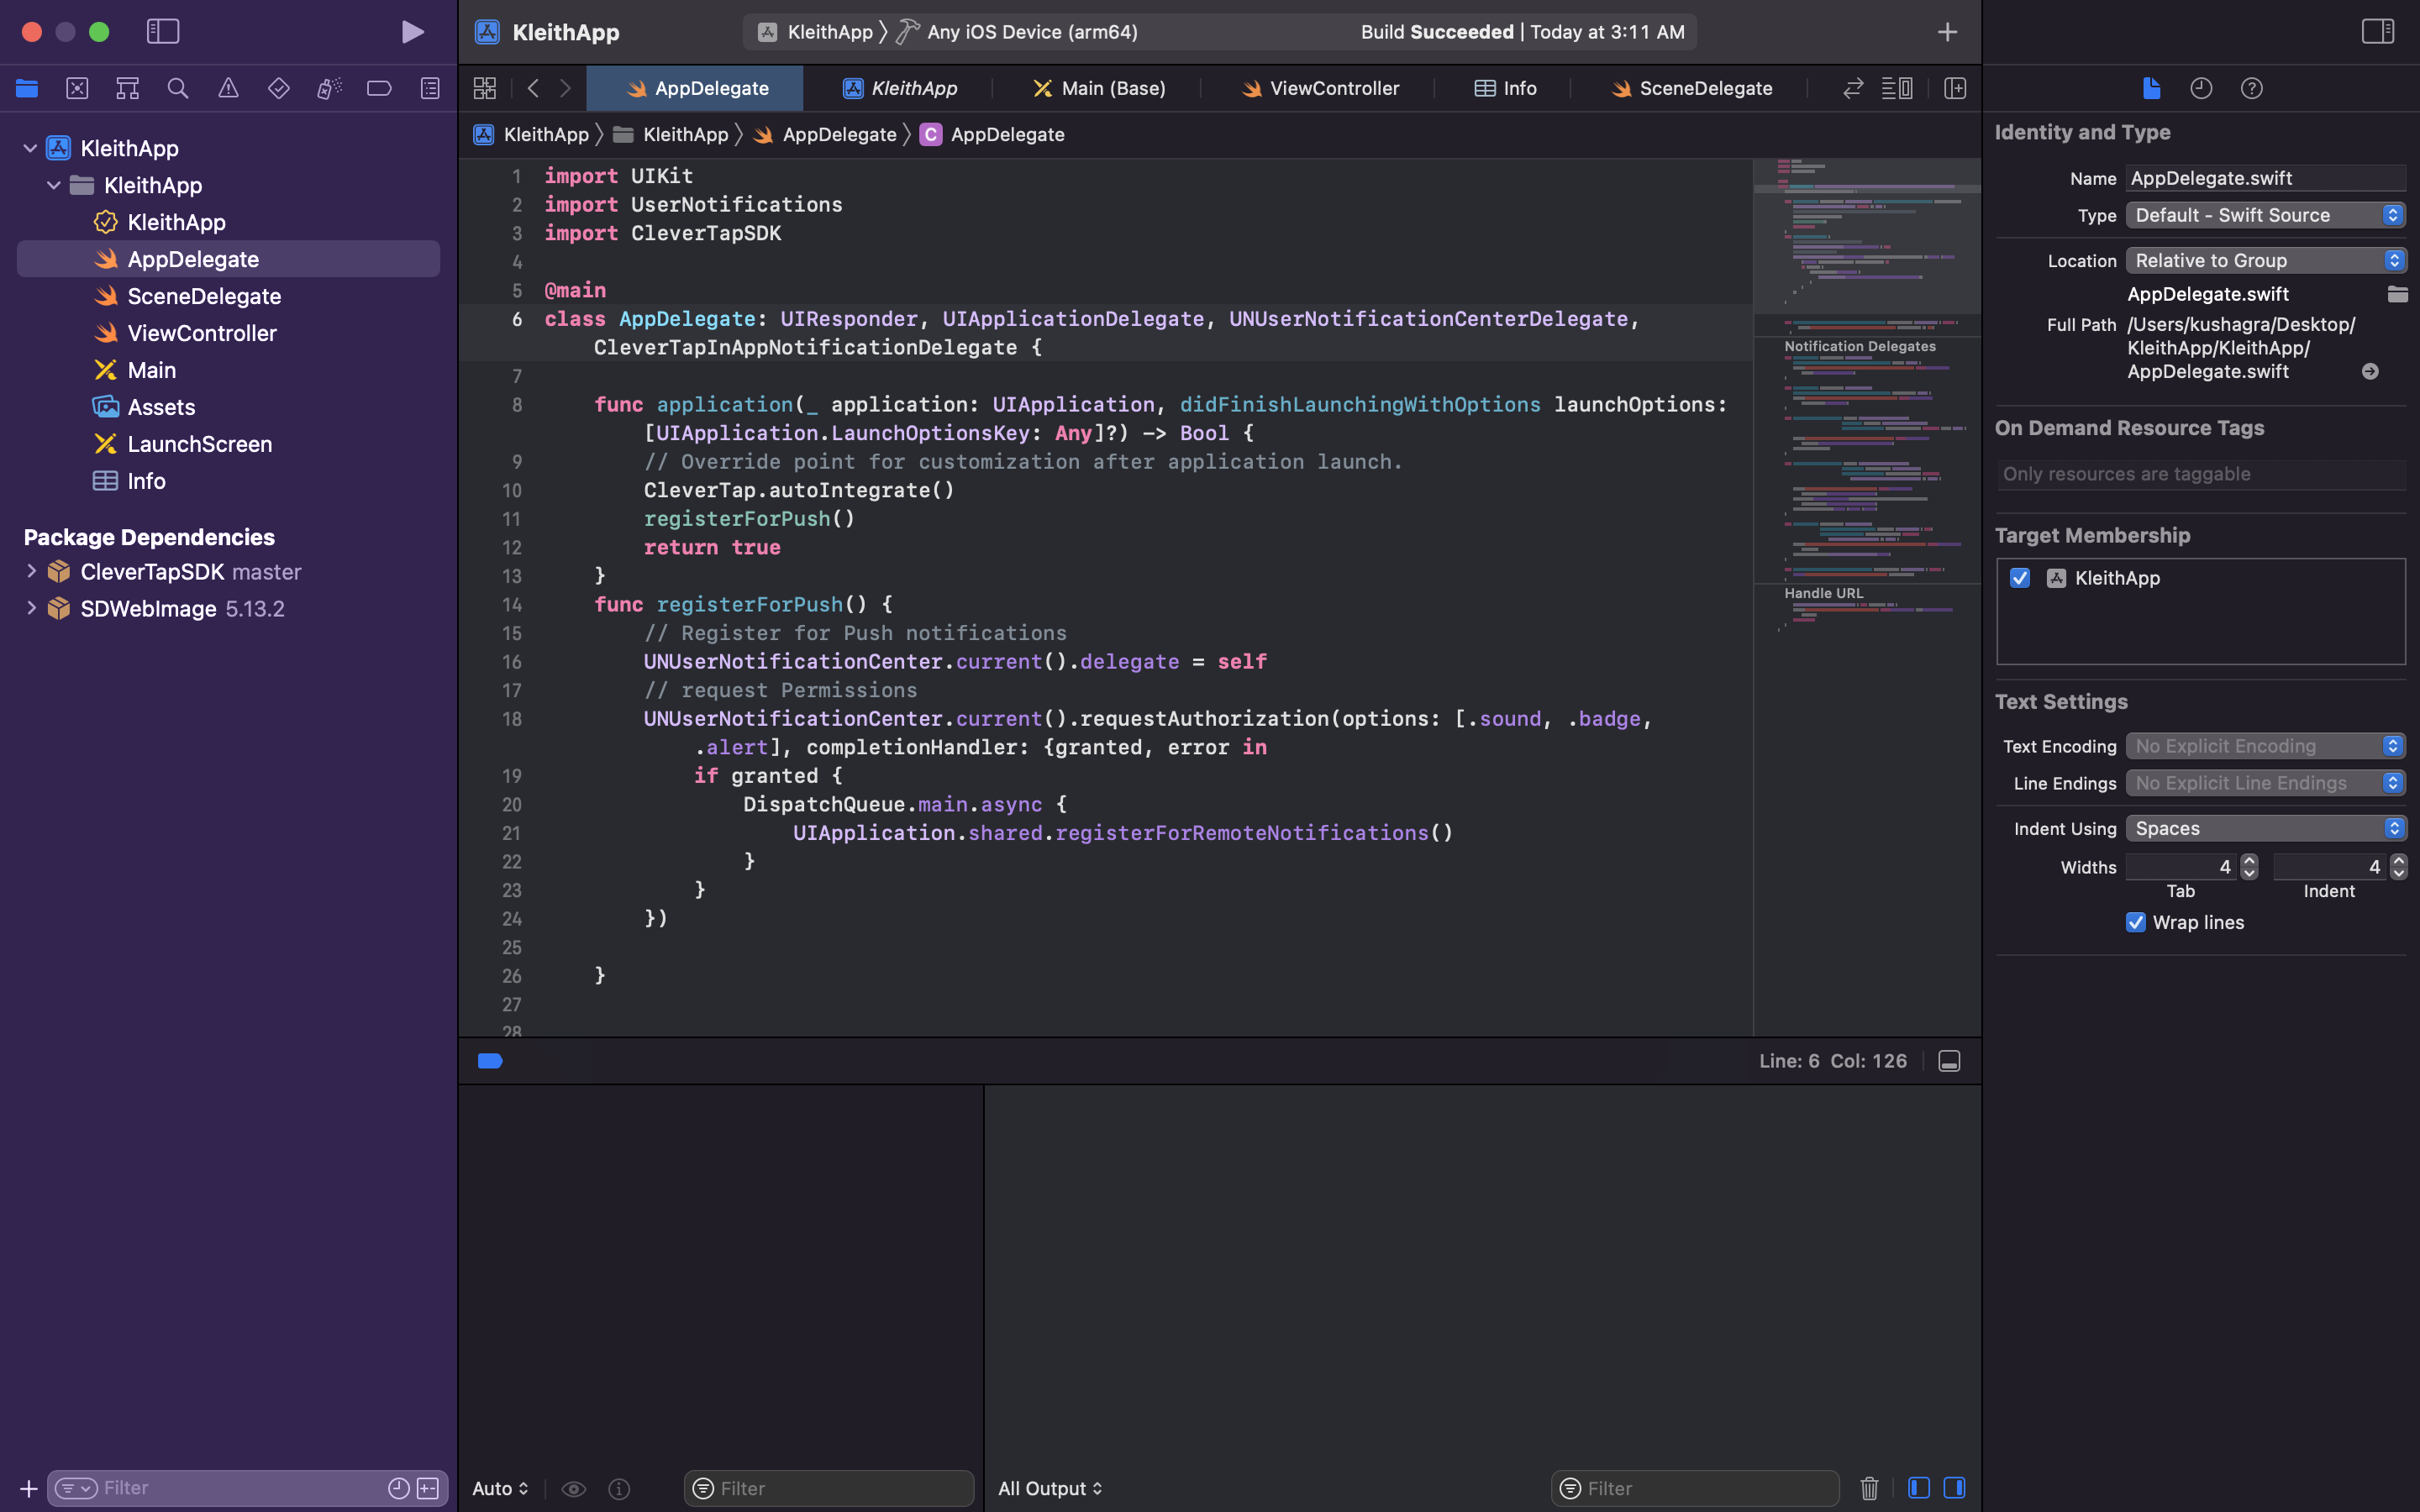
Push Notifications Register
It is a mandatory step to send push notifications to an iOS Application. The first time your app makes this authorization request, the system prompts the user to grant or deny the request and records the user’s response.
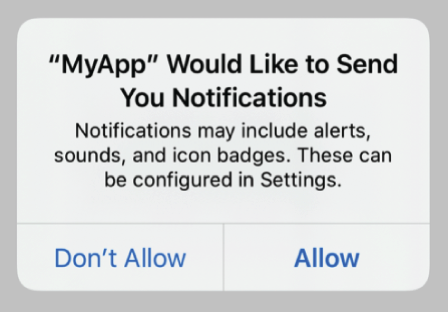
Push Notification Pop Up in iOS
Step 4: Enabling push handling
The following delegate methods of the UNUserNotificationCenterDelegate protocol receives push notifications from CleverTap and logs the payload on console and are necessary for logging push analytics and link handling. Ensure you call all push integration code in your application’s main thread.
func application(_ application: UIApplication, didFailToRegisterForRemoteNotificationsWithError error: Error) {
        NSLog("%@: failed to register for remote notifications: %@", self.description, error.localizedDescription)
    }

    func application(_ application: UIApplication, didRegisterForRemoteNotificationsWithDeviceToken deviceToken: Data) {
        NSLog("%@: registered for remote notifications: %@", self.description, deviceToken.description)
    }

    func userNotificationCenter(_ center: UNUserNotificationCenter,
                                didReceive response: UNNotificationResponse,
                                withCompletionHandler completionHandler: @escaping () -> Void) {

        NSLog("%@: did receive notification response: %@", self.description, response.notification.request.content.userInfo)
        completionHandler()
    }

    func userNotificationCenter(_ center: UNUserNotificationCenter,
                                willPresent notification: UNNotification,
                                withCompletionHandler completionHandler: @escaping (UNNotificationPresentationOptions) -> Void) {

        NSLog("%@: will present notification: %@", self.description, notification.request.content.userInfo)
        CleverTap.sharedInstance()?.recordNotificationViewedEvent(withData: notification.request.content.userInfo)
        completionHandler([.badge, .sound, .alert])
    }

    func application(_ application: UIApplication,
                     didReceiveRemoteNotification userInfo: [AnyHashable : Any],
                     fetchCompletionHandler completionHandler: @escaping (UIBackgroundFetchResult) -> Void) {
        NSLog("%@: did receive remote notification completionhandler: %@", self.description, userInfo)
        completionHandler(UIBackgroundFetchResult.noData)
    }

    func pushNotificationTapped(withCustomExtras customExtras: [AnyHashable : Any]!) {
        NSLog("pushNotificationTapped: customExtras: ", customExtras)
    }
-(void) application:(UIApplication *)application didFailToRegisterForRemoteNotificationsWithError:(NSError *)error{
NSLog(@"%@: failed to register for remote notifications: %@", self.description, error.localizedDescription);
}
-(void) application:(UIApplication *)application didRegisterForRemoteNotificationsWithDeviceToken:(NSData *)deviceToken{
NSLog(@"%@: registered for remote notifications: %@", self.description, deviceToken.description);
}
-(void) userNotificationCenter:(UNUserNotificationCenter *)center didReceiveNotificationResponse:(UNNotificationResponse *)response withCompletionHandler:(void (^)(void))completionHandler{
NSLog(@"%@: did receive notification response: %@", self.description, response.notification.request.content.userInfo);
completionHandler();
}
-(void) userNotificationCenter:(UNUserNotificationCenter *)center willPresentNotification:(UNNotification *)notification withCompletionHandler:(void (^)(UNNotificationPresentationOptions))completionHandler{
NSLog(@"%@: will present notification: %@", self.description, notification.request.content.userInfo);
[CleverTap sharedInstance] recordNotificationViewedEventWithData:request.content.userInfo];
completionHandler(UNAuthorizationOptionAlert | UNAuthorizationOptionBadge | UNAuthorizationOptionSound);
}
- (void)application:(UIApplication *)application didReceiveRemoteNotification:(NSDictionary *)userInfo fetchCompletionHandler:(void (^)(UIBackgroundFetchResult))completionHandler{
NSLog(@"%@: did receive remote notification completionhandler: %@", self.description, userInfo);
completionHandler(UIBackgroundFetchResultNewData);
}
- (void)pushNotificationTappedWithCustomExtras:(NSDictionary *)customExtras{
NSLog(@"pushNotificationTapped: customExtras: ", customExtras)
}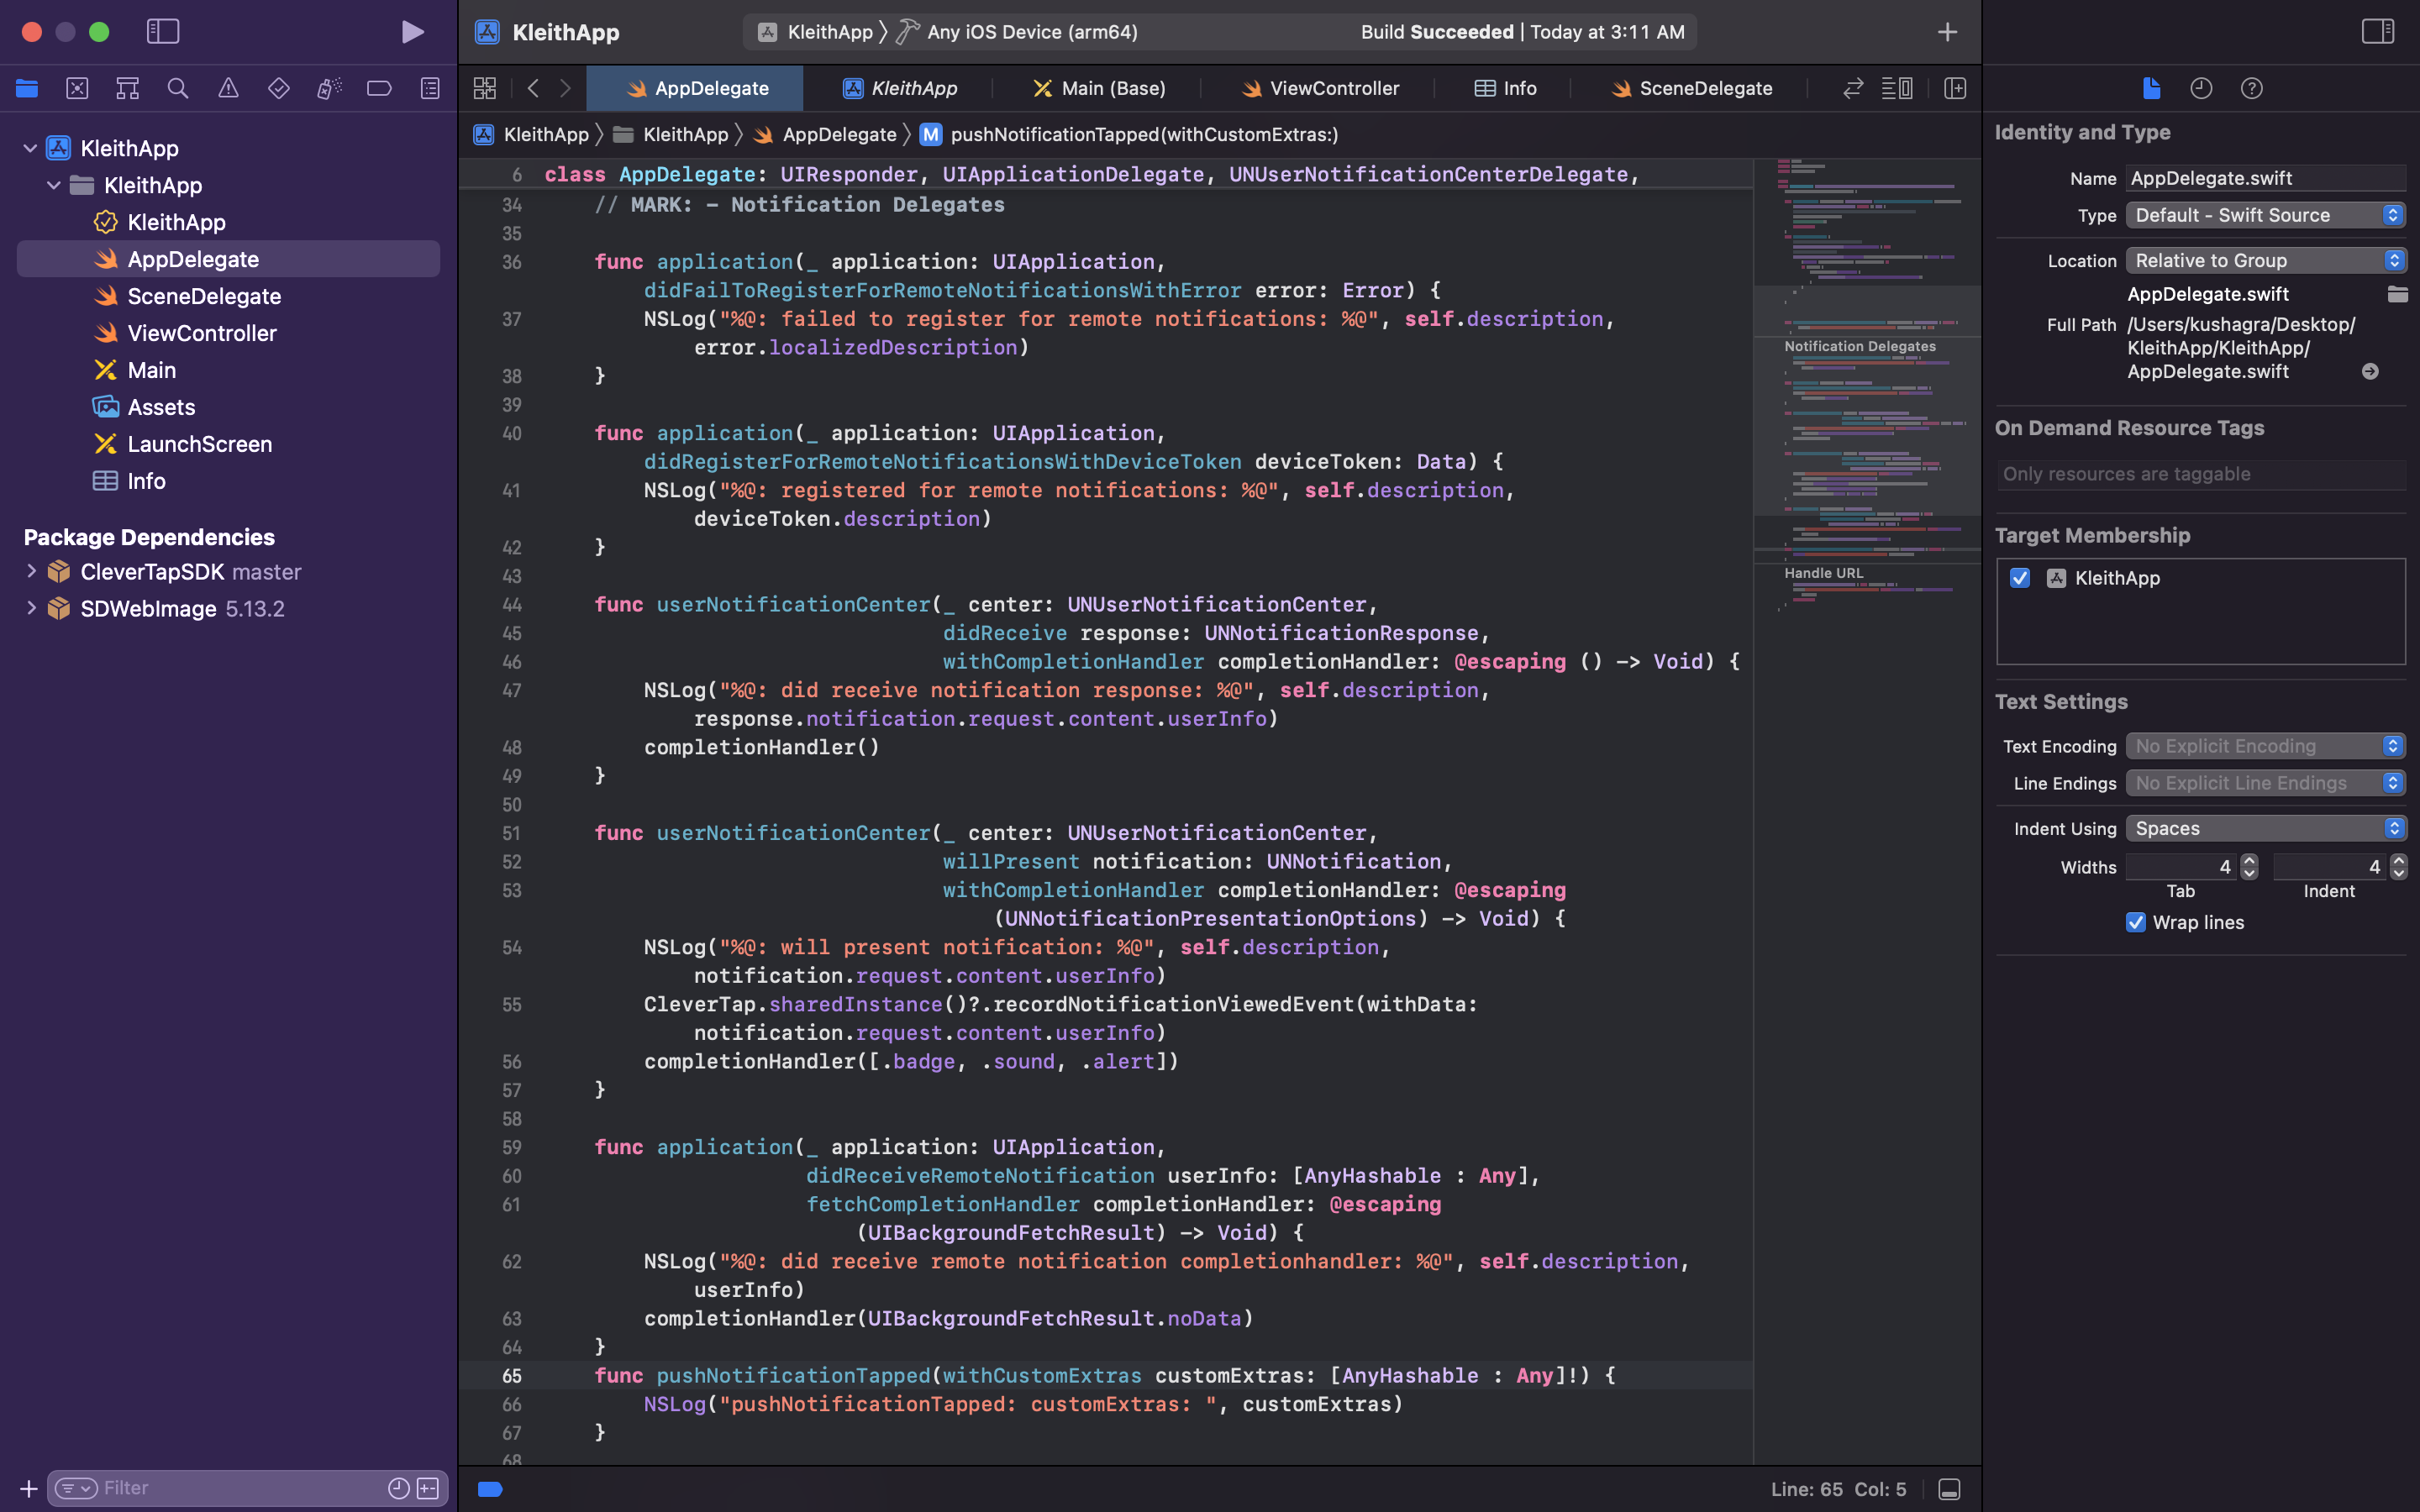
Enable Push Handling
Step 5: Configuring CleverTap SDK for sending Push Notifications from dashboard
Refer to the CleverTap docs for creating push notification campaigns
To send Push Notifications, login to the CleverTap Dashboard, click on Messages > Campaigns. Then click on the Campaign button on the top right to select Push Notifications.
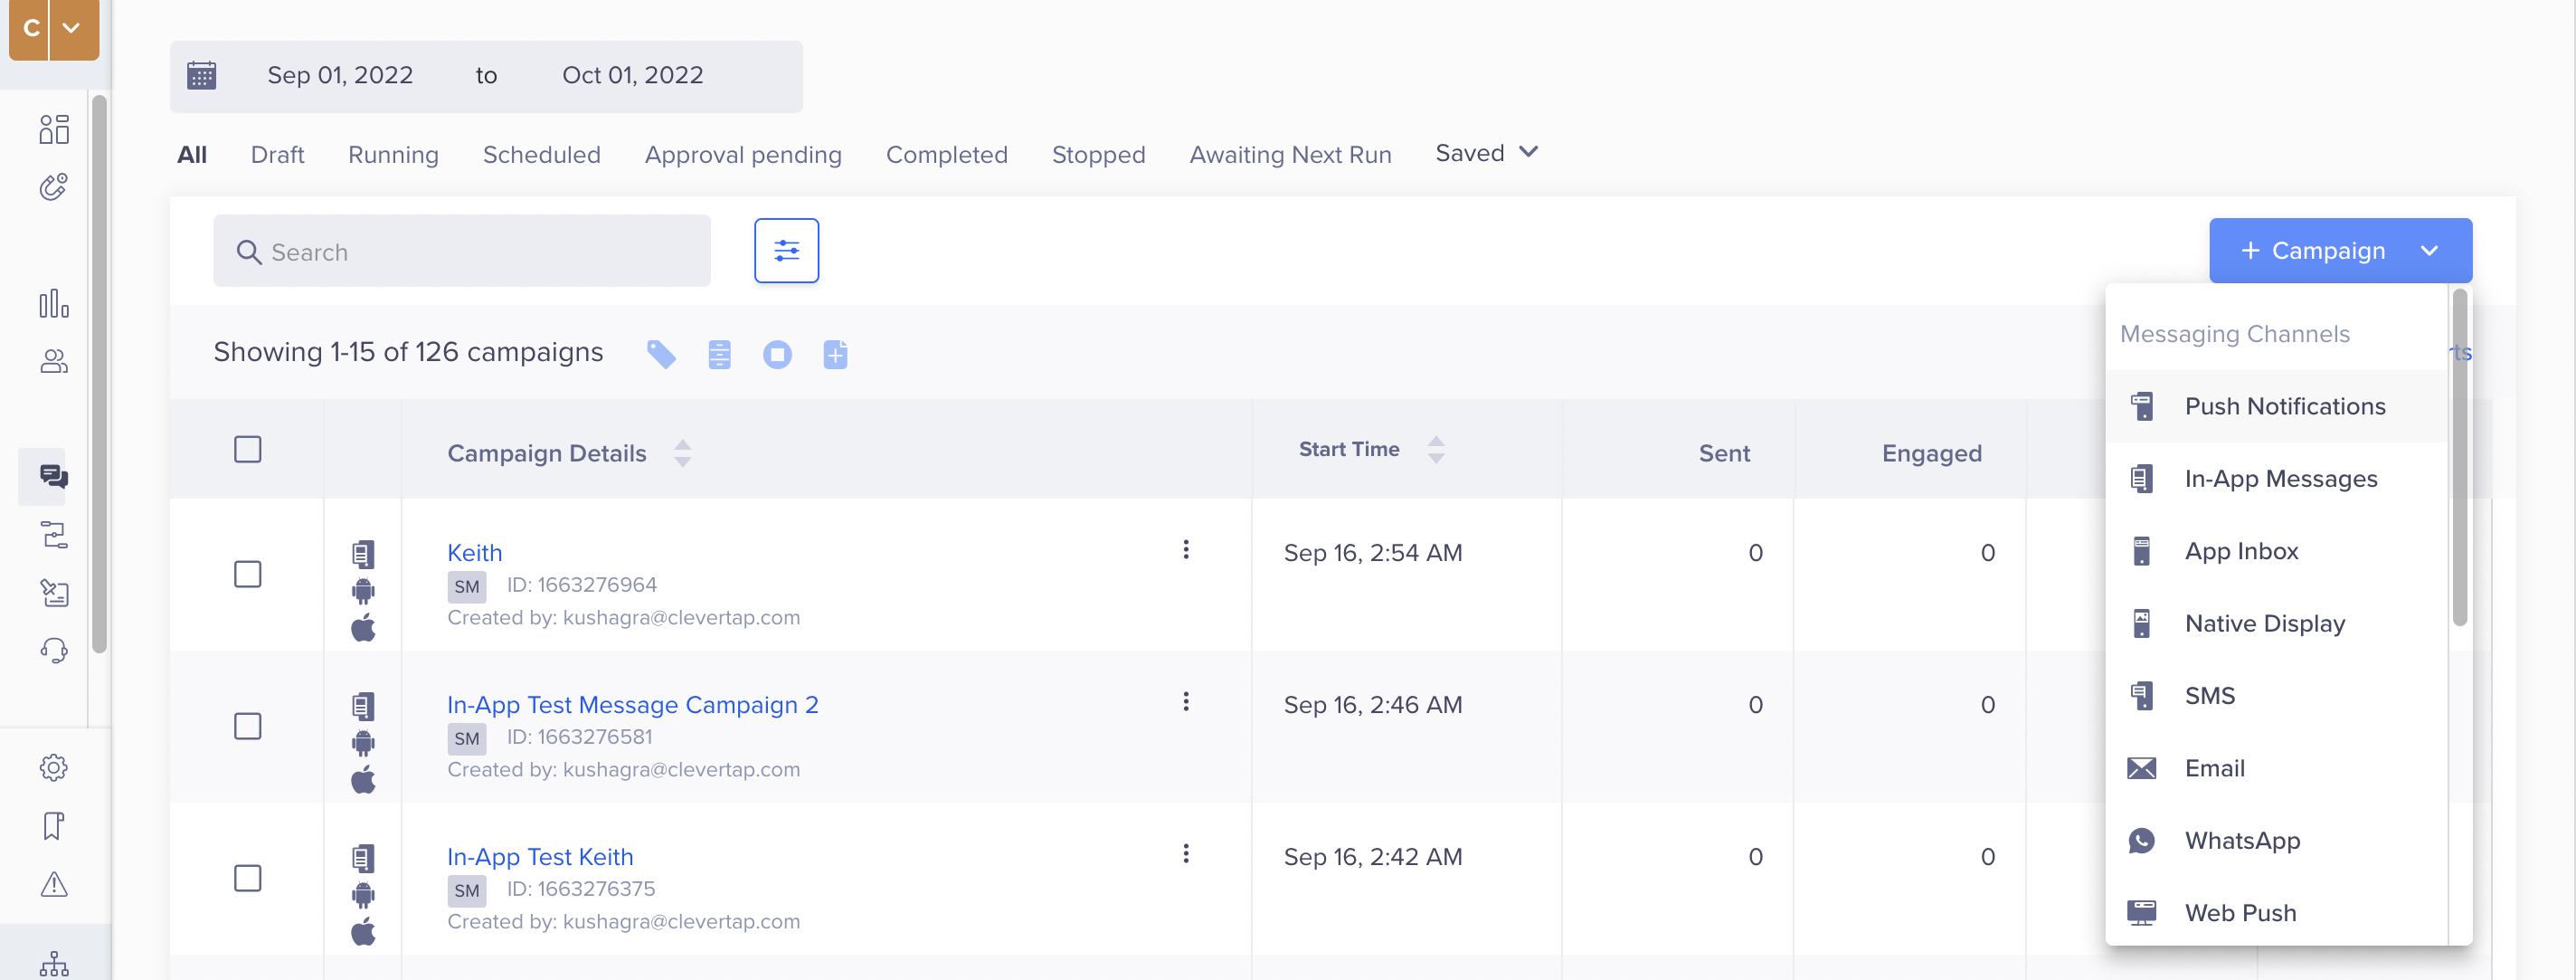
Send Push Notifications from CleverTap Dashboard
Set up Push Notification campaign by determining when you want to send out your notification, who you want to send it out to (in this case, it will be iOS users). For testing purposes by the developer, in the Who segment, you can raise a Custom Event(Button Pressed for instance in below image) to trigger the push notifications.
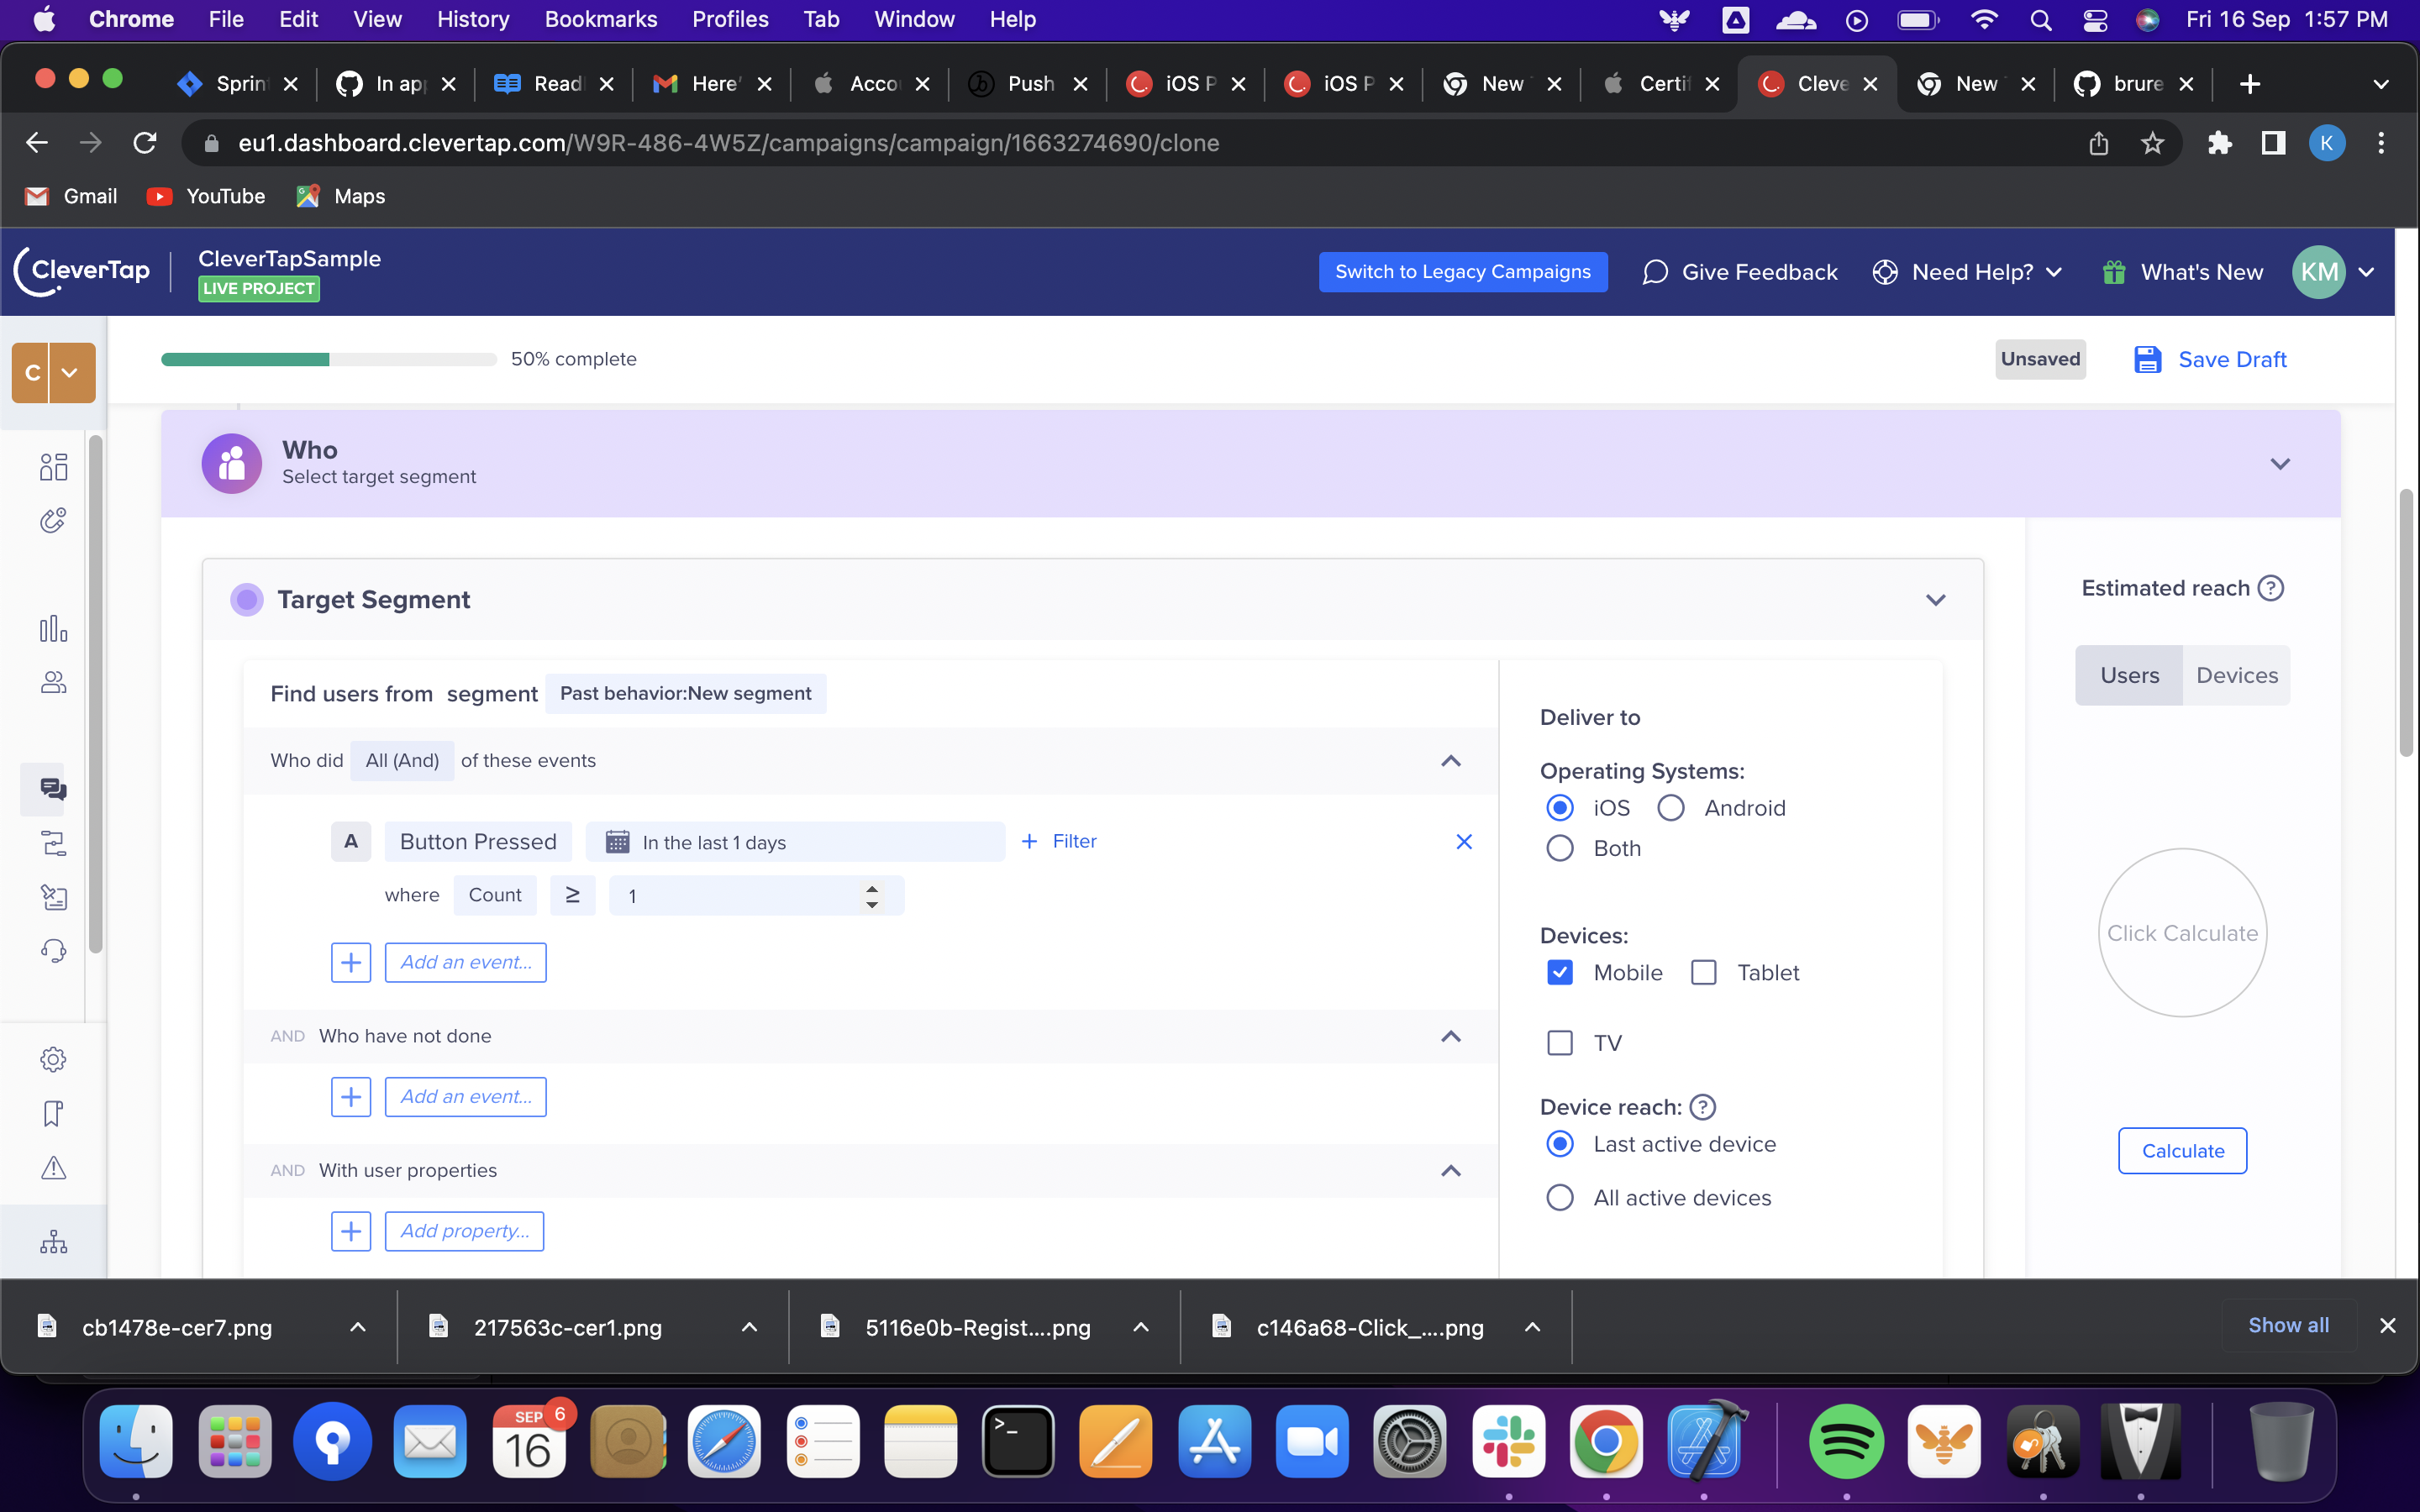
Set up Push Notification Campaign
In What section you can choose the title and message for your push notifications.
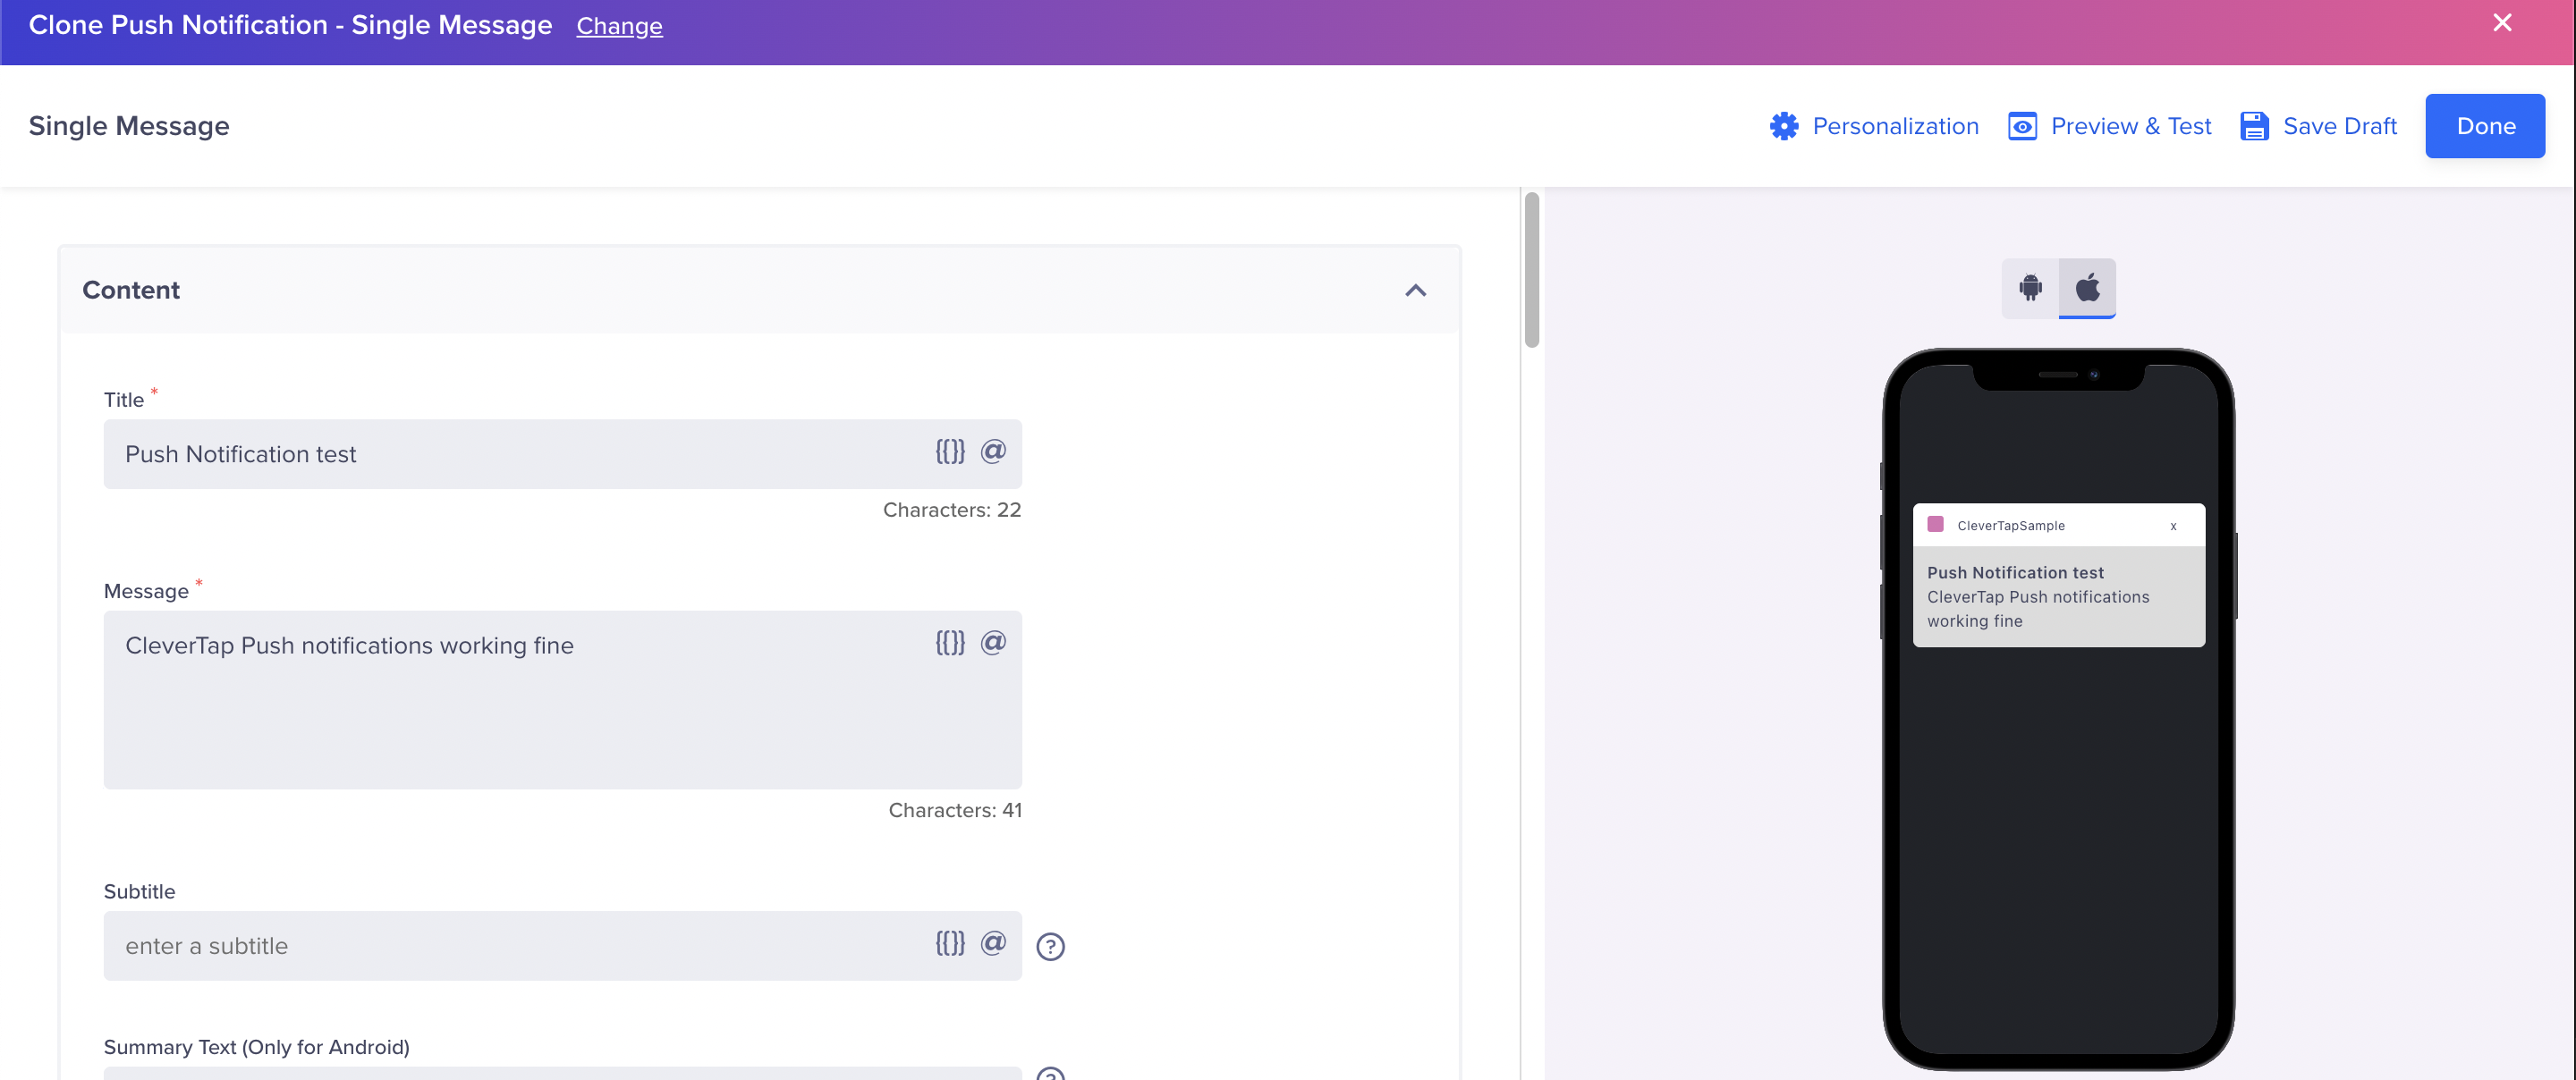
Add Title and Message for Push Notifications
In When section, you can schedule it as per your requirement. After successfully configuring the campaign, select Publish Campaign and it will start.
Now you have to raise an event in your application(Button Pressed for instance). You can raise it on click of a button.
Raising Events on click of Send Push Notification button in the test application:
CleverTap.sharedInstance()?.recordEvent("Button Pressed")
Send Push Notification
The push notifications are successfully set up in your application. Now apart from sending title and message to your application, you can also send rich media and various other interactive templates from CleverTap dashboard. Please refer to Rich Push Templates to configure advanced push notifications in your application.
Custom Handling Deeplink/External URL
Deep links allow you to land the user on a particular part of your app. Your app's OpenURL method is called with the deep link specified here. If you want to use external URLs, you will have to whitelist the IPs or provide http/https before the URL so that the SDK can appropriately handle them.
For CleverTap iOS SDK 3.10.0 and above, you can implement custom handling for URLs of in-app notification CTAs, push notifications, and app Inbox messages.
Check that your class conforms to the CleverTapURLDelegate protocol by first calling setURLDelegate. Use the following protocol method shouldHandleCleverTap(_ : forChannel:) to handle URLs received from channels such as in-app notification CTAs, push notifications, and app Inbox messages:
// Set the URL Delegate
CleverTap.sharedInstance()?.setUrlDelegate(self)


 // CleverTapURLDelegate method
public func shouldHandleCleverTap(_ url: URL?, for channel: CleverTapChannel) -> Bool {
    print("Handling URL: \(url!) for channel: \(channel)")
    return true
}
#import <CleverTapSDK/CleverTapURLDelegate.h>
// Set the URL Delegate
[[CleverTap sharedInstance]setUrlDelegate:self];
// CleverTapURLDelegate method
- (BOOL)shouldHandleCleverTapURL:(NSURL *)url forChannel:(CleverTapChannel)channel {
NSLog(@"Handling URL: \(%@) for channel: \(%d)", url, channel);
return YES;
}Manually Integrating Push Notification Support
If you automatically integrated the SDK in the quick start guide using the autoIntegrate method, you have already enabled push notification support and can skip this section. If you have not yet, follow the steps listed in the sections to follow.
CleverTap using the SDK is capable of sending push notifications to your users using the dashboard. To enable this support, when your app delegate receives the application:didRegisterForRemoteNotificationsWithDeviceToken: message, include a call to CleverTap setPushToken: as follows:
func application(_ application: UIApplication,
                     didRegisterForRemoteNotificationsWithDeviceToken deviceToken: Data) {
        CleverTap.sharedInstance()?.setPushToken(deviceToken as Data)
    }
- (void) application:(UIApplication *)application
didRegisterForRemoteNotificationsWithDeviceToken:(NSData *)deviceToken {
[[CleverTap sharedInstance] setPushToken:deviceToken];
}The above code saves the user's APNs token with CleverTap. This token is:
- Used to send push notifications.
- Mandatory if you are doing Manual Integration or using CleverTap iOS SDK v.3.1.7 and below.
UNUserNotificationCenterDelegate
iOS 10 has introduced the UNUserNotificationCenterDelegate protocol for handling notifications.
You can check if your device is registered for push notifications:
func application(_ application: UIApplication, didFailToRegisterForRemoteNotificationsWithError error: Error) {
        NSLog("%@: failed to register for remote notifications: %@", self.description, error.localizedDescription)
    }

    func application(_ application: UIApplication, didRegisterForRemoteNotificationsWithDeviceToken deviceToken: Data) {
        NSLog("%@: registered for remote notifications: %@", self.description, deviceToken.description)
    }
If you want CleverTap to track notification opens and fire attached deep links, you must manually call the SDK as follows:
/** For iOS 10 and above - Background **/
func userNotificationCenter(_ center: UNUserNotificationCenter,
                                didReceive response: UNNotificationResponse,
                                withCompletionHandler completionHandler: @escaping () -> Void) {

	/**
	 Use this method to perform the tasks associated with your app’s custom actions. When the user responds to a notification, the system calls this method with the results. You use this method to perform the task associated with that action, if at all. At the end of your implementation, you must call the completionHandler block to let the system know that you are done processing the notification.

	 You specify your app’s notification types and custom actions using UNNotificationCategory and UNNotificationAction objects. You create these objects at initialization time and register them with the user notification center. Even if you register custom actions, the action in the response parameter might indicate that the user dismissed the notification without performing any of your actions.

	 If you do not implement this method, your app never responds to custom actions.

	 see https://developer.apple.com/reference/usernotifications/unusernotificationcenterdelegate/1649501-usernotificationcenter

	 **/

	// if you wish CleverTap to record the notification open and fire any deep links contained in the payload. Skip this line if you have opted for auto-integrate.
	CleverTap.sharedInstance().handleNotification(withData: response.notification.request.content.userInfo)

	completionHandler()

}
/** For iOS 10 and above - Background **/
- (void)userNotificationCenter:(UNUserNotificationCenter *)center
didReceiveNotificationResponse:(UNNotificationResponse *)response
withCompletionHandler:(void (^)())completionHandler {
/** For iOS 10 and above.
Use this method to perform the tasks associated with your app’s custom actions. When the user responds to a notification, the system calls this method with the results. You use this method to perform the task associated with that action, if at all. At the end of your implementation, you must call the completionHandler block to let the system know that you are done processing the notification.
You specify your app’s notification types and custom actions using UNNotificationCategory and UNNotificationAction objects. You create these objects at initialization time and register them with the user notification center. Even if you register custom actions, the action in the response parameter might indicate that the user dismissed the notification without performing any of your actions.
If you do not implement this method, your app never responds to custom actions.
see https://developer.apple.com/reference/usernotifications/unusernotificationcenterdelegate/1649501-usernotificationcenter?language=objc
**/
// Skip this line if you have opted for auto-integrate. If you wish CleverTap to record the notification open and fire any deep links contained in the payload.
[[CleverTap sharedInstance] handleNotificationWithData:response.notification.request.content.userInfo];
completionHandler();
}When your app is not running or is in the background, the above method will track notification opens, and fire attached deep links. But if you want CleverTap to continue to fire attached deep links when in the foreground, you must manually call the SDK as follows:
/** For iOS 10 and above - Foreground**/

func userNotificationCenter(_ center: UNUserNotificationCenter, willPresent notification: UNNotification, withCompletionHandler completionHandler: (UNNotificationPresentationOptions) -> Void) {

       /**
     Use this method to perform the tasks associated with your app's custom actions. When the user responds to a notification, the system calls this method with the results. You use this method to perform the task associated with that action, if at all. At the end of your implementation, you must call the completionHandler block to let the system know that you are done processing the notification.

     You specify your app's notification types and custom actions using UNNotificationCategory and UNNotificationAction objects.
     You create these objects at initialization time and register them with the user notification center. Even if you register custom actions, the action in the response parameter might indicate that the user dismissed the notification without performing any of your actions.

     If you do not implement this method, your app never responds to custom actions.

     see https://developer.apple.com/reference/usernotifications/unusernotificationcenterdelegate/1649501-usernotificationcenter
     **/

    print("APPDELEGATE: didReceiveResponseWithCompletionHandler \(response.notification.request.content.userInfo)")

    // If you wish CleverTap to record the notification click and fire any deep links contained in the payload.

     CleverTap.sharedInstance()?.handleNotification(withData: notification.request.content.userInfo, openDeepLinksInForeground: true)
     completionHandler([.badge, .sound, .alert])
}
/** For iOS 10 and above - Foreground **/
- (void)userNotificationCenter:(UNUserNotificationCenter *)center willPresentNotification:(UNNotification *)notification withCompletionHandler:(void (^)(UNNotificationPresentationOptions))completionHandler{
/**
Use this method to perform the tasks associated with your app's custom actions. When the user responds to a notification, the system calls this method with the results. You use this method to perform the task associated with that action, if at all. At the end of your implementation, you must call the completionHandler block to let the system know that you are done processing the notification.
You specify your app's notification types and custom actions using UNNotificationCategory and UNNotificationAction objects.
You create these objects at initialization time and register them with the user notification center. Even if you register custom actions, the action in the response parameter might indicate that the user dismissed the notification without performing any of your actions.
If you do not implement this method, your app never responds to custom actions.
see https://developer.apple.com/reference/usernotifications/unusernotificationcenterdelegate/1649501-usernotificationcenter?language=objc
**/
// if you wish CleverTap to record the notification open and fire any deep links contained in the payload
[[CleverTap sharedInstance]handleNotificationWithData:notification.request.content.userInfo openDeepLinksInForeground: YES];
completionHandler(UNAuthorizationOptionSound | UNAuthorizationOptionAlert | UNAuthorizationOptionBadge);
}Push Notification Callback
To get the callback on the click of the Push Notifications, check that your class implements the CleverTapPushNotificationDelegate delegate and then use the following method to handle the user-selected actions from Push notifications:
func pushNotificationTapped(withCustomExtras customExtras: [AnyHashable : Any]!) {
      print("Push Notification Tapped with Custom Extras: \(customExtras)")
      ...
}
- (void)pushNotificationTappedWithCustomExtras:(NSDictionary *)customExtras {
NSLog(@"Push Notification Tapped with Custom Extras: %@", customExtras);
...
}Push Impressions
You can now raise and record push notifications delivered onto your user's iOS devices.
CleverTap SDK v3.5.0 and above supports raising Push Impressions for push campaigns. To raise Push Impressions for iOS, you must enable the Notification Service Extension.
Notification Service Extension is a separate and distinct binary embedded in your app bundle. Before displaying a new push notification, the system will call your Notification Service Extension to allow you to call the Notification Viewed method for your Application. In function didReceive of Notification Service file write the following:
NotePush Impressions are not raised if the Notification Service Extension is not included in your app bundle.
override func didReceive(_ request: UNNotificationRequest, withContentHandler contentHandler: @escaping (UNNotificationContent) -> Void) {
        // While running the Application add CleverTap Account ID and Account token in your .plist file

        // call to record the Notification viewed
        CleverTap.sharedInstance()?.recordNotificationViewedEvent(withData: request.content.userInfo)
        super.didReceive(request, withContentHandler: contentHandler)
    }
- (void)didReceiveNotificationRequest:(UNNotificationRequest *)request withContentHandler:(void (^)(UNNotificationContent * _Nonnull))contentHandler {
self.contentHandler = contentHandler;
self.bestAttemptContent = [request.content mutableCopy];
// While running the Application add CleverTap Account ID and Account token in your .plist file
// call to record the Notification viewed
[[CleverTap sharedInstance] recordNotificationViewedEventWithData:request.content.userInfo];
[super didReceiveNotificationRequest:request withContentHandler:contentHandler];
}
Dummy Profile CreationIf the
Notification viewedmethod is incorrectly called, it would create a new profile in CleverTap with only this event. This will create a dummy profile with no other event and will not be mapped to the profile from which the Push Impressions event was raised.To avoid the creation of a new user profile while calling the Notification Viewed method from your Application, you must pass the Identity/Email to CleverTap in the Notification Service Class, or you can call recordNotificationViewedEvent API from your Main Application.
Remote notifications sent by your server must be crafted explicitly to support modification by a notification service app extension. Notifications that do not include the proper modifications are delivered directly to the user without modification. When creating the payload for the remote notification, your server should do the following:
Include the mutable-content key with a value of 1.
Setting the behaviour of push notifications:
You have two options to set the behavior of the notification after the user clicks on the notification. The notification can either be dismissed or stay in the notification tray until explicitly swiped/dismissed.
-
Sound File
You will have to specify the name of the sound file included in your app bundle. Apple supports .aiff, .caf and .wav extensions. For more information on how you can generate such sound files, refer to the Managing Your App’s Notification Support article. -
Badge Count
This updates the badge count for your app to the one specified while creating the campaign. However, this does not increment the badge count or set the value to 0 (zero) to hide the badge number. That should be handled manually at the application level. -
Category
You can input the name of the category while creating the campaign. Each category has to be registered with the app. Each such category is associated with actions the user can perform when a notification of a rich media type is delivered. Each category can have up to four related actions, although the number of actions displayed depends on the type of notification delivered. This enables users to take multiple actions for the notification. For example, a single media push notification can have two buttons – ‘Buy Now’ and ‘Save for Later’. -
Mutable Content
Select this box to send the mutable-content flag along with your payload. This will invoke your app's notification service extension. For more information click here. -
Content Available
Suppose you include the content-available key with a value of 1 to send out a silent notification to your users. In that case, it will not alert the user in any way (update badge count/play a sound/show a notification), but it will wake your app up in the background, allowing you to fetch new content and prepare it for the next time the user opens your app.- Key: content-available
- Value: 1
Push Notification Clicked
You can now raise and record push notifications clicked on your user's iOS devices.
CleverTap SDK v3.8.1 and above supports raising Push Notification Clicked for push campaigns.
CleverTap.sharedInstance()?.recordNotificationClickedEvent(withData: response.notification.request.content.userInfo)[CleverTap sharedInstance] recordNotificationClickedEventWithData:response.notification.request.content.userInfo
Using the Notification Clicked public APIUse this API only if you wish to raise a Notification Clicked event if the carousel action button is tapped.
Dummy Profile CreationIf the
Notification Clickedmethod is not called correctly, it will create a new profile in CleverTap with only this event. This will create a dummy profile with no other event and will not be mapped to the profile from which the Notification Clicked event was raised.To avoid the creation of a new user profile while calling the Notification Clicked method from your Application, you must pass the Identity/ Email to CleverTap in the Notification Content Class.
Checking Push Notifications from CleverTap
If you want to determine whether a notification originated from CleverTap, call this method:
- (BOOL)isCleverTapNotification:(NSDictionary *)payload;
You must manually call the SDK as follows/add the following CleverTap code to your AppDelegate:
func userNotificationCenter(_ center: UNUserNotificationCenter, didReceive response: UNNotificationResponse, withCompletionHandler completionHandler: @escaping () -> Void) {

     /**
     Use this method to perform the tasks associated with your app's custom actions. When the user responds to a notification, the system calls this method with the results. You use this method to perform the task associated with that action, if at all. At the end of your implementation, you must call the completionHandler block to let the system know that you are done processing the notification.

     You specify your app's notification types and custom actions using UNNotificationCategory and UNNotificationAction objects.
     You create these objects at initialization time and register them with the user notification center. Even if you register custom actions, the action in the response parameter might indicate that the user dismissed the notification without performing any of your actions.

     If you do not implement this method, your app never responds to custom actions.

     see https://developer.apple.com/reference/usernotifications/unusernotificationcenterdelegate/1649501-usernotificationcenter
     **/

      print("APPDELEGATE: didReceiveResponseWithCompletionHandler \(response.notification.request.content.userInfo)")

      // If you wish to determine whether a notification originated from CleverTap, you must manually call the SDK as follows:
      if CleverTap.sharedInstance().isCleverTapNotification(response.notification.request.content.userInfo) {

          ...
      }
 }
- (void) userNotificationCenter:(UNUserNotificationCenter *)center didReceiveNotificationResponse:(UNNotificationResponse *)response withCompletionHandler:(void (^)(void))completionHandler {
/**
Use this method to perform the tasks associated with your app's custom actions. When the user responds to a notification, the system calls this method with the results. You use this method to perform the task associated with that action, if at all. At the end of your implementation, you must call the completionHandler block to let the system know that you are done processing the notification.
You specify your app's notification types and custom actions using UNNotificationCategory and UNNotificationAction objects.
You create these objects at initialization time and register them with the user notification center. Even if you register custom actions, the action in the response parameter might indicate that the user dismissed the notification without performing any of your actions.
If you do not implement this method, your app never responds to custom actions.
see https://developer.apple.com/reference/usernotifications/unusernotificationcenterdelegate/1649501-usernotificationcenter?language=objc
**/
if ([[CleverTap sharedInstance] isCleverTapNotification:response.notification.request.content.userInfo]) {
...
}
completionHandler();
}iOS Push Primer
A Push Primer explains the need for push notifications to your users and helps to improve your engagement rates. It is an InApp notification that provides the details of message types, your users can expect, before requesting notification permission. It helps with the following:
- Educates your users about the purpose of requesting this permission before invoking a system dialog that asks the user to allow/deny this push permission.
- Acts as a precursor to the hard system dialogue. This allows you to ask for permission multiple times to enable the permission again if the permission is previously denied without making your users search the device settings.
Supported VersionsCleverTap iOS SDK v4.2.0 and above versions support the Push Primer.
Push Primer using Half-Interstitial InApp
This template can send a customized push primer notification, such as displaying an image and modifying the text, button, and background color.
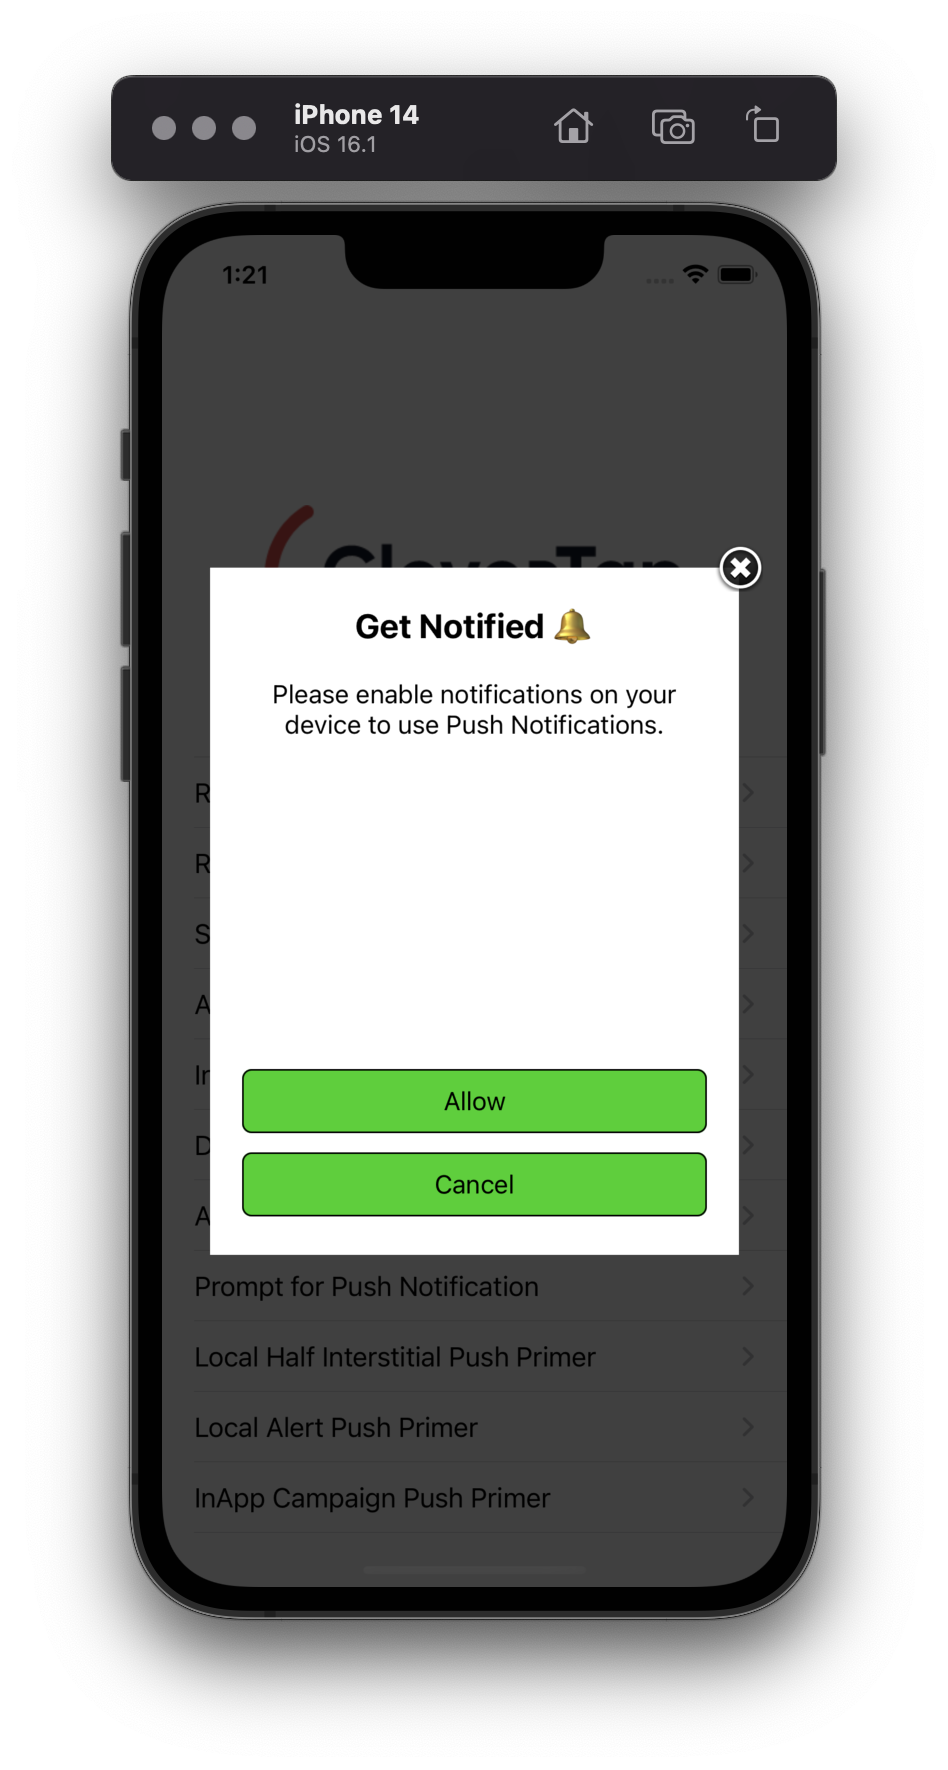
Push Primer Using Half-Interstitial InApp
Use the following to create Push Primer using Half-Interstitial InApp:
import CleverTapSDK

// Required field.
let localInAppBuilder = CTLocalInApp(inAppType: CTLocalInAppType.HALF_INTERSTITIAL,
                                     titleText: "Get Notified",
                                     messageText: "Please enable notifications on your device to use Push Notifications.",
                                     followDeviceOrientation: true,
                                     positiveBtnText: "Allow",
                                     negativeBtnText: "Cancel")

// Optional fields.
localInAppBuilder.setFallbackToSettings(true)
localInAppBuilder.setBackgroundColor("#FFFFFF")
localInAppBuilder.setTitleTextColor("#FF0000")
localInAppBuilder.setMessageTextColor("#FF0000")
localInAppBuilder.setBtnBorderRadius("4")
localInAppBuilder.setBtnTextColor("#FF0000")
localInAppBuilder.setBtnBorderColor("#FF0000")
localInAppBuilder.setBtnBackgroundColor("#FFFFFF")
localInAppBuilder.setImageUrl("https://icons.iconarchive.com/icons/treetog/junior/64/camera-icon.png", contentDescription: "This is alt text")

// Prompt Push Primer with above settings.
CleverTap.sharedInstance()?.promptPushPrimer(localInAppBuilder.getSettings())
#import <CleverTapSDK/CTLocalInApp.h>
// Required field.
CTLocalInApp *localInAppBuilder = [[CTLocalInApp alloc] initWithInAppType:HALF_INTERSTITIAL
titleText:@"Get Notified"
messageText:@"Please enable notifications on your device to use Push Notifications."
followDeviceOrientation:YES
positiveBtnText:@"Allow"
negativeBtnText:@"Cancel"];
// Optional fields.
[localInAppBuilder setFallbackToSettings:YES]; // default is NO.
[localInAppBuilder setBackgroundColor:@"#FFFFFF"]; // default is White.
[localInAppBuilder setTitleTextColor:@"#FF0000"];
[localInAppBuilder setMessageTextColor:@"#FF0000"];
[localInAppBuilder setBtnBorderRadius:@"4"]; // default is @"2".
[localInAppBuilder setBtnTextColor:@"#FF0000"];
[localInAppBuilder setBtnBorderColor:@"#FF0000"];
[localInAppBuilder setBtnBackgroundColor:@"#FFFFFF"]; // default is White.
setImageUrl:@"https://icons.iconarchive.com/icons/treetog/junior/64/camera-icon.png" contentDescription:@"This is alt text"];
// Prompt Push Primer with above settings.
[[CleverTap sharedInstance] promptPushPrimer:localInAppBuilder.getLocalInAppSettings];Push Primer using Alert InApp
This template can send a basic push primer notification with a title, message, and two buttons.
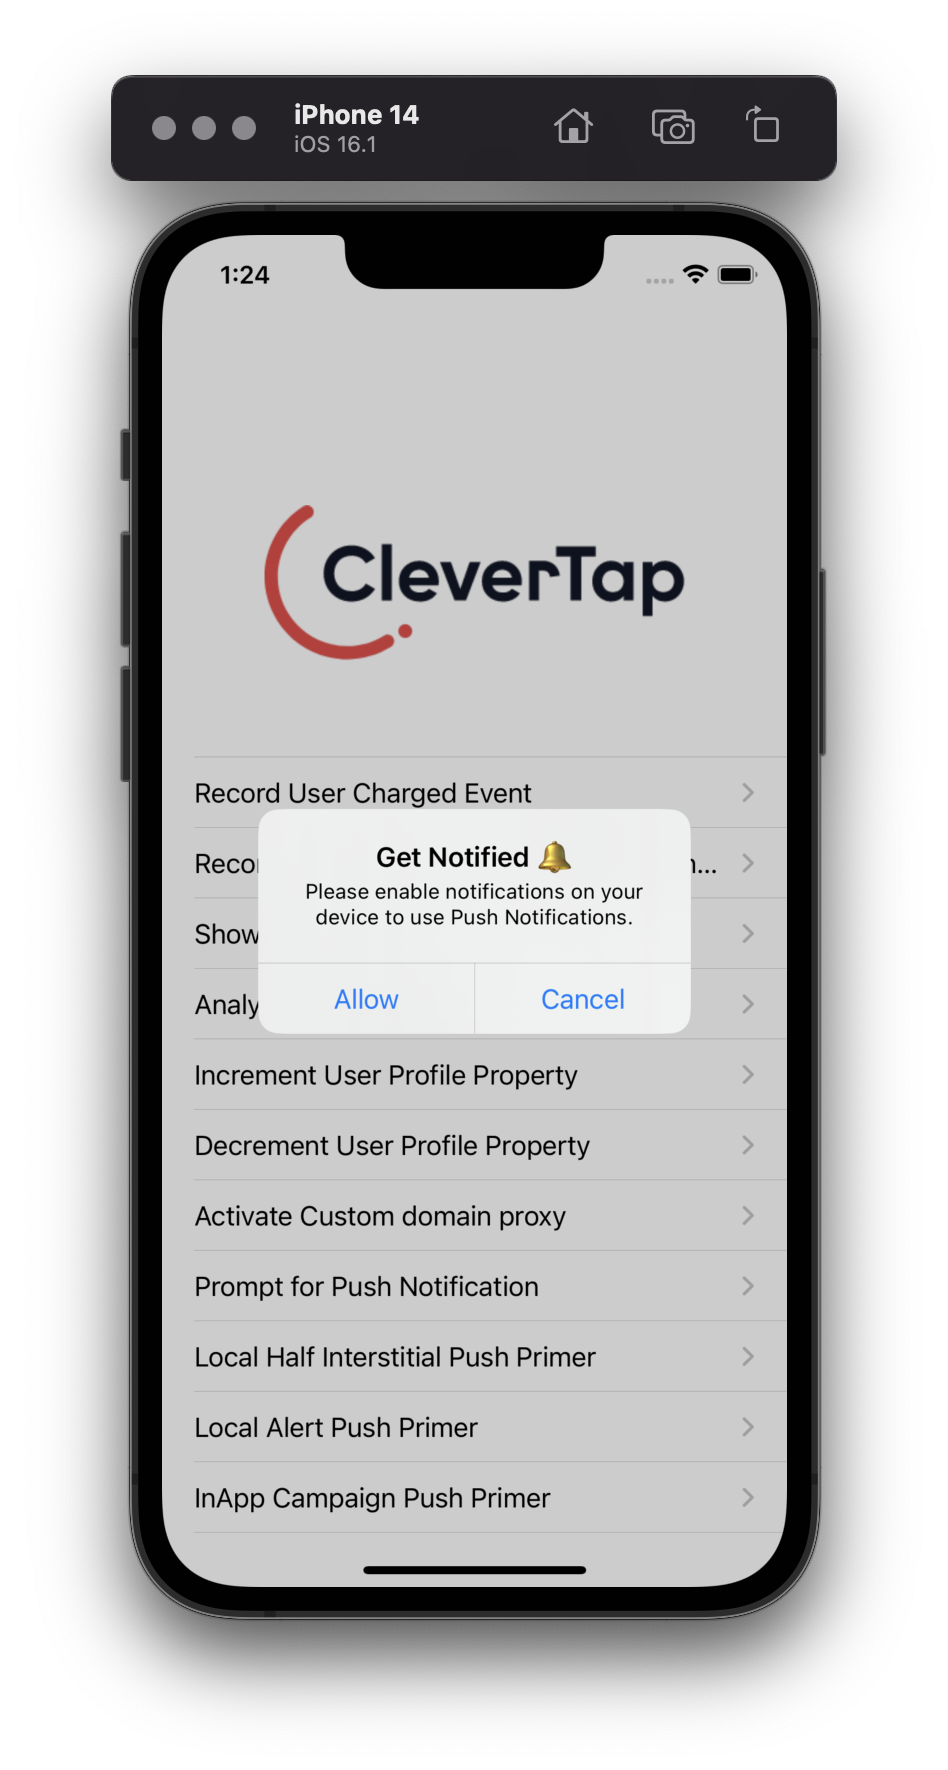
Push Primer Using Alert InApp
Use the following to create a Push Primer using Alert InApp:
import CleverTapSDK

// Required field.
let localInAppBuilder = CTLocalInApp(inAppType: .ALERT,
                                     titleText: "Get Notified",
                                     messageText: "Enable Notification permission",
                                     followDeviceOrientation: true,
                                     positiveBtnText: "Allow",
                                     negativeBtnText: "Cancel")

// Optional fields.
localInAppBuilder.setFallbackToSettings(true)

// Prompt Push Primer with above settings.
CleverTap.sharedInstance()?.promptPushPrimer(localInAppBuilder.getSettings())
#import <CleverTapSDK/CTLocalInApp.h>
// Required field.
CTLocalInApp *localInAppBuilder = [[CTLocalInApp alloc] initWithInAppType:ALERT
titleText:@"Get Notified"
messageText:@"Enable Notification permission"
followDeviceOrientation:YES
positiveBtnText:@"Allow"
negativeBtnText:@"Cancel"];
// Optional fields.
[localInAppBuilder setFallbackToSettings:YES];
// Prompt Push Primer with above settings.
[[CleverTap sharedInstance] promptPushPrimer:localInAppBuilder.getLocalInAppSettings];Methods Descriptions
The following table describes all the methods used to create In-App templates:
| Builder Methods | Parameters | Description | Required / Optional |
|---|---|---|---|
inAppType(CTLocalInAppType) | CTLocalInAppType.HALF_INTERSTITIAL OR CTLocalInAppType.ALERT | Displays the In-App type. Accepts only HALF_INTERSTITIAL and ALERT type as parameters. | Required |
titleText(NSString *) | Text | Sets the title of the local in-app. | Required |
messageText(NSString *) | Text | Sets the subtitle of the local in-app. | Required |
followDeviceOrientation(BOOL) | YES/NO | If true then the local InApp is shown for both portrait and landscape. If it sets false then local InApp only displays in portrait mode. | Required |
positiveBtnText(NSString *) | Text | Sets the text of the positive button for allowing permission. | Required |
negativeBtnText(NSString *) | Text | Sets the text of the negative button. | Required |
setFallbackToSettings(BOOL) | YES/NO | If true and the permission is denied then fallback to app’s notification settings. If the received value is false, then display a verbose log saying permission is denied. | Optional |
setBackgroundColor(NSString *) | Accepts Hex color as String | Sets the background color of the local in-app. | Optional |
setBtnBorderColor(NSString *) | Accepts Hex color as String | Sets the border color of both positive and negative buttons. | Optional |
setTitleTextColor(NSString *) | Accepts Hex color as String | Sets the title color of the local in-app. | Optional |
setMessageTextColor(NSString *) | Accepts Hex color as String | Sets the sub-title color of the local in-app. | Optional |
setBtnTextColor(NSString *) | Accepts Hex color as String | Sets the color of text for both positive and negative buttons. | Optional |
setBtnBackgroundColor(NSString *) | Accepts Hex color as String | Sets the background color for both positive and negative buttons. | Optional |
setBtnBorderRadius(NSString *) | Text | Sets the radius for both positive and negative buttons. Default radius is “2” if not set previously. | Optional |
(NSDictionary *)getLocalInAppSettings | Returns Dictionary containing all parameters | The dictionary is passed as an argument in promptPushPrimer to display push primer. | Required |
Available Callbacks for iOS Push Primer
Based on whether the notification permission is granted or denied, a callback is provided with the permission status. To use this, check that your class conforms to the CleverTapPushPermissionDelegate and implement the following method:
// Set the delegate
CleverTap.sharedInstance()?.setPushPermissionDelegate(self)

// CleverTapPushPermissionDelegate method
func  onPushPermissionResponse(_ accepted: Bool) {
	print("Push Permission response called ---> accepted = \(accepted)")
}
// Set the delegate
[[CleverTap sharedInstance] setPushPermissionDelegate:self];
// CleverTapPushPermissionDelegate method
- (void)onPushPermissionResponse:(BOOL)accepted {
NSLog(@"Push Permission response called ---> accepted = %d", accepted);
}Check the iOS Push Notification Permission Status
Returns the status of the push permission in the completion handler. Can be used to check the status of the push notification permission for your application.
CleverTap.sharedInstance()?.getNotificationPermissionStatus(completionHandler: { status in
	if status == .notDetermined || status == .denied {
		// call push primer here.
	} else {
		print("Push Permission is already enabled.")
	}
})
[[CleverTap sharedInstance] getNotificationPermissionStatusWithCompletionHandler:^(UNAuthorizationStatus status) {
if (status == UNAuthorizationStatusNotDetermined || status == UNAuthorizationStatusDenied) {
// call push primer here.
} else {
NSLog(@"Push Permission is already enabled.");
}
}];Call the iOS Push Permission Dialog without using Push Primer
You can choose to call the iOS push permission dialog directly without a Push Primer using the following method. It takes a boolean value as a parameter.
CleverTap.sharedInstance()?.prompt(forPushPermission: true)[[CleverTap sharedInstance] promptForPushPermission:YES];The following is an example alert that is shown to users before redirecting to the application's settings. If the boolean value that is passed is YES, then this alert will nudge the application users who have denied push notifications previously to enable it again.
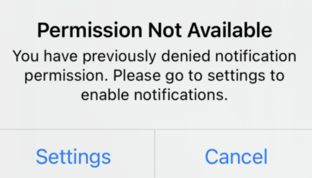
Default Push Permission Pop Up without Push Primer
FAQs
This section provides information about push notification errors observed on iOS
1. APNS Device Token Does Not Match The Specified Topic
Apple Push Notification service (APNs) returns this error when the device token doesn't match the specified topic.
In the context of CleverTap, you get this error when you try to send the notification with the wrong certificate. Check that you use a production certificate for the production environment. This error is caused because of incorrect configurations.
Check the provisioning profile used to deploy the app and send the device token to the CleverTap dashboard. To avoid this error, the "App bundle ID" of the provisioning profile and the CleverTap push certificate (p12 certificate) must match.
2. APNS Unregistered
The Push notification delivery to the target fails because the device token is inactive for the specified topic. If the device token is not valid/inactive you may have to wait till the user installs the app again. You can then start sending notifications.
3. APNS Topic Disallowed
The topic is currently the bundle identifier of the target application on an iOS device. The "APNS Topic Disallowed" error appears when you specify the incorrect "App Bundle ID" in the Account Settings. For more information, see Apple documentation.
To resolve this error, check the value of the "App Bundle ID" and "APNs push mode" that you have configured in the CleverTap Dashboard under Push Settings.
4. APNS Temporarily Blacklisted
You are temporarily blacklisted from sending push notifications to the device, which can be due to sending bad tokens. The push notification will not be delivered for some duration.
5. APNS Failed Delivery
The notification to the device sent from CleverTap failed to deliver due to either of the following reasons
- The app was uninstalled and the token is no longer valid.
- You have sent too many notifications in short duration to the same device.
If the user has uninstalled the app then you may have to wait until the user installs the app again before the user can receive your notifications.
For more info about APNs, see Handling Notification Responses from APNs.
6. APNs Bad Device Token
The push notification delivery to the target device has failed due to an invalid token. The APNs bad device token error occurs when there is a mismatch between the APNs push mode on your app and the CleverTap dashboard.
For example, you have set the APNs push mode in your app to the "development" stage and in the "CleverTap" dashboard you have set up to "production" stage. To check your CleverTap dashboard APNs push mode: Navigate to Settings > Engage > Mobile Push > iOS.
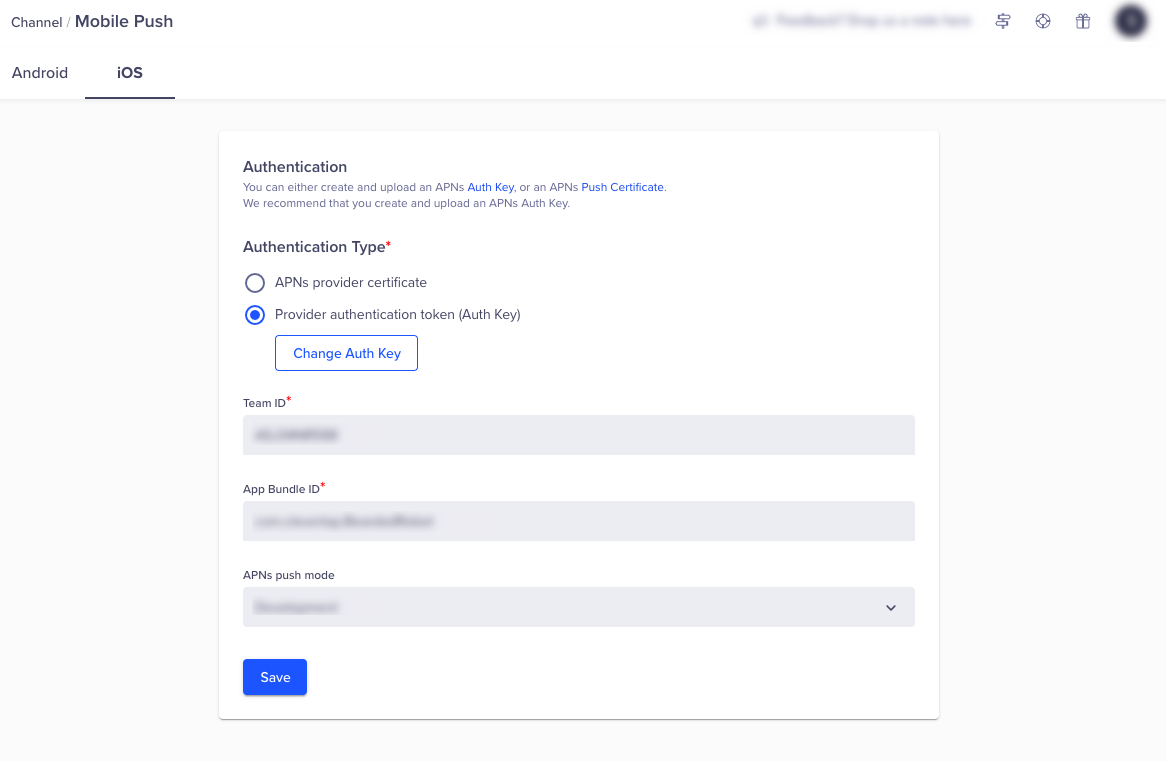
View APNs Push Mode on CleverTap Dashboard
Updated about 1 month ago
