Web Pop-ups & Exit Intent
Learn about the basic configurations for Web Pop-ups
Web Pop-ups
A CleverTap web pop-up is a modal, alert-type message view displayed by CleverTap on your desktop or mobile website.
CleverTap Web Pop-ups
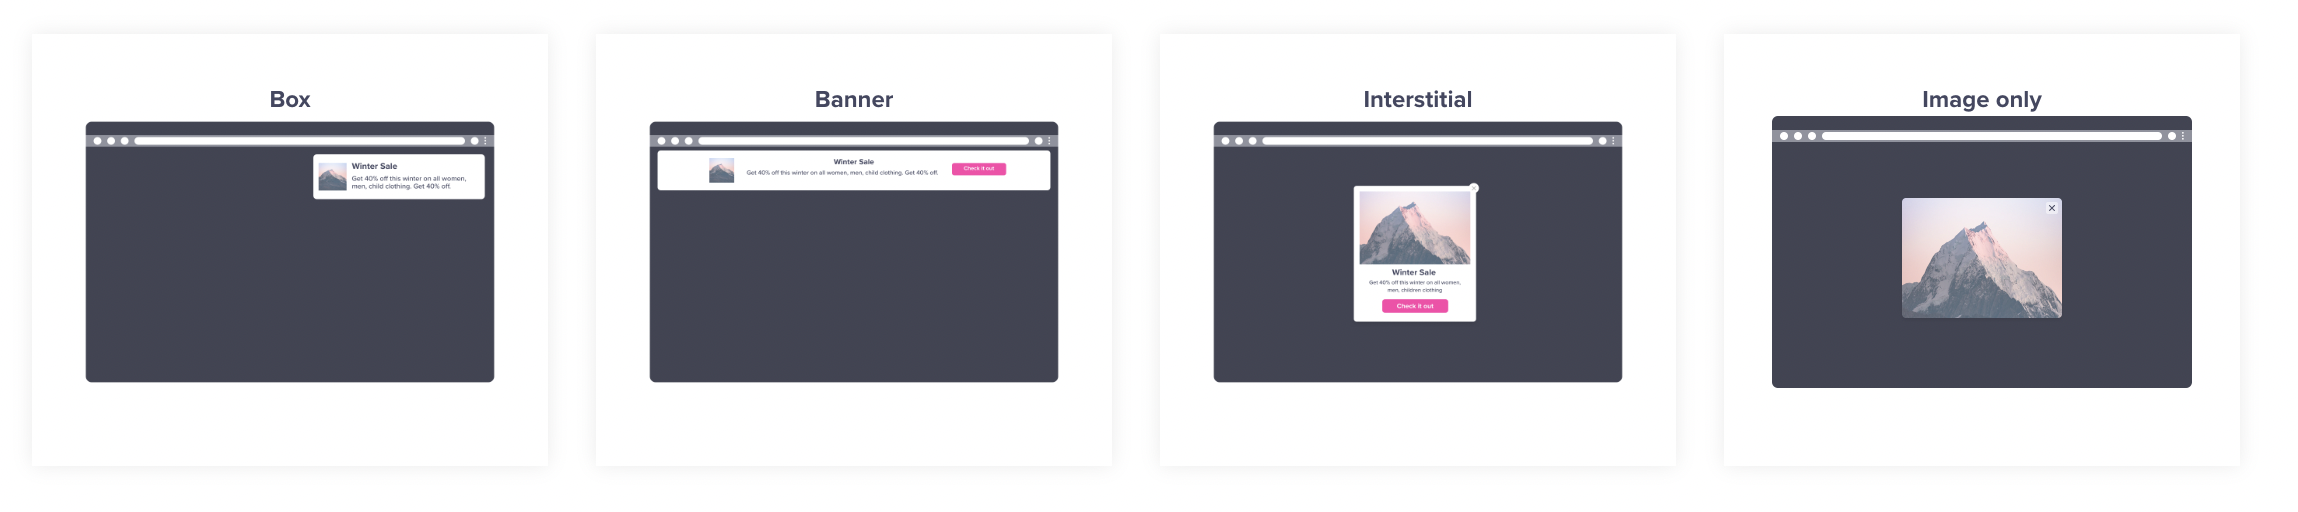
CleverTap web pop-ups come in two types:
- Simple web pop-up notifications: You can use these templates to create your notifications, including a box, banner, interstitial, and image only.
- Exit intent notifications: These notifications are displayed before the user exits your site. These are only available for desktops.
User clicks on a web notification can be silent, open a URL, or invoke a JavaScript function. Custom key-value pairs can also be passed to the invoked JavaScript function. You may also include a pre-set or custom image to be displayed in the notification.
Adding Close Buttons to Web Pop-ups
You can add a close button to your web pop-up by using the following:
Box
<div class="btn">CLOSE</div>
<script>
var btn = document.querySelector('.btn');
var wrapper = window.parent.document.getElementById('wizParDiv0');
btn.addEventListener('click', closePopUp);
function closePopUp() {
  setTimeout(() => {
    wrapper.remove();
  }, 0);
}
</script>
Banner
<div class="btn">CLOSE</div>
<script>
var btn = document.querySelector('.btn');
var wrapper = window.parent.document.getElementById('wizParDiv2');
btn.addEventListener('click', closePopUp);
function closePopUp() {
  setTimeout(() => {
    wrapper.remove();
  }, 0);
}
</script>
Interstitial
<div class="btn">CLOSE</div>
<script>
var btn = document.querySelector('.btn');
var overlay = window.parent.document.getElementById('intentOpacityDiv');
var wrapper = window.parent.document.getElementById('intentPreview');
btn.addEventListener('click', closePopUp);
function closePopUp() {
  setTimeout(() => {
    overlay.remove();
    wrapper.remove();
  }, 0);
}
</script>
Define a Custom Callback
Using the custom callback, you can control the look, feel, and location of the web pop-up which you create in your CleverTap dashboard.
You need to explicitly call clevertap.renderNotificationViewed(); and clevertap.renderNotificationClicked(); to ensure that notification views and clicks are tracked in your CleverTap dashboard.
To define the callback and raise the clicked and viewed events, you need to add the following snippet to the embed code:
let customNotificationPayload = {
    msgId: string; // required
    pivotId?: string; // optional - String value containing an A/B testing campaign's variant name.
 }

clevertap.notificationCallback = function(msg){
      //raise the notification viewed and clicked events in the callback
      clevertap.renderNotificationViewed(customNotificationPayload);
      console.log(JSON.stringify(msg));            //your custom rendering implementation here
      var $button = jQuery("<button></button>");   //element on whose click you want to raise the notification clicked event
      $button.click(function(){
         clevertap.renderNotificationClicked(customNotificationPayload);
     });
};
The message will be in the following format:
msgIdconsists of campaign ID and date stamp separated by an underscore.kvcontains the custom key-value pairs.
{
  "msgContent": {
     "html": "<Your HTML goes here/>",
     "type": 1,
     "templateType": "banner",  //templateType can also be box/interstitial
     "title": "Title goes here",
     "description": "Description goes here",
     "kv": {
         "key1": "value1",
         "key2": "value2"
      }
   },
   "msgId": "campaignId_date" //1630318544_20211004
}
{
"msgContent": {
"html": "<Your HTML goes here/>",
"type": 1,
"templateType": "banner" //templateType can also be box/interstitial
},
"msgId": "campaignId_date" //1630318544_20211004
}Raising a Notification Clicked Event for Custom HTML Pop-ups
You can raise Notification Clicked events for custom HTML-based Pop-ups for versions 1.1.0 and above.
To raise this event, follow the steps below:
- Add a
<script>tag to your web pop-up code, assign thepopupCallbackvariable to a function, and save the notification object passed to it by the SDK.
<script>
var notificationObj;
window.parent.clevertap.popupCallback = (notificationData) => {
    notificationObj = notificationData;
};
</script>- For
onclickevent handler functions, call theraisePopupNotificationClickedfunction with the notification object stored in Step 1.
function submit_pressed() {
    window.parent.clevertap.raisePopupNotificationClicked(notificationObj)
}
Custom HTML Click Tracking
The user must select the Enable click tracking for Custom HTML flag when creating a campaign from the CleverTap dashboard.
To track only selective buttons or anchor tags, set the Enable click tracking for Custom HTML flag
to false and manually add the wzrk_c2a attribute on the required buttons/anchor tags to track clicks. For example, <button wzrk_c2a>Click Me</button> will start tracking the Click Me button.
Enable Click Tracking for Custom HTML
Dismiss Spam Control
The dismissSpamControl is a spam control flag that restricts repeat notifications to users after the user closes a Web Pop-up or Web Exit Intent notification.
Behavior
-
When
dismissSpamControl= false:- This ensures that a campaign, once shown to a user, will not be shown again, until a new session begins and the user qualifies for it again.
- This setting is ideal for most customers who expect one-time delivery of a campaign during a session, which does not have the same limits mentioned.
- This is evaluated at the campaign level, not globally.
-
When
dismissSpamControl= true:- This overrides the above restriction and allows the same campaign to be shown repeatedly to a user, as long as the user satisfies the campaign conditions, even within the same session.
- The campaign is triggered again even if the notification for the same campaign was previously closed by the user.
- This is useful for specific or advanced use cases where campaign repetition is intentional.
Dismiss Spam ControlStarting from Web SDK version 2.0.0,
dismissSpamControlis set to true by default.If you want to control how often a user sees a notification (for example, show only once or show multiple times), you should configure Delivery Preference for that campaign. This gives you more precise control over user experience, independent of the
dismissSpamControlbehavior.
When to Use dismissSpamControl = false
dismissSpamControl = falseSet this flag to false only if:
- You do not configure Delivery Preferences for a campaign.
- You want the campaign to show only once per session, and not reappear if dismissed, even if the user still qualifies.
In such cases, setting dismissSpamControl = false prevents users from being interrupted by the same message repeatedly.
Updated 7 months ago