Signed Call™ iOS SDK
Learn how to integrate Signed Call™ iOS SDK in your app to avail the Signed Call feature.
Overview
CleverTap provides in-app calls via its Signed Call™ iOS SDK, which means you can make and receive calls in any iOS application if the device has an internet connection and Signed Call iOS SDK. This section shows you how to set up and integrate the Signed Call iOS SDK and manage calls. To know more about the Signed Call feature, refer to Signed Call.
iOS Prerequisites
The Signed Call framework is built using Swift-5 in Xcode v16. To support CallKit, the target iOS version for deployment must be greater than or equal to iOS 12. You can test Signed Call on both devices and simulators.
Simulator Support
The Signed Call iOS SDK does not support testing on simulators because
CallKitis not supported in the simulator.
Setup
This section explains how to set up the Signed Call iOS SDK. Following is the setup required before you start integrating the Signed Call iOS SDK:
- Enable VoIP Push
- Install Signed Call iOS SDK Using Pods
- Set Up Xcode Project
- Set an Outgoing Tone
- Configure Quick Launch Button on
CallKitScreen
Enable VoIP Push
The following is a list of required details to enable your infrastructure with VoIP push:
- Team ID
- Bundle ID
- Authkey .p8 file
- .p12 VoIP certificate
- .pem VoIP certificate
- Key ID
To know more, refer to VoIP APNs Setup.
Install Signed Call iOS SDK using Pods
To install the Signed Call iOS SDK:
- Add the pod spec repo as a source and the
CleverTap-SignedCall-SDKpod to your Podfile as shown below:
source 'https://github.com/CleverTap/podspecs.git'
source 'https://github.com/CocoaPods/Specs.git'

target 'SignedCallDemo' do
  use_frameworks!
  pod 'CleverTap-SignedCall-SDK'

end

post_install do |installer|
    installer.pods_project.targets.each do |target|
        target.build_configurations.each do |config|
            config.build_settings['BUILD_LIBRARY_FOR_DISTRIBUTION'] = 'YES'
        end
   end
end
- Update your Podfile, and run
pod install --repo-updatein your terminal.
For more details, refer to Pod setup.
Set Up Xcode Project
To set up your Xcode project, add the following capabilities to your project:
Add Permissions
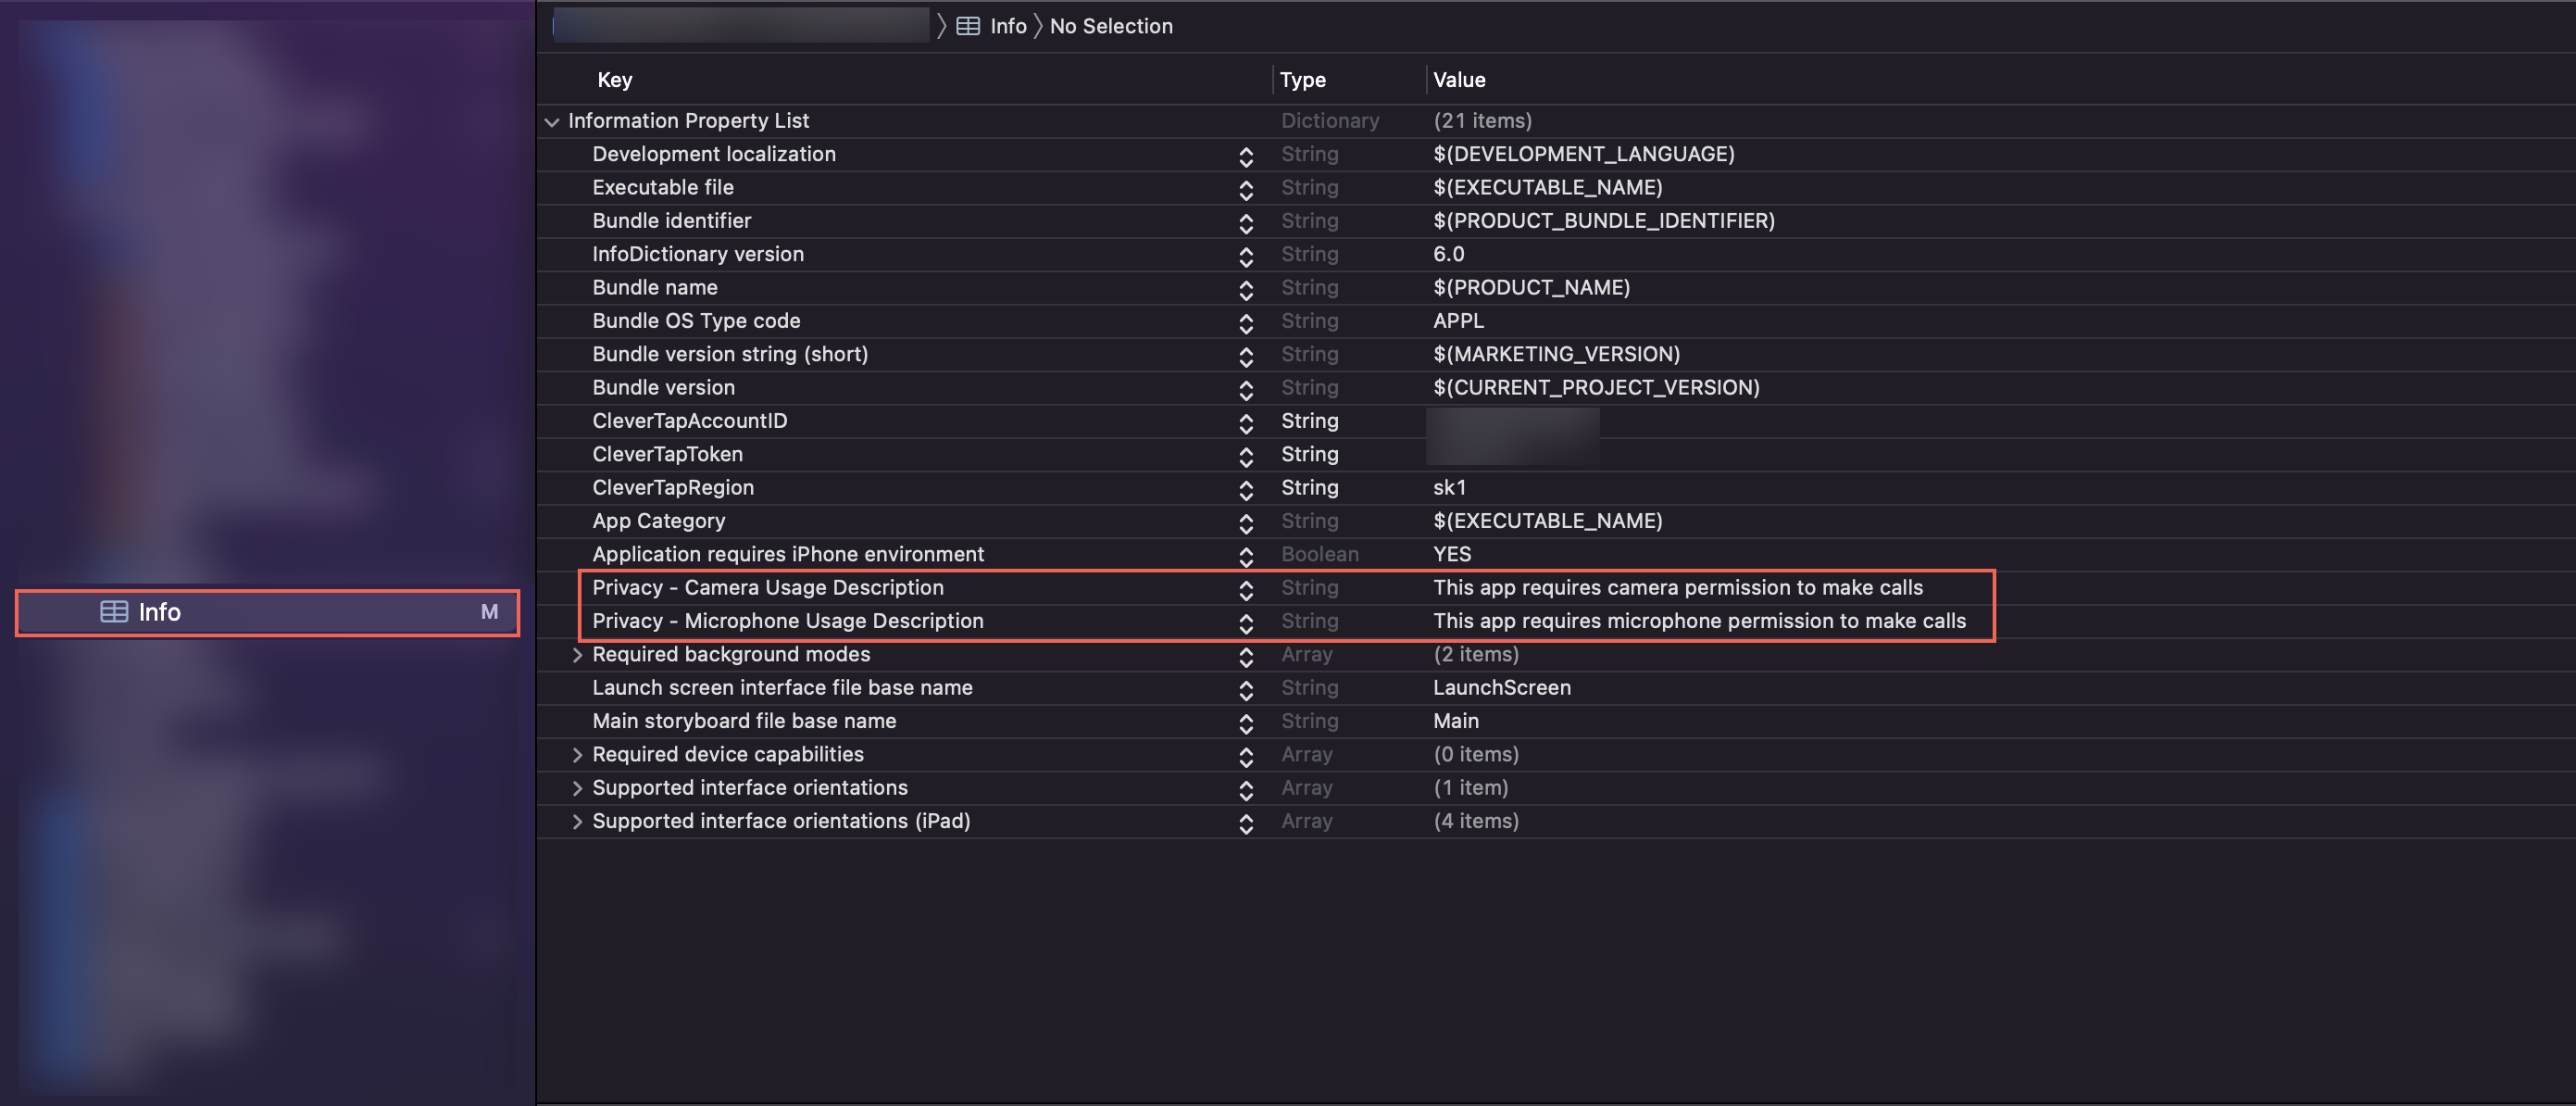
To add permissions in your application's Info.plist file:
- Navigate to the
Info.plistfile from your project navigator.

Information Property List in Info.plist File
- Create the
Privacy - Camera Usage Descriptionkey of string type. - Create the
Privacy - Microphone Usage Descriptionkey of string type.
To know more, refer to Requesting Access to Protected Resources.
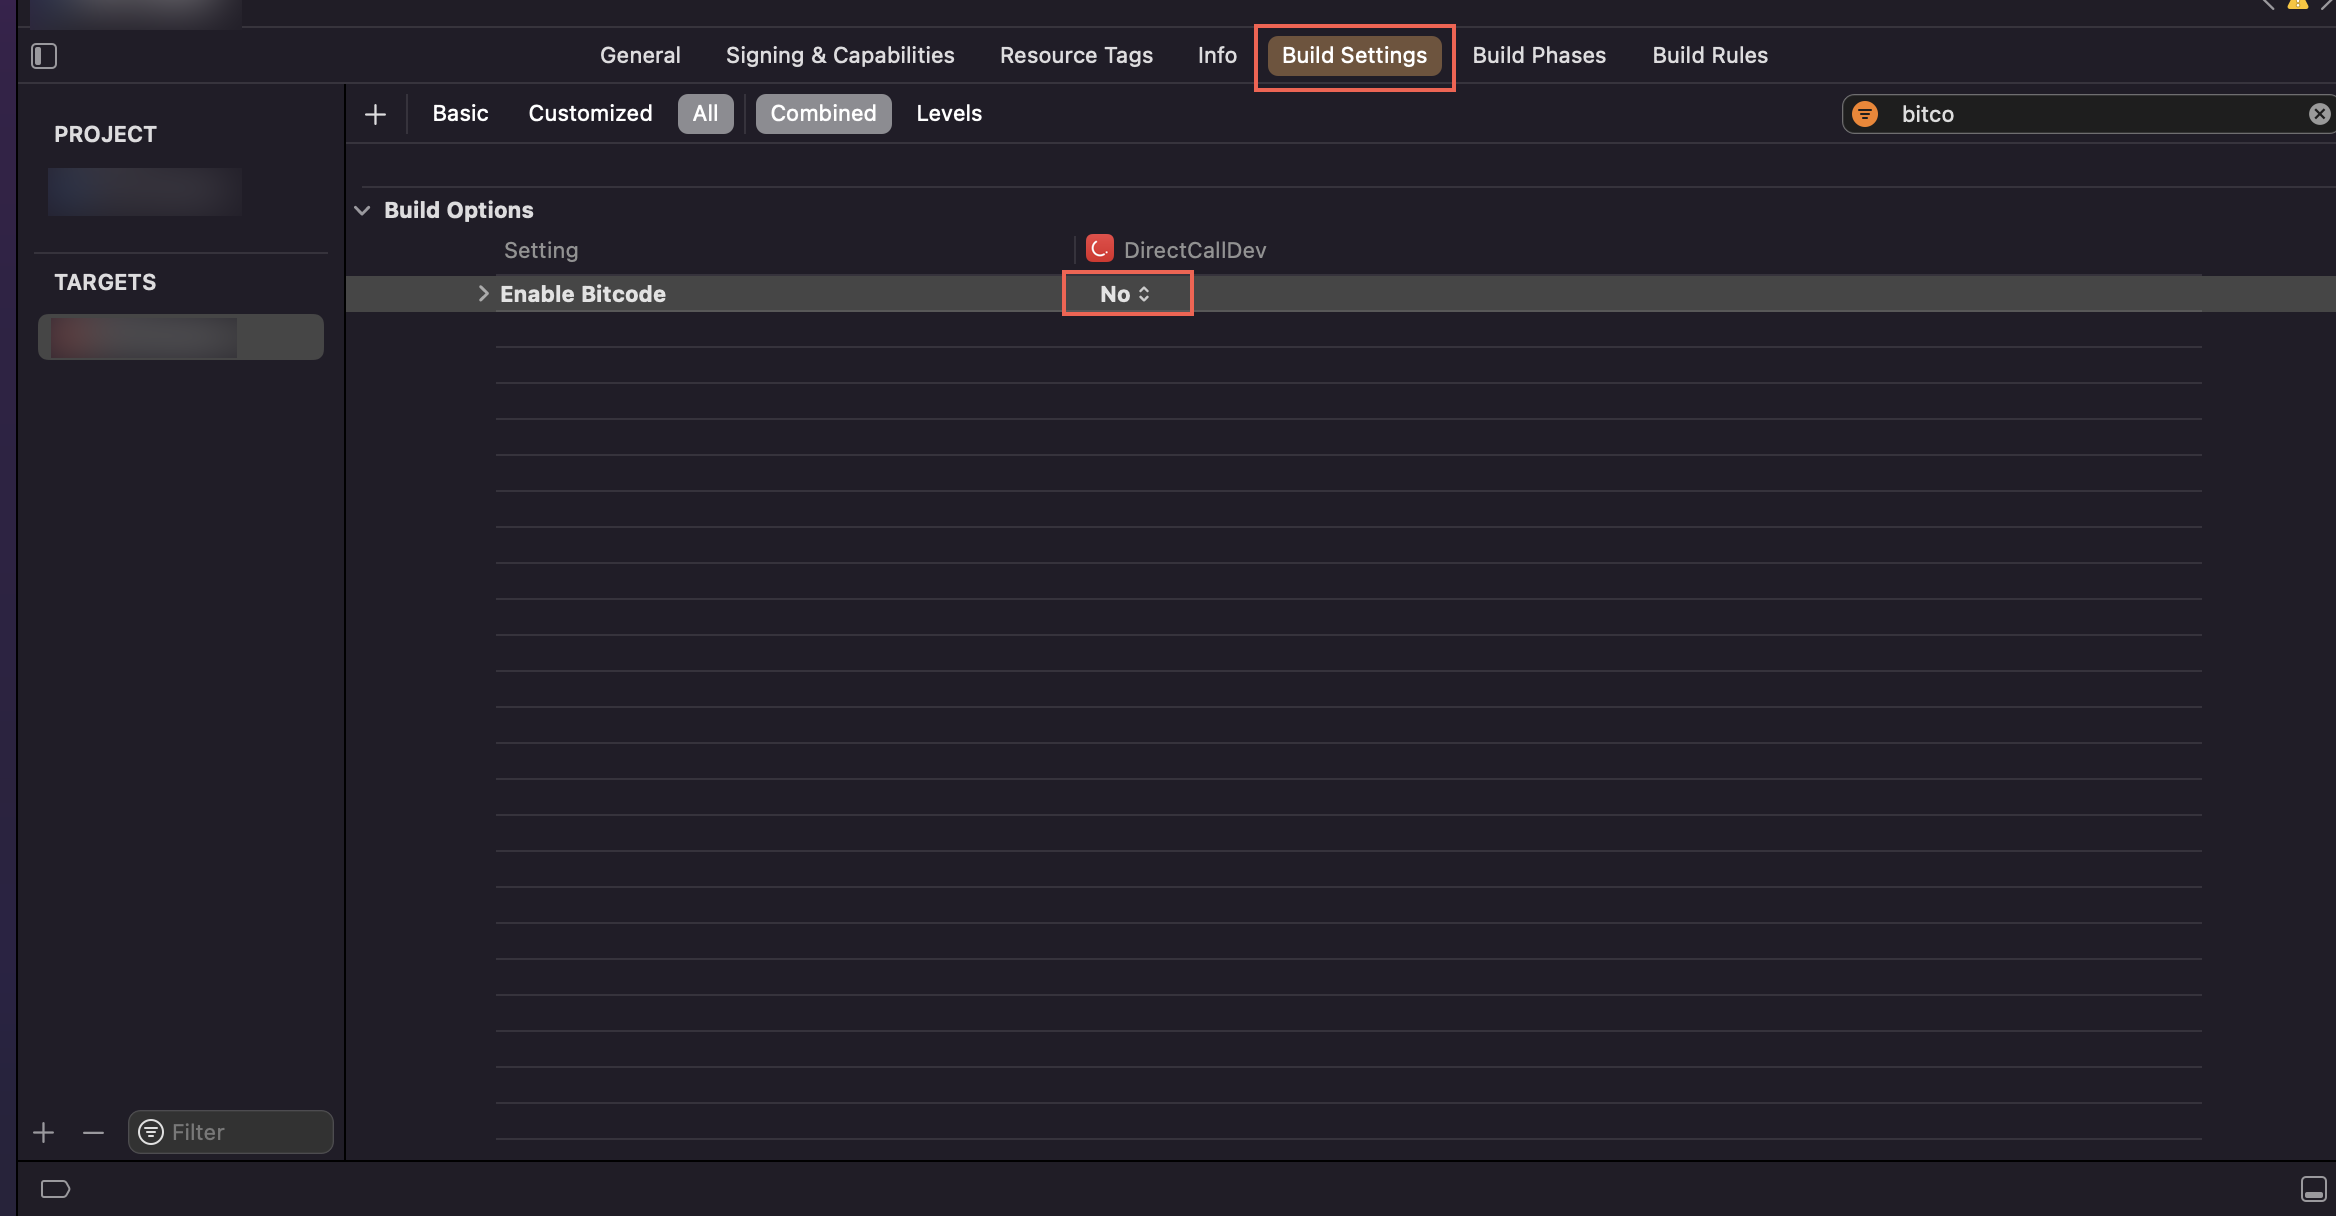
Disable Bitcode
To disable bitcode from your build settings:
- Click the Build Setting tab.
- Search Enable Bitcode.
- Select No to disable it.

Build Options in Build Settings
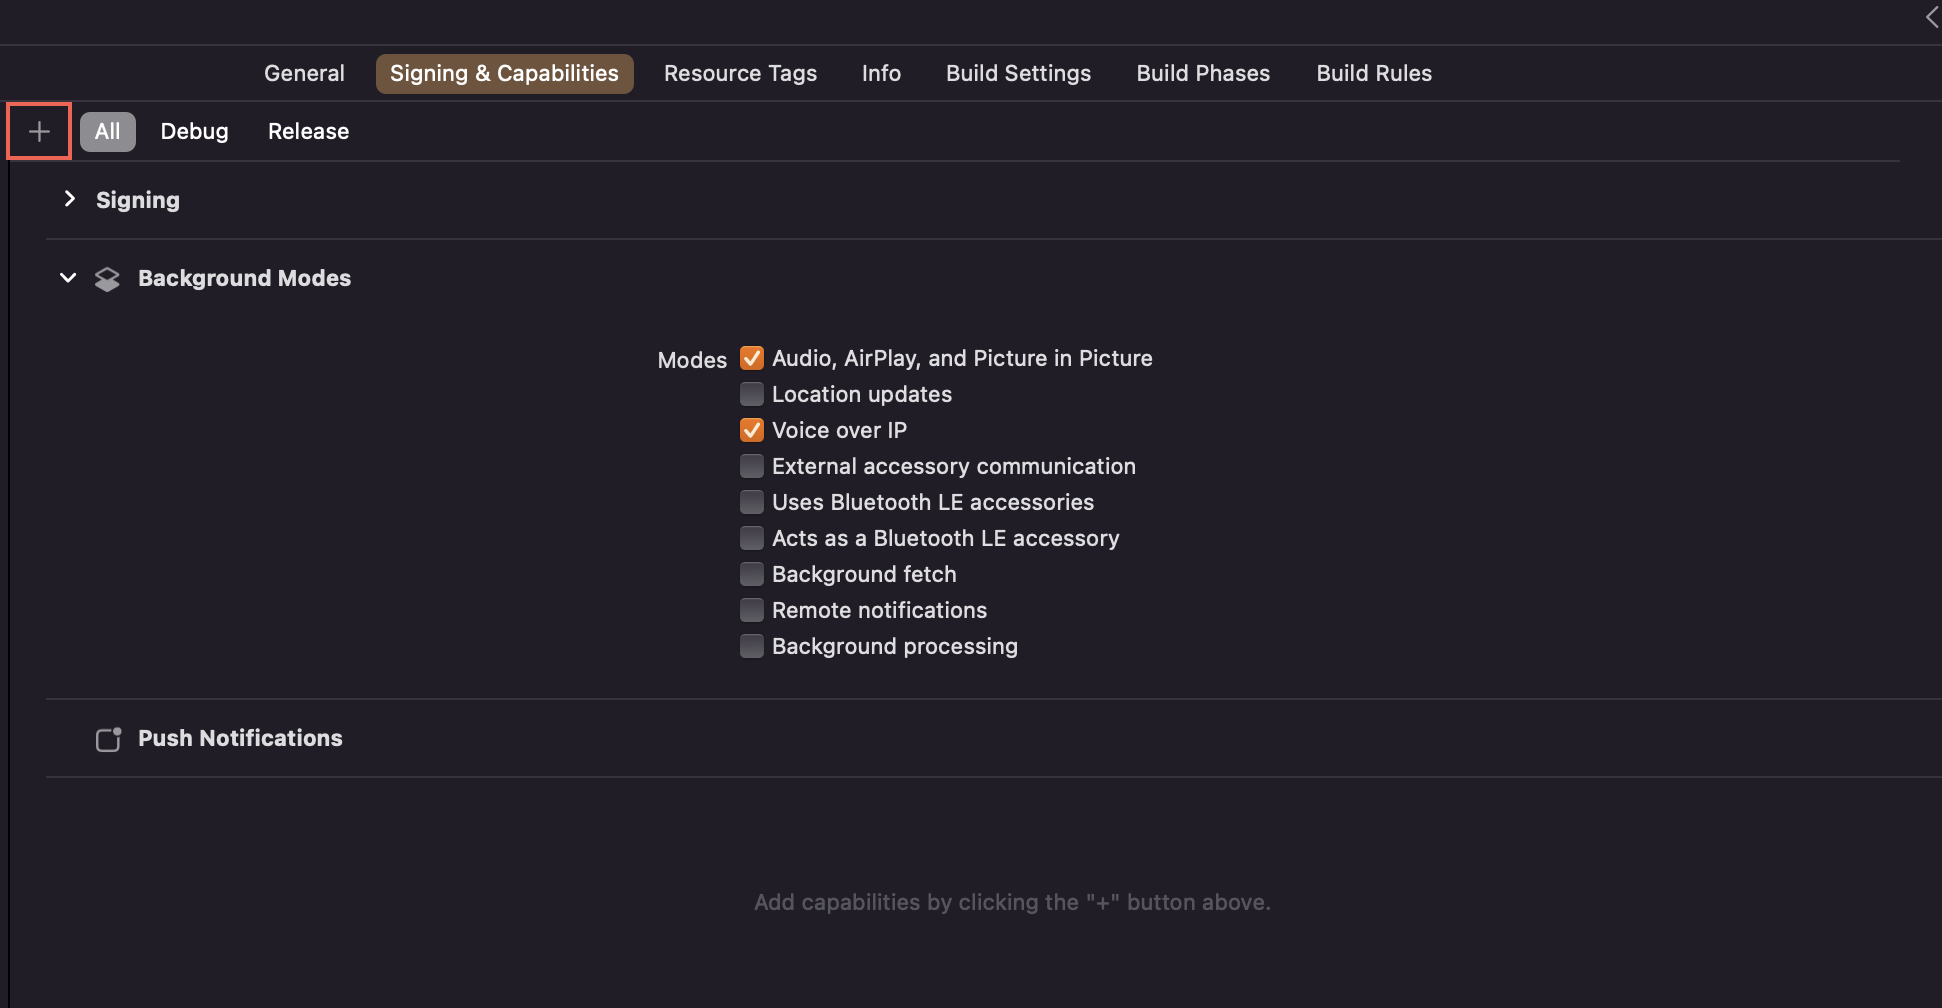
Set Up Signing & Capabilities
Add the following capabilities from the Signing & Capabilities tab:
- Add Push Notifications capability.
- Select the following modes under the Background Modes capability:
- Audio, Airplay, and Picture in Picture
- Voice over IP

Set Up Signing & Capabilities
Set Up an Outgoing Tone
Add the .mp3 file named outgoing_tone to your project to set up an outgoing tone. This file plays the added outgoing tone when the user makes a call.
Configure Quick Launch Button on the CallKit Screen
CallKit ScreenThe CallKit function adds a quick launch button on the call screen for your application, which helps to switch between the application and the native CallKit screen. The icon file (white mask) SCCallkitLogo.png is read from your application resources.
Icon Image File Specifications
The icon must be a square image with a side length of 40 points. The alpha channel of the image creates a white mask image used in the native
CallKitscreen, which helps to switch between the nativeCallKitscreen and the application calling screen.
Integrate CleverTap iOS SDK
The Signed Call iOS SDK uses CleverTap SDK for analytics. Signed Call iOS SDK requires an active CleverTap instance as a parameter during the SDK initialization. If the CleverTap instance is unavailable, the Signed Call iOS SDK does not initialize and returns an error ERR_CLEVERTAP_URL_NOT_AVAILABLE.
To integrate the CleverTap iOS SDK, refer to the CleverTap iOS Integration Guide.
Minimum Supported Version
The Signed Call iOS SDK requires a CleverTap SDK version of v4.1.0 or higher.
Integrate the Signed Call iOS SDK
After the CleverTap iOS SDK is integrated, register and initialize your application with the SignedCallSDK framework as follows:
- Open your
AppDelegatefile and import both, CleverTap and Signed Call SDKs as shown below:
import CleverTapSDK
import SignedCallSDK
#import <CleverTapSDK/CleverTap.h>
#import <SignedCallSDK/SignedCallSDK-Swift.h>
- Enable
SignedCallSDKlogging as follows:
SignedCall.isLoggingEnabled = true
[SignedCall setIsLoggingEnabled: YES];
- Call the
registerVoIPfunction to generate a VoIP token and setpushRegistryDelegatein yourAppDelegatefile.
func application(_ application: UIApplication, didFinishLaunchingWithOptions launchOptions: [UIApplication.LaunchOptionsKey: Any]?) -> Bool {
        // Override point for customization after application launch.
        CleverTap.setDebugLevel(CleverTapLogLevel.off.rawValue)
        CleverTap.autoIntegrate()
        SignedCall.isLoggingEnabled = true
        SignedCall.cleverTapInstance = CleverTap.sharedInstance()

        guard let rootView = self.window?.rootViewController else {
            return true
        }
        SignedCall.registerVoIP(withRootView: rootView)

        return true
    }
- (BOOL)application:(UIApplication *)application didFinishLaunchingWithOptions:(NSDictionary *)launchOptions {
    [CleverTap setDebugLevel: CleverTapLogOff];
    [CleverTap autoIntegrate];

    [SignedCall setIsLoggingEnabled: YES];
    [SignedCall registerVoIPWithRootView:self.window.rootViewController appName:@"TestApp"];

    return YES;
}
The registerVoIP function expects the following parameters:
| Parameter | Description | Type | Notes |
|---|---|---|---|
rootView | The view controller on which the call screen displays. | UIViewController | Required |
appName | The application name you want to display on the CallKit incoming screen. | String | Optional |
- Initialize the Signed Call iOS SDK as follows:
SignedCall.initSDK(withInitOptions: initOptions) { result in
    switch result {
    case .success(let success):
        print("SDK Initialized! \(success)")
        //Handle success scenario

    case .failure(let error):
        print("SDK initialization failed \(error)")
        //Handle failure scenario
    }
}
[SignedCall initSDKWithInitOptions:initOptions completion:^(BOOL success, SCErrorObj * _Nullable error) {
      NSLog(@"%i", success);
      NSLog(@"%@", error);
}];
The syntax for the parameters of initOptions is as follows:
let initOptions: [String: Any] = [
    "accountID": "Signed Call Account Id",
    "apiKey": "Signed Call Api Key",
    "cuid" : "unique-cuid",
    "production": true/false
]
NSDictionary *initOptions = @{
    @"accountID": @"Signed Call Account Id",
    @"apiKey": @"Signed Call Api Key",
    @"production": @0/ @1,
    @"cuid": @"unique-cuid"

};
The initOptions in the function call expects a dictionary with the following parameters:
Parameter | Description | Type | Notes |
|---|---|---|---|
accountID |
| String | Required |
apiKey |
| String | Required |
cuid | Unique identity of the user. | String | Required |
production | Used to set up production/ development environment for VoIP push support. Note: It must be true if you build an application for production and false if you build an application for development. | Boolean | Required |
CUID Validation Rules
The following are the validation rules for
cuid:
- Must range between 5 and 50 characters.
- Must start with either alphabet or number.
- The name is case-sensitive, and only '_' is allowed as a special character.
- The
cuidparameter cannot be of type number-number, that is, a number followed by a special character, which is again followed by another number. For example, org_25 is allowed, but 91_8899555 is not permitted.- Must be unique for every user.
- Must be unique for every device to allow multiple logins for the user from different devices. In such cases, the user will have multiple
cuids. If the same CUID is associated with multiple devices, the device with the most recent SignedCall initialization is prioritized for receiving the call.
Make a Signed Call
Use the following code to make a Signed Call:
let customMetaData = SCCustomMetadata(remoteContext: String, initiatorImage: String, receiverImage: String)

let callOptions = SCCallOptionsModel(context: String, receiverCuid: String, customMetaData: SCCustomMetadata)


SignedCall.call(callOptions: callOptions) { result in
            switch result {
            case .success(let success):
                //Handle call initiated

            case .failure(let error):
                //Handle call failure
            }
        }
SCCustomMetadata *customMetaData = [[SCCustomMetadata alloc] initWithRemoteContext:@"string context" initiatorImage:@"image string url" receiverImage:@"image string url"];

SCCallOptionsModel *model = [[SCCallOptionsModel alloc] initWithContext:@"context string" receiverCuid:@"cuid string" customMetaData: customMetaData];

[SignedCall callWithCallOptions:model completion:^(BOOL success, SCErrorObj * _Nullable error) {
    NSLog(@"%i", success);
    NSLog(@"%@", error);
}];
The parameters to make a Signed Call are as follows:
| Parameter | Description | Type | Required/Optional |
|---|---|---|---|
cuid | It is the receiver's cuid. | String | Required |
context | It specifies the context of the call. For example, the Delivery Partner is calling, the Driver is calling, the Agent is calling, and so on. Note: It must include alphanumeric characters, and the length must not exceed 64 characters. | String | Required |
customMetaData | It is a SCCustomMetadata object with the following properties:
| object of SCCustomMetadataclass | Optional |
Handle Call Events
Add the following code inside the viewDidLoad() of your View Controller to monitor call events:
NotificationCenter.default.addObserver(self, selector: #selector(self.callStatus(notification:)), name: NSNotification.Name(rawValue: "MessageReceived"), object: nil)
[NSNotificationCenter.defaultCenter addObserver:self selector:@selector(receiveCallNotifications:) name:@"MessageReceived" object:nil];
Following is an example of creating a function to handle call events:
@objc func callStatus(notification: Notification) {
    let message = notification.userInfo?["callStatus"] as? SCCallStatus

    if message == SCCallStatus.CALL_DECLINED {
        //when the call is declined from the receiver's end

    } else if message == SCCallStatus.CALL_MISSED {
        //when the call is missed at the receiver's end

    } else if message == SCCallStatus.CALL_OVER {
        //when the call has been disconnected

    }
    else if message == SCCallStatus.CALL_ANSWERED {
        // when call is answered

    } else if message == SCCallStatus.RECEIVER_BUSY_ON_ANOTHER_CALL {
        //when the receiver is busy on another call

    } else if message ==
                SCCallStatus.ERR_MICROPHONE_PERMISSION_NOT_GRANTED {
        //this message is thrown if microphone permission is denied while receiving a call.
    }
}
- (void) receiveCallNotifications:(NSNotification *) notification {
  NSLog(@"%@", notification.userInfo[@"callStatus"]);
}
Close Socket Connection
The Signed Call iOS SDK uses the socket connection to signal VoIP calls from the initiator to the receiver. After successful SDK initialization, the socket connection to initiate or receive VoIP calls opens.
If the socket is left open for a longer period, the application might drain the device's battery. Therefore, we recommend disconnecting the socket after all expected/pending transactions are over.
To close the socket connection, use the following method as per your business use case:
SignedCall.disconnectSignallingSocket()
[SignedCall disconnectSignallingSocket];
The following is the Signed Call iOS SDK behavior after the SDK calls the disconnectSignallingSocket() method:
| Functionality | Signed Call iOS SDK Behavior |
|---|---|
| Initiate a call | Users cannot initiate calls. Signed Call iOS SDK returns ERR_SIGNALLING_SOCKET_CONNECTION failure if they attempt a VoIP call request. It is essential to reinitialize the Signed Call SDK if a use case arises where a call needs to be initiated.For example, if a user places an order in the application and the business wants to give the option to initiate a VoIP call, the Signed Call iOS SDK needs to be reinitialized. |
| Receive a call | Users can still receive calls as Signed Call uses APNs as a fallback channel to receive VoIP calls. |
Busy Handling
The following scenarios describe the Signed Call iOS SDK behavior when the user is busy on a call:
Scenario 1: The user is busy on a call (VoIP or PSTN), and another user initiates a VoIP call with the user who is busy on another call. In this case, the Signed Call iOS SDK displays User is busy on another call on the outgoing call screen and declines the initiated call.
Scenario 2: The user is busy on a Signed Call VoIP call and receives another VoIP or PSTN call. In this case, the Signed Call iOS SDK provides the option of either declining the new call or ending the current call and accepting the new call.
Put a Call on Hold
Currently, Signed Call iOS SDK does not support putting the call on hold functionality.
Call Hangup Functionality
The hangup function ends a call for both parties programmatically. For example, if there is a metered call and the business wants to end the call after a specific duration, then they must maintain a timer in the application and call the hangup function at the appropriate time.
SignedCall.hangup()
[SignedCall hangup];
Override the Dashboard Branding for Call Screen
CleverTap dashboard provides a branding tool to alter the look and feel of the call screens. If you have multiple applications to integrate with the Signed Call iOS SDK, all those applications will share the same branding that you have set from the CleverTap dashboard. By overriding the dashboard's call screen branding, you can have different branding for each application.
To override the dashboard branding, use overrideDefaultBranding during the Signed Call iOS SDK initialization.
SignedCall.overrideDefaultBranding = SCCallScreenBranding(bgColor: "bgColor", fontColor: "fontColor", logo: "logoUrl", buttonTheme: ButtonTheme)
SCCallScreenBranding *branding = [[SCCallScreenBranding alloc] initWithBgColor:@"bgColor" fontColor:@"fontColor" logo:@"logo" buttonTheme: ButtonThemeLight/ ButtonThemeDark];

SignedCall.overrideDefaultBranding = branding;
The parameters to override the dashboard's call screen branding are as follows:
| Parameter | Description | Type | Notes |
|---|---|---|---|
bgColor | Hex color code for the background of the call screens. For example, #000000. | String | Required |
fontColor | Hex color code for the text displayed on the call screens. For example, #ffffff. | String | Required |
logo | The HTTPS URL of the image that renders in the call screens. | Sting | Required |
buttonTheme | The theme for the control buttons of the call screen (Mute, Speaker, and Bluetooth). Note: The .light theme represents the white color of the buttons, whereas the .dark is for black color. | ButtonTheme | Required |
Logout the Signed Call iOS SDK
Add the following code to clear the session after a user logs out from the application. It ends all the connections, and to make a new call, you must repeat the Initialization and Authentication steps.
SignedCall.logout()
[SignedCall logout];
Exceptions
From iOS 13, Apple now mandates that all VoIP push notifications must be reported to the CallKit framework as a new call. If a VoIP push notification is not reported to CallKit within the required time window, iOS terminates the application. If VoIP push notifications are not reported to CallKit repeatedly, Apple ultimately stops delivering VoIP push notifications to the application. The end user needs to reinstall the application to get VoIP push notifications again.
Due to this, the SignedCallSDK demonstrates the following two expected behaviors in iOS:
- If the receiver is busy in an ongoing VoIP call, then making another VoIP call to the same receiver reports an incoming dummy call to
CallKitand ends it instantly but does not affect the previous, ongoing call. - If the user has logged out from the active session maintained by
SignedCallSDKby calling theSignedCall.logout(), then making a call to the samecuidopens up theCallKitscreen and ends it on the next tick as an invalid call.
To know more, refer to Apple pushRegistry
Errors
The following table lists the different errors and their probable causes:
| Error | Description |
|---|---|
| ERR_NETWORK_NOT_AVAILABLE | No internet connection. |
| ERR_SIGNEDCALLSDK_NOT_INITIALIZED | Signed Call iOS SDK is not initialized. |
| ERR_MICROPHONE_PERMISSION_NOT_GRANTED | Microphone permission not granted. |
| ERR_CONTACT_NOT_REACHABLE | The receiver is not reachable. |
| ERR_SERVER_FAILURE | The server is not reachable. |
| ERR_INVALID_CUID | Invalid cuid. |
| ERR_CUID_ALREADY_CONNECTED_ELSEWHERE | The cuid is connected to another device. |
| ERR_VOIP_SERVICE_FAILED_TO_REGISTER | The VoIP service failed to register. |
| ERR_CUID_MISSING | The cuid is missing. |
| ERR_CONTACT_REGISTRATION_FAILED | Contact registration failed. |
| ERR_ACCOUNTID_REQUIRED | The Signed Call Account ID is required. |
| ERR_APIKEY_REQUIRED | The API Key is required. |
| ERR_INVALID_LENGTH_CUID | The cuid length must be in the range of 5-50. |
| ERR_PRODUCTION_FIELD_REQUIRED | The Production key is missing. |
| ERR_CLEVERTAP_INSTANCE_REQUIRED | CleverTap instance not available. |
| ERR_STOP_RETRY | Signed Call iOS SDK initialization failed. |
| ERR_FAILURE_IN_MAKE_CALL | Failure while making a call. |
| ERR_CALL_CONTEXT_INVALID | The characters are not alphanumeric, or the length is more than 64 characters. |
| ERR_CAN_NOT_CALL_SELF | The receiver's and initiator's cuid cannot be the same. |
| ERR_CLEVERTAP_URL_NOT_AVAILABLE | The CleverTap iOS SDK's base URL was not found. |
| ERR_SIGNALLING_SOCKET_CONNECTION | Connection to a socket signaling channel is not available. |
FAQs
Q. Is Signed Call accountId and apiKey the same as CleverTap's accountId and token?
accountId and apiKey the same as CleverTap's accountId and token?A. No. Signed Call accountId and apiKey differ from CleverTap's accountId and token. You can find these details under your dashboard's Signed Call Settings.
Q. Why are SignedCallSDK dependencies not downloaded even after running the pod install?
SignedCallSDK dependencies not downloaded even after running the pod install?A. Performing pod install --repo-update will help download and install the required latest dependencies.
Q. What channels are used for call routing by Signed Call iOS SDK?
A. Signed Call iOS SDK uses an active socket connection when the SDK is initialized. The socket connection is a primary routing channel to receive the calls, whereas APNs is a fallback channel in case the receiver is not connected to the socket channel. This socket connection processes the call requests raised to make a call. For more information, refer to the Best practices for initializing Signed Call SDKs.
Updated 3 months ago
