SCIM Provisioning With SSO (SAML Enabled)
Learn to set up SCIM provisioning with SAML SSO to automate CleverTap user access.
Overview
Use this setup if your organization already uses SAML-based SSO and wants SCIM to manage user lifecycle actions such as provisioning and deprovisioning.
In this setup, SCIM controls user creation and access updates, while SAML continues to handle authentication.
This guide covers SCIM provisioning using an Identity Provider (IdP) with SSO. For SCIM provisioning using an IdP without SSO, refer to SCIM Provisioning Without SSO.
Prerequisites
Before configuring SCIM provisioning, ensure the following:
- SSO is configured and working in CleverTap.
- You have generated a SCIM token. Refer to Generate SCIM Token for IdP-Based Provisioning.
- A CleverTap Admin has generated a SCIM token for your account.
Ensuring all this helps your IdP authenticate and sync users correctly with CleverTap.
Integrate SCIM Provisioning With SSO
Integrate SCIM provisioning with your existing SAML SSO setup to automate user management while maintaining secure authentication. To do so, perform the following steps:
- Configure Single Sign On (SSO)
- Configure the SCIM Application in Okta
- Configure the SCIM Token
- Configure Required Attributes
- Migrate from SAML to SCIM Provisioning
- Managed Users
- Verify User Sync and Login
This document uses Okta to illustrate the SCIM setup process. You can follow the same steps for other SCIM-compatible IdPs such as Azure AD or OneLogin.
Configure Single Sign On (SSO)
Before enabling SCIM provisioning with SSO, ensure that SAML-based Single Sign-On (SSO) is already configured and working in CleverTap.
To configure SSO and map the required attributes, refer to the following guide:
Once SSO is successfully configured in your Identity Provider (for example, Okta), the SCIM configuration screen appears as shown in the image below.

SCIM Configuration Screen
Configure SCIM Application in Okta
After setting up SSO, configure the IdP to use SCIM with SAML by performing the following steps:
- In Okta, go to Applications > SCIM with SAML (the application created in the previous step) > General > App Settings.
- Click on Edit.
- Change Provisioning from None to SCIM
- Keep the default setting as is and click Save.
Configure SCIM Application in Okta
Configure SCIM Token
Enable SAML and link your Okta SCIM application to CleverTap using your SCIM token by performing the following steps:
- Navigate to the Provisioning tab, then open the Integration section and click Edit.
- Configure the following settings:
-
SCIM Connector Base URL:
https://<your_clevertap_domain>/nx/v2/scim/v2/idp
(Example:https://us1.dashboard.clevertap.com/nx/v2/scim/v2/idp)Region-SpecificThe CleverTap domain is environment- and region-specific. Do not copy the example URL directly. Always replace
<your_clevertap_domain>with the domain for your region. Refer Region for more details. -
User Identifier:
userName -
Supported Provisioning Actions: Enable the following options by selecting the respective checkboxes:
- Import New Users and Profile Updates
- Push New Users
- Push Profile Updates
- Push Groups
-
Authentication Mode:
HTTP Header -
HTTP Header Authorization:
<SCIM_TOKEN>(paste your CleverTap SCIM token). For more information, refer to Generate SCIM Token for IdP-Based Provisioning.
-

SCIM Connector Configuration - Okta
- Click Test Connector Configuration, and once successful, click Save.
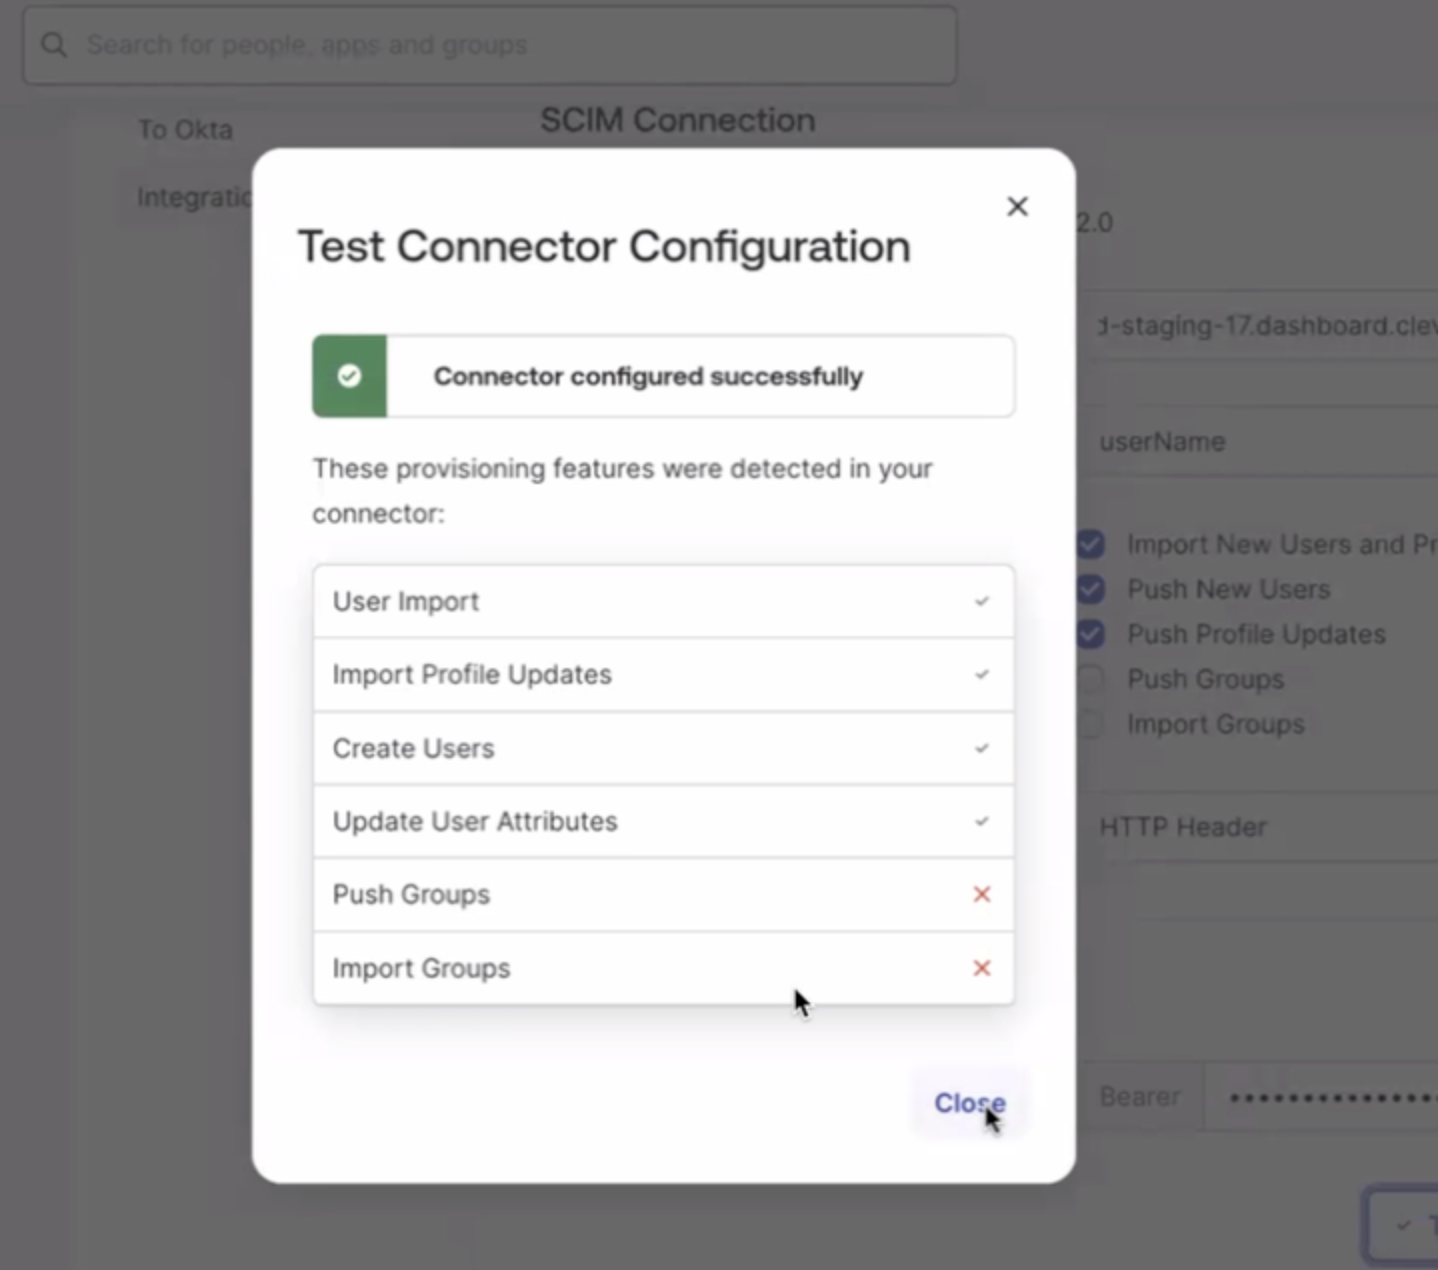
Test Connector Configuration
Configure Required Attributes
Add a custom attribute to define which CleverTap accounts each user can access.
- To add the attribute, refer to Add
accountsAttribute. - To unmap and delete unnecessary attributes, refer to Remove Unnecessary Attributes.
The schema requires only the following attributes: userName, givenName, familyName, and accounts
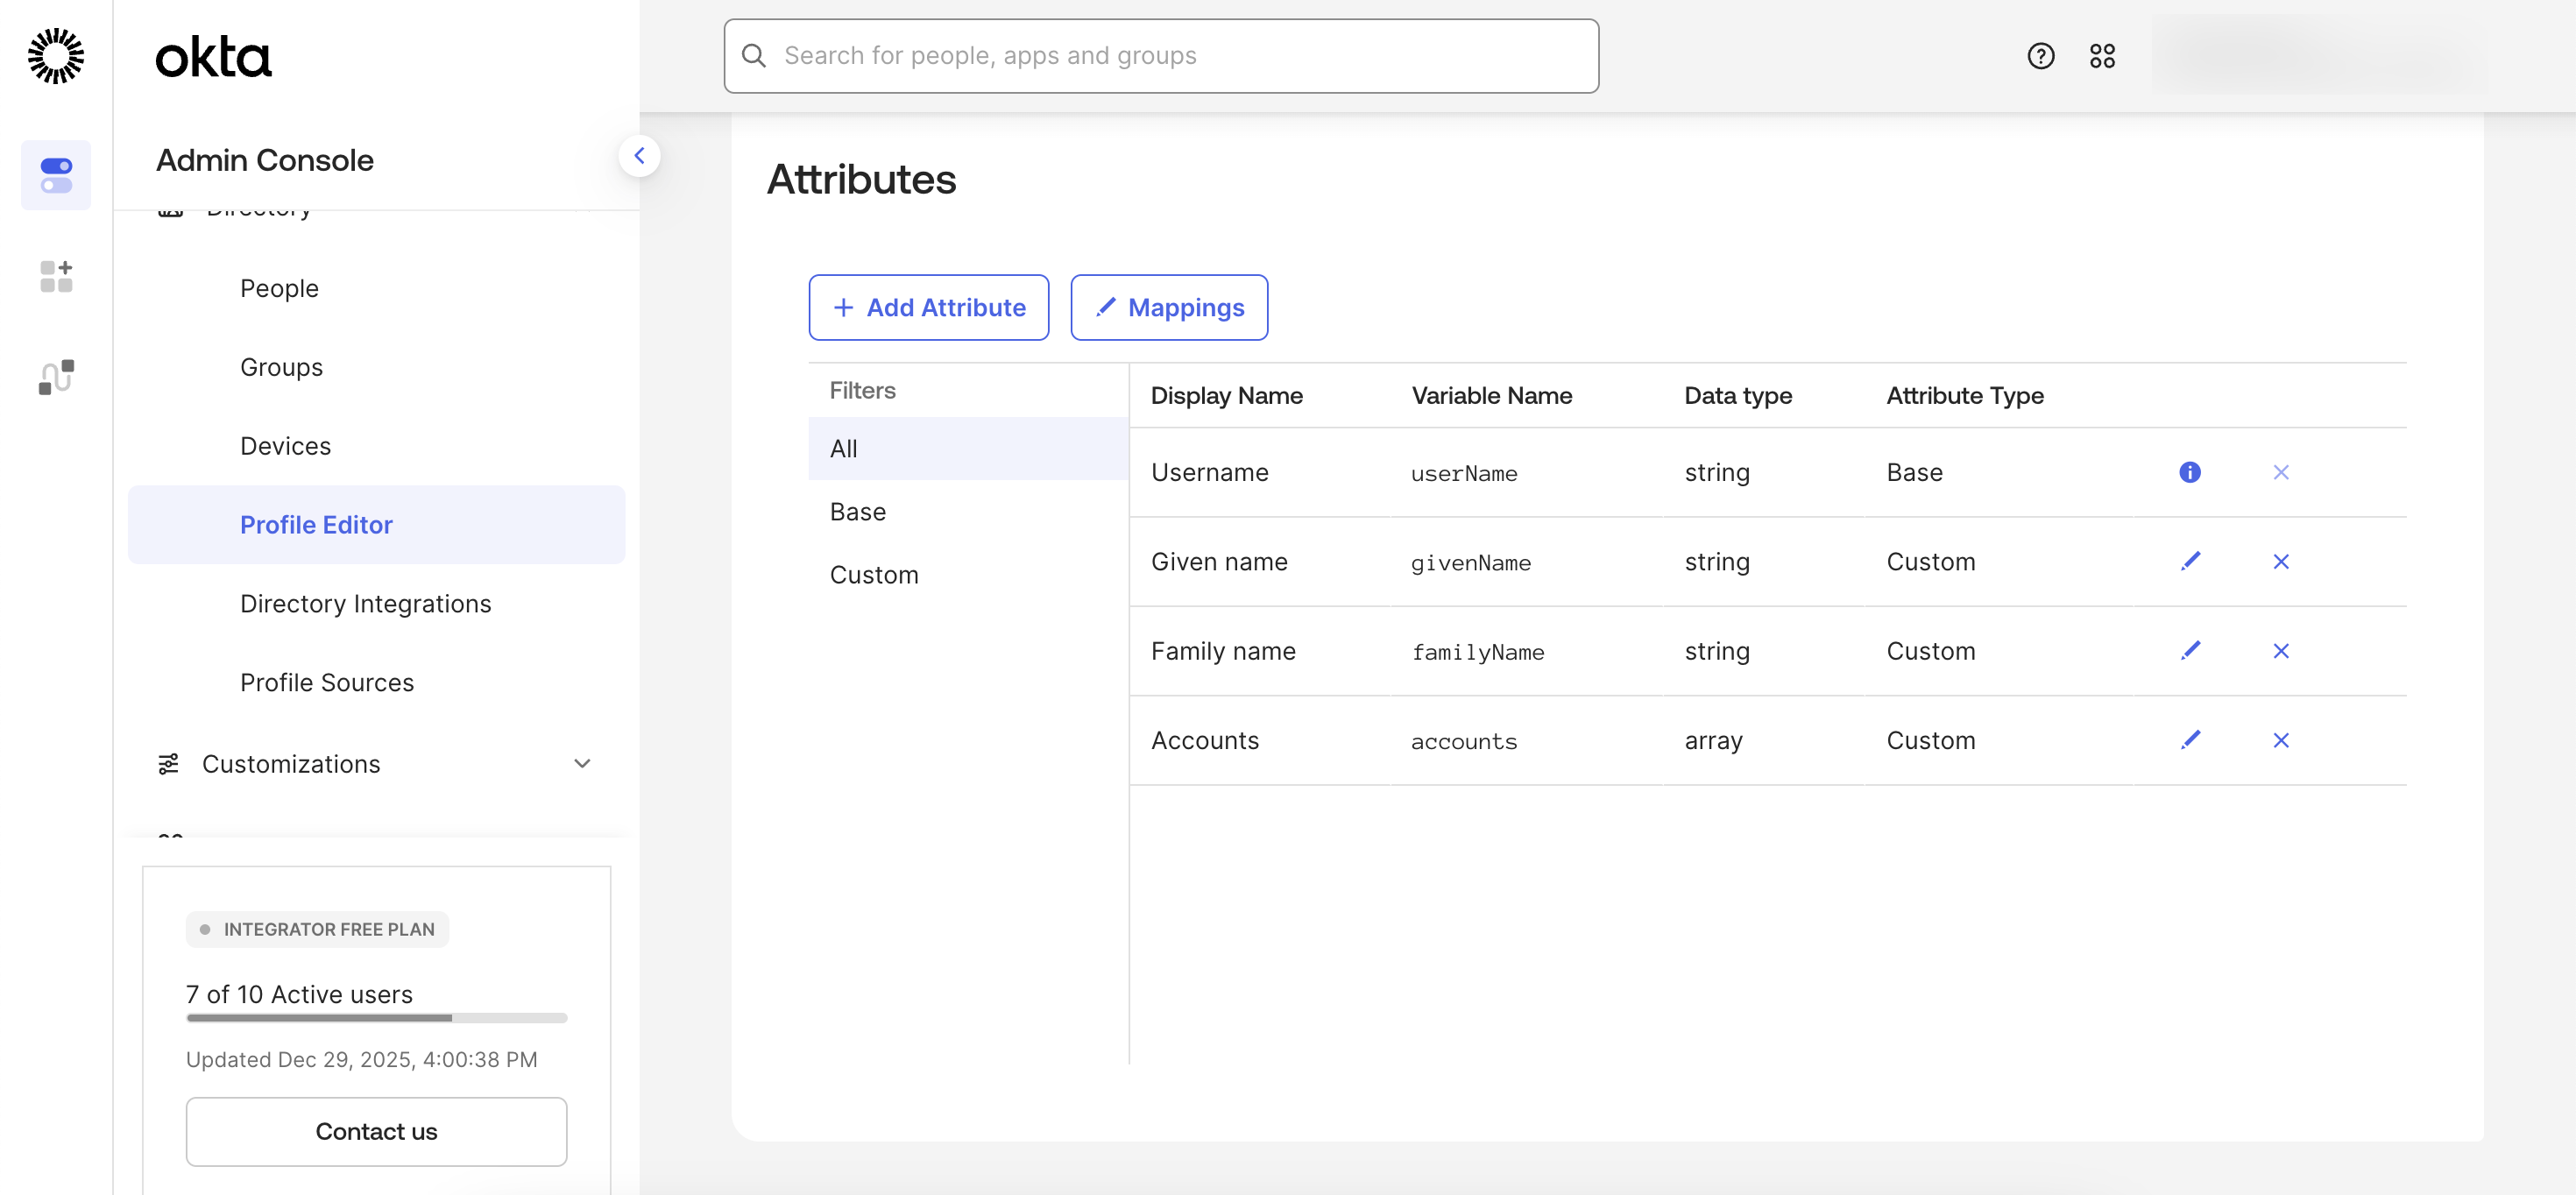
SCIM Required Attributes
Migrate from SAML to SCIM Provisioning
Ensure a clean transition to avoid conflicts between SCIM and SAML.
Important
- Remove or unmap the SAML
accountListattribute before enabling SCIM.- Avoid creating users with both SAML and SCIM simultaneously.
- Migrate existing SSO users to SCIM provisioning for consistency.
Delete accountList Attribute
accountList AttributeIf you plan to use SCIM for user provisioning, you must set the accountList attribute to Not Mapped in the Edit User Assignment screen. This prevents conflicts between SAML-based SSO and SCIM provisioning.
To Delete the accountList attribute:
- In your IdP, go to Profile Editor
- Click the X (Remove) icon next to the attribute name
accountListto delete the Attribute.
Delete accountList Attribute
This ensures that user provisioning (creation, updates, and removal) is handled exclusively through SCIM.
Provision Existing SSO Users into SCIM
If SSO is already configured and users exist before enabling SCIM:
- Existing users are not automatically SCIM-managed.
- The IdP provides a Provision All option.
Using Provision All:
- Sends SCIM create calls for existing users.
- Does not immediately change access.
- Brings users under SCIM lifecycle management.
After this step, updates and access changes are managed through SCIM.
Provision Existing SSO Users
To provision existing SSO users into SCIM, follow these steps:
- Complete the SCIM setup by following:
- After configuring the SCIM token, go to the Assignments tab in your IdP.
- Click Provision Users (this is a one-time action).
- Confirm the action to successfully provision all existing users into SCIM.
Provision Existing SSO Users
Once provisioning is complete, all existing SSO users are fully managed through SCIM.
Managed Users
Managed Users define how CleverTap adds, updates, and deactivates users based on assignments made in your Identity Provider (IdP).
The IdP controls user lifecycle management. CleverTap does not require manual user management once SCIM provisioning is configured.
Add or Update a User in CleverTap
You can add a new user or update an existing user by editing the user assignment in your IdP.
- Go to Applications > Assignments.
- Click the Edit icon next to the assigned user.
- Update the JSON payload as required. For example, you can:
- Add or modify roles.
- Change the user status.
Example JSON payload.
{
  "accountId": "ACC123", // CleverTap ID
  "roles": "Editor",
  "teams": "Dev",
  "status": "Active"
}- Click Save.
After saving:
- The IdP fetches the user data from CleverTap.
- If the user already exists, CleverTap updates the user.
- If the user does not exist, CleverTap creates a new user.
No manual action is required in the CleverTap dashboard.
Add or Update a User
To Delete User, refer to Delete User.
Verify User Sync and Login
After assigning users, verify that provisioning is working correctly and that CleverTap reflects your IdP updates in real time by performing the following steps:
- In the CleverTap dashboard, go to Settings > Users.
- Search for the user you just assigned to check their provisioning status. The user’s status should display as User Invited once provisioning is successful.
- Confirm that updates in Okta (or your IdP) automatically sync and appear in CleverTap.
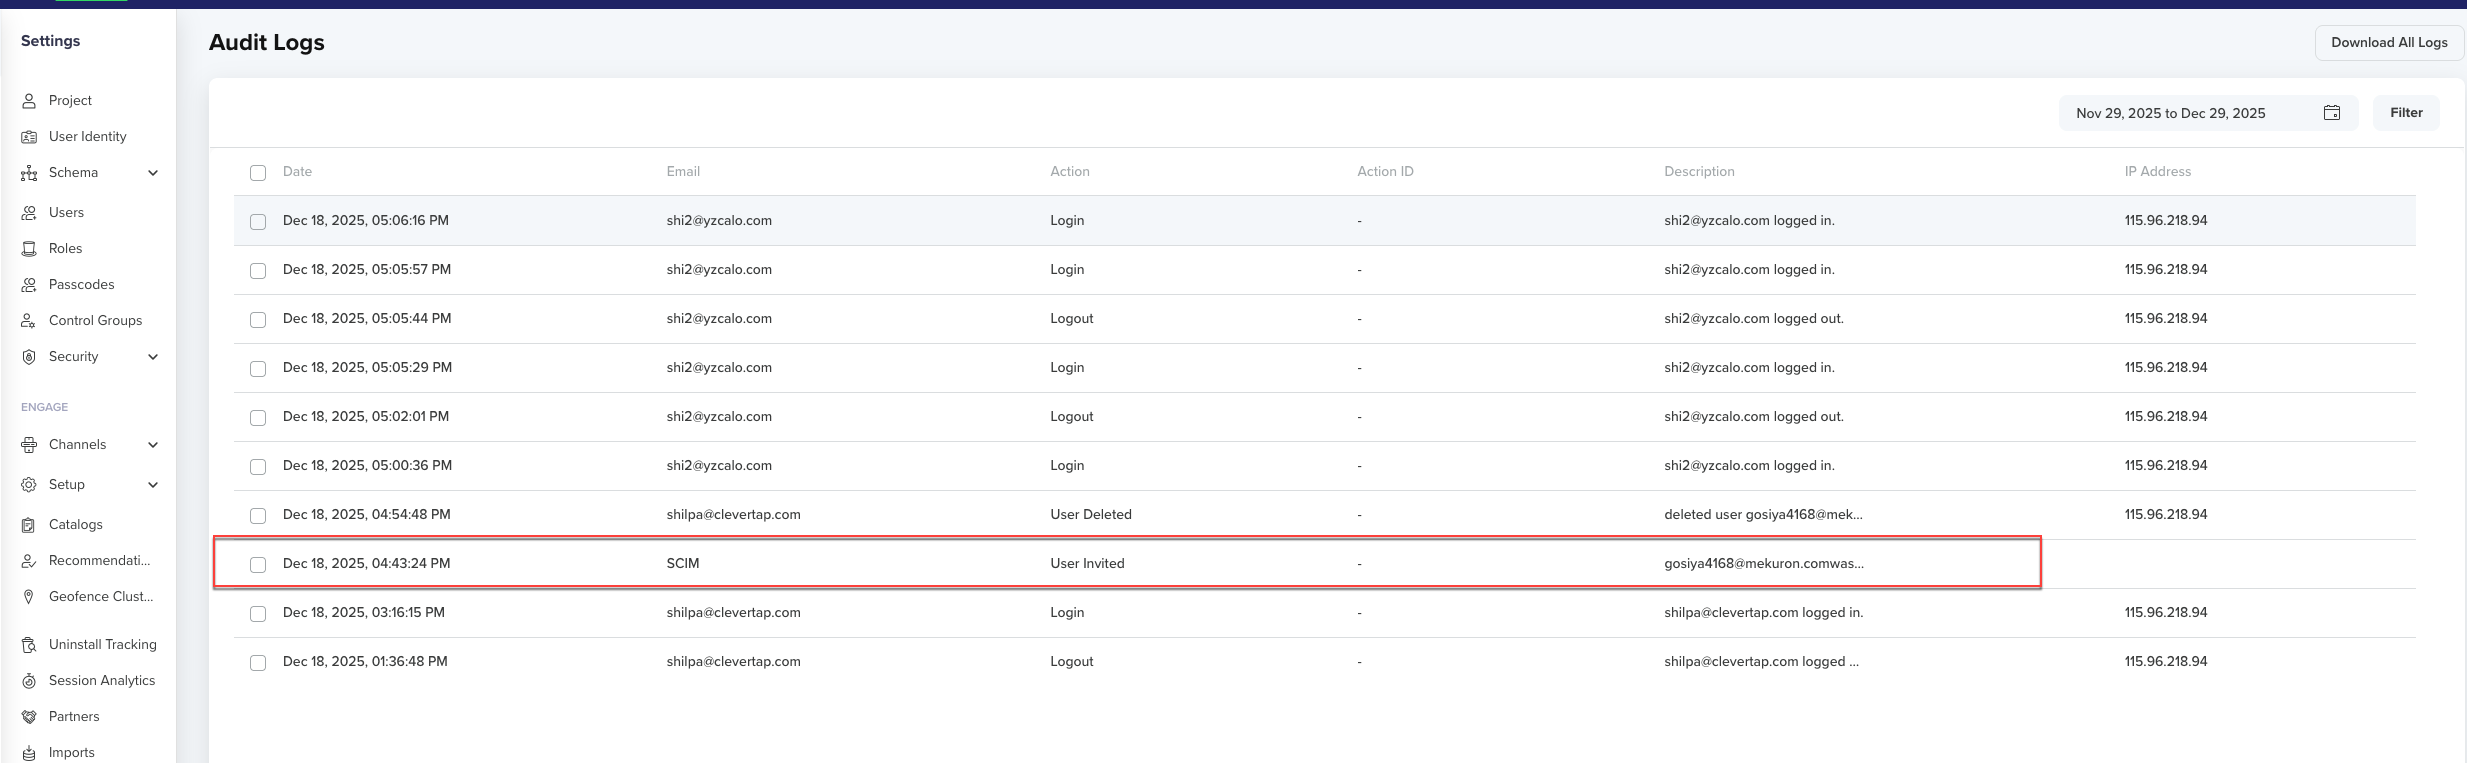
Verify User Sync and Login
If changes made in your IdP (for example, user deactivation or role updates) do not appear immediately in CleverTap, wait a few minutes for SCIM synchronization or trigger a manual sync in your IdP.
Troubleshooting
| Issue | Cause | Resolution |
|---|---|---|
| Duplicate users | Both SCIM and SAML are active | Disable SAML accountList mapping |
| Login fails | Old SSO session | Reset password or clear cookies |
| Missing users | Attribute mismatch | Verify accounts mapping |
FAQ
The following are common questions and answers about SCIM:
Why do first-time SCIM IdP users need to reset their password?
When a user is provisioned through SCIM for the first time (and SSO is not enabled), the account is created in CleverTap without a predefined password. To access the platform:
- Go to the CleverTap login page and click Forgot Password.
- Enter the registered email address.
- Click the password reset link sent to their email to set a new password.
This is a one-time action required only for the user’s initial login. Once the password is set, subsequent logins use the new credentials unless the organization later enables SSO.
Updated 6 months ago