Unity Multi-Environment Credential Support
Learn how to configure and manage multiple CleverTap environments in a Unity project using the multi-environment credential system.
Overview
The CleverTap Unity SDK 5.5.0 and above supports multi-environment credential configuration, allowing you to manage multiple CleverTap environments, such as TEST, DEV, STAGE, PROD, and custom environments, within a single Unity project.
This capability helps teams maintain clean separation between development, testing, staging, and production environments while reducing the risk of misconfigured release builds.
Use this feature if you:
- Work with multiple CleverTap projects.
- Maintain separate credentials for non-production environments.
- Need a controlled environment switching during development.
Key Capabilities
The CleverTap Unity SDK provides the following capabilities for managing multiple environments.
- Configure separate CleverTap credentials for multiple environments.
- Define custom environment keys beyond the default options.
- Switch environments during development builds.
- Automatically use the default environment in release builds.
- Supported on both iOS and Android.
- Managed entirely through the Unity Editor.
Prerequisites
Before configuring multi-environment credentials, ensure that:
- The CleverTap Unity SDK 5.5.0 and above is installed in your Unity project.
- You can access CleverTap Account ID, Account Token, and Region values from the CleverTap dashboard.
For initial SDK installation, refer to Unity SDK Quick Start Guide.
Configuration
This section explains how to configure multiple CleverTap environments and manage environment credentials using the Unity Editor.
- Access the CleverTap Settings
- Configure Default Environments
- Create Custom Environments
- Save Environment Settings
Access the CleverTap Settings
Open the CleverTap Settings window in the Unity Editor using one of the following methods:
-
From the menu: Assets > CleverTap Settings.
Or
-
Right-click in the Project window and select CleverTap Settings.
Multi-Environment Credential Support
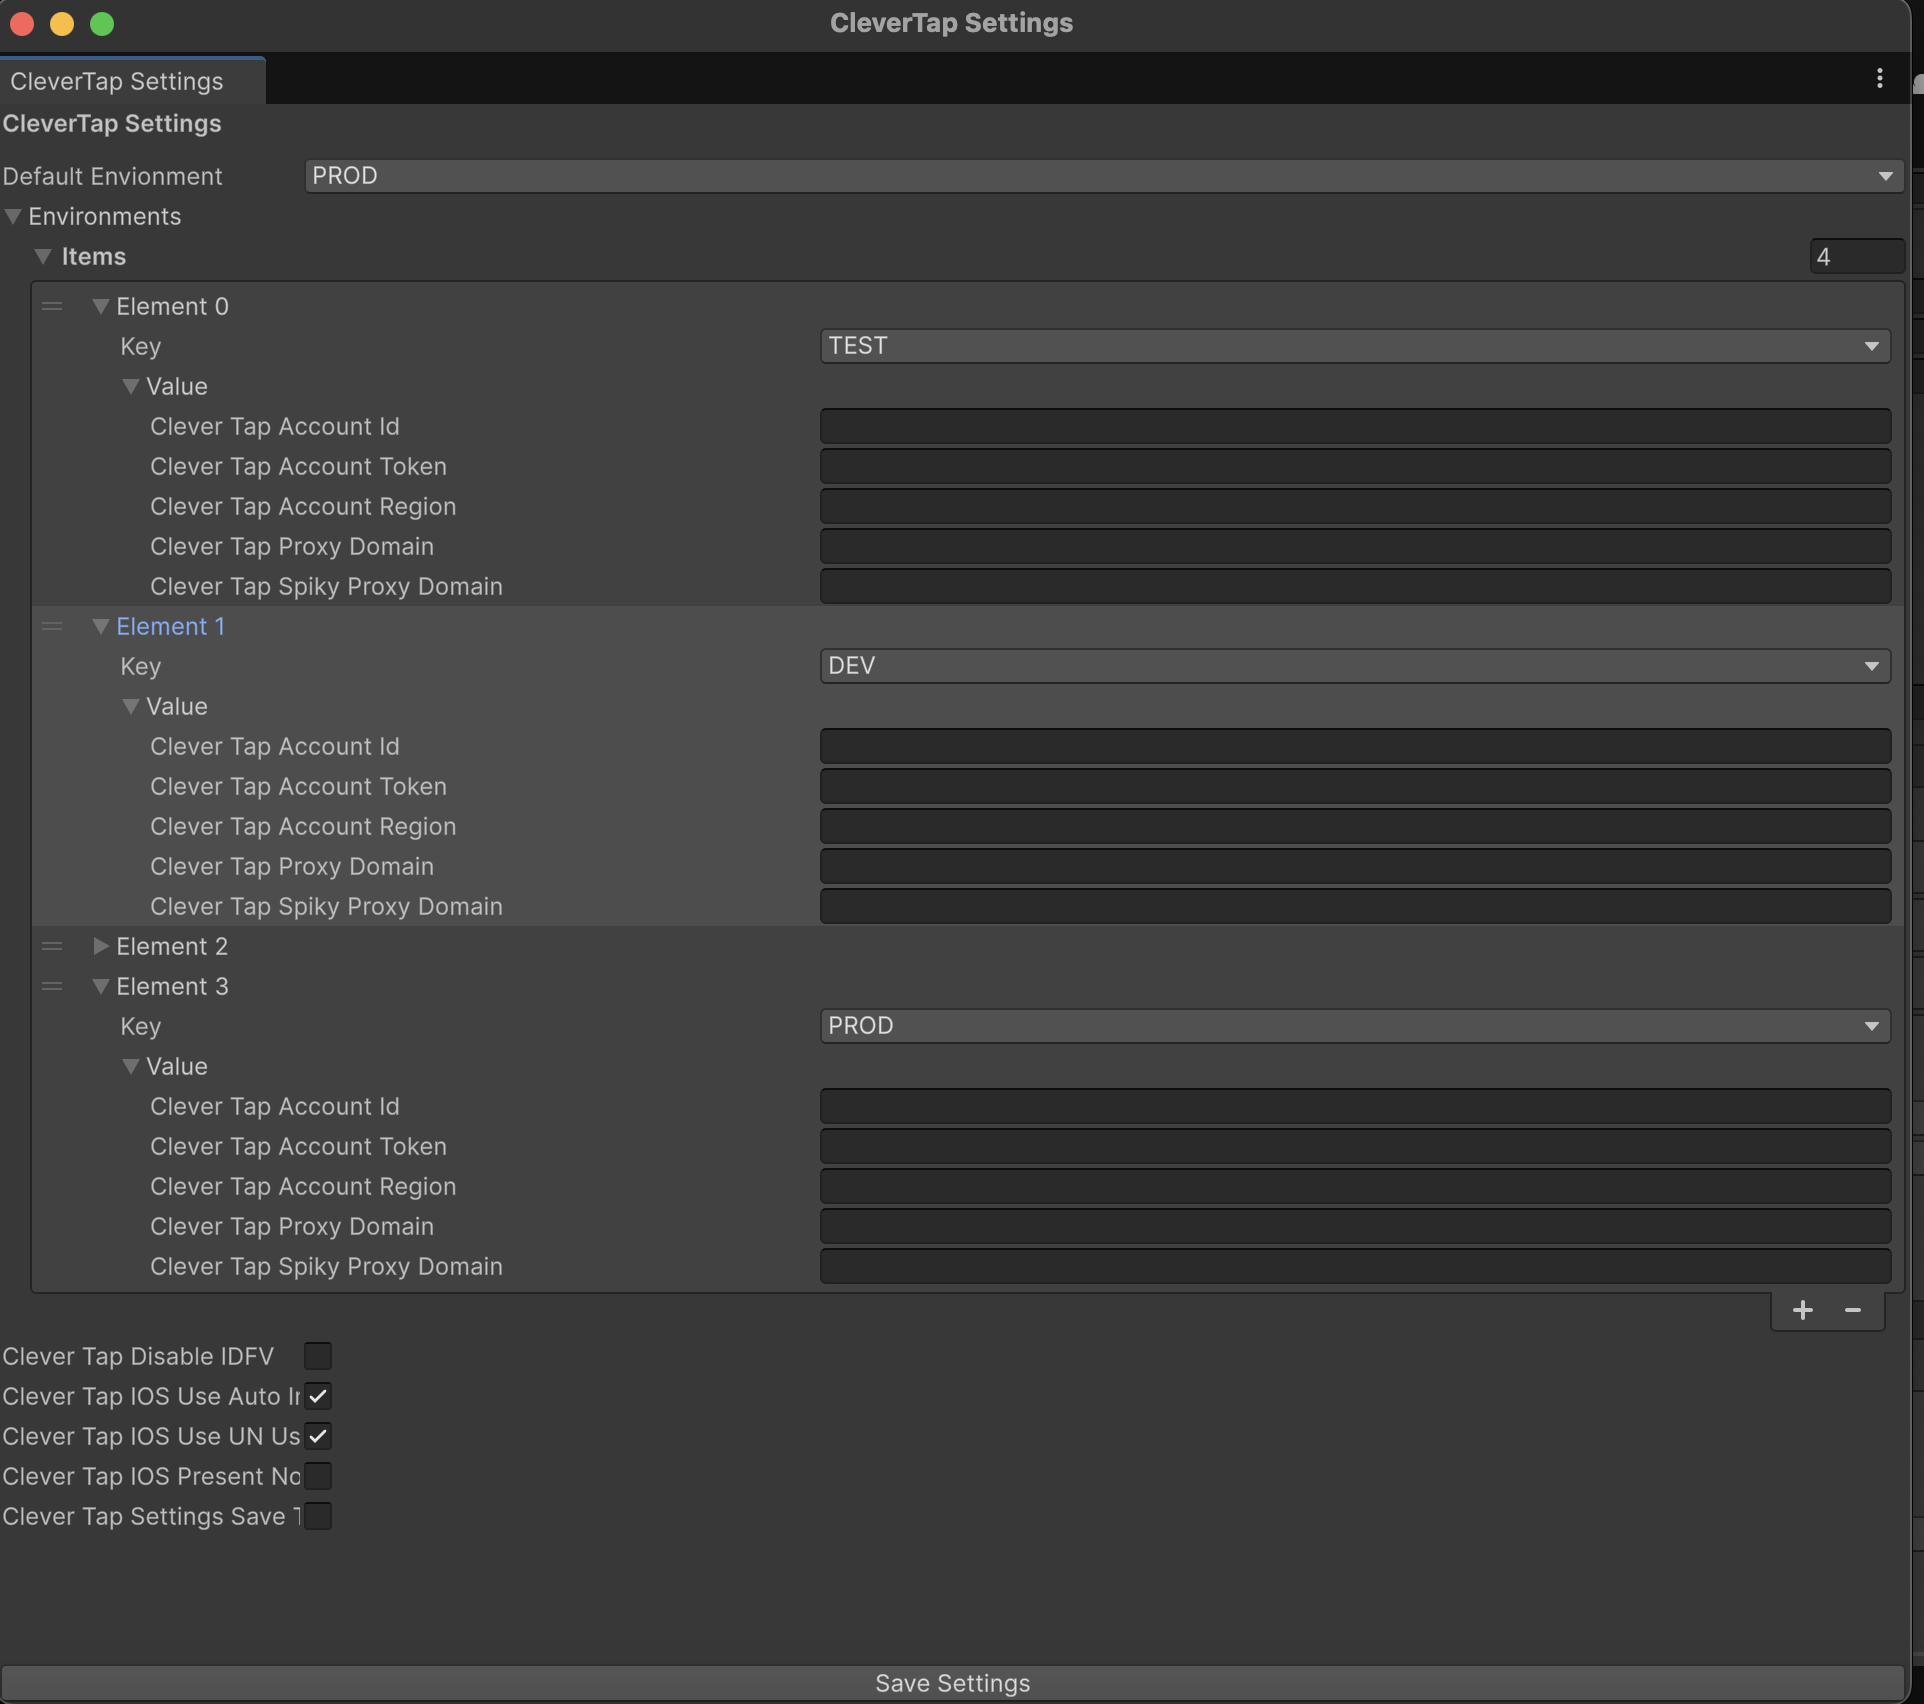
Configure Default Environments
Configure each predefined environment (TEST, DEV, STAGE, PROD):
- Select the default Environment from the dropdown.
- Expand each environment in the list to configure:
- CleverTap Account Id: Your CleverTap Project ID
- CleverTap Account Token: Your CleverTap Project Token
- CleverTap Account Region (Optional): Region code for regional endpoints
- CleverTap Proxy Domain (Optional): Custom proxy domain
- CleverTap Spiky Proxy Domain (Optional): Spiky proxy domain
The default environment is used automatically in release builds.
Create Custom Environments
You can define additional environment keys beyond the predefined set. This is useful when your workflow includes environments such as QA, UAT, or DEMO.
To add custom environments, extend the CleverTapEnvironmentKey enum.
// Add to CleverTapEnvironment.cs
public enum CleverTapEnvironmentKey
{
    TEST = 0,
    DEV = 1,
    STAGE = 2,
    PROD = 3,
    QA = 4,          // Custom QA environment
    UAT = 5,         // User Acceptance Testing
    DEMO = 6         // Demo environment
}
After adding a new key, it becomes available for selection in the CleverTap Settings window.
Save Environment Settings
To persist your configuration:
- In Assets >CleverTapSettings, enable
CleverTapSettingsSaveToJSON. - Click Save Settings.
The SDK generates the following file:
StreamingAssets/CleverTapSettings.json
This file is read at runtime to determine the active environment configuration.
Runtime Environment Switching
This section explains how to switch between CleverTap environments programmatically at runtime.
Development Builds Only
You can switch environments programmatically during development builds.
CleverTap.SelectCleverTapEnvironmentCredential(CleverTapEnvironmentKey.DEV);
Build BehaviorRuntime environment switching is supported only in development builds. Release builds always use the configured default environment.
Migrating from Legacy Single-Environment Settings
To migrate projects that were previously configured with a single CleverTap environment to the new multi-environment credential model.
Migration RequiredIf you previously used the single-environment CleverTap configuration, you must re-enter your credentials using the new multi-environment settings. Credentials are stored differently to support multiple environments.
Migration Steps
Follow these steps to move your existing CleverTap credentials into the new multi-environment configuration.
- Open the CleverTap Settings Window
- Locate Existing Credentials
- Configure the PROD Environment (Required)
Open the CleverTap Settings Window
Access the CleverTap Settings in the Unity Editor to begin the migration process.
- Go to Assets > CleverTap Settings, or search for CleverTap Settings in the Project window.
Locate Existing Credentials
Identify your previously configured CleverTap credentials so you can reuse them in the new environment setup.
- Find your current CleverTap credentials from one of these locations:
- Source Location old Settings File
Assets/CleverTapSettings.asset(if exists)
Use these values to populate the new environment configuration.
Configure the PROD Environment (Required)
Re-enter your production credentials in the PROD environment to ensure correct behavior in release builds.
- In the CleverTap Settings window, select the default environment to PROD.
- Expand Environments PROD.
- If PROD does not exist, add a new environment entry and set Key to
PROD.
- If PROD does not exist, add a new environment entry and set Key to
- Fill in the following fields with your production credentials:
- CleverTap Account Id: Your PRODUCTION Account ID
- CleverTap Account Token: Your PRODUCTION Account Token
- CleverTap Account Region (Optional): Region code for regional endpoints
- CleverTap Proxy Domain (Optional): Custom proxy domain
- CleverTap Spiky Proxy Domain (Optional): Spiky proxy domain

Configure the PROD Environment
If the settings fail to load, reopen the settings window: Assets > CleverTap Settings.
Updated 6 months ago